Love this? Save it for later!
Share the inspiration with your friends
Introduction
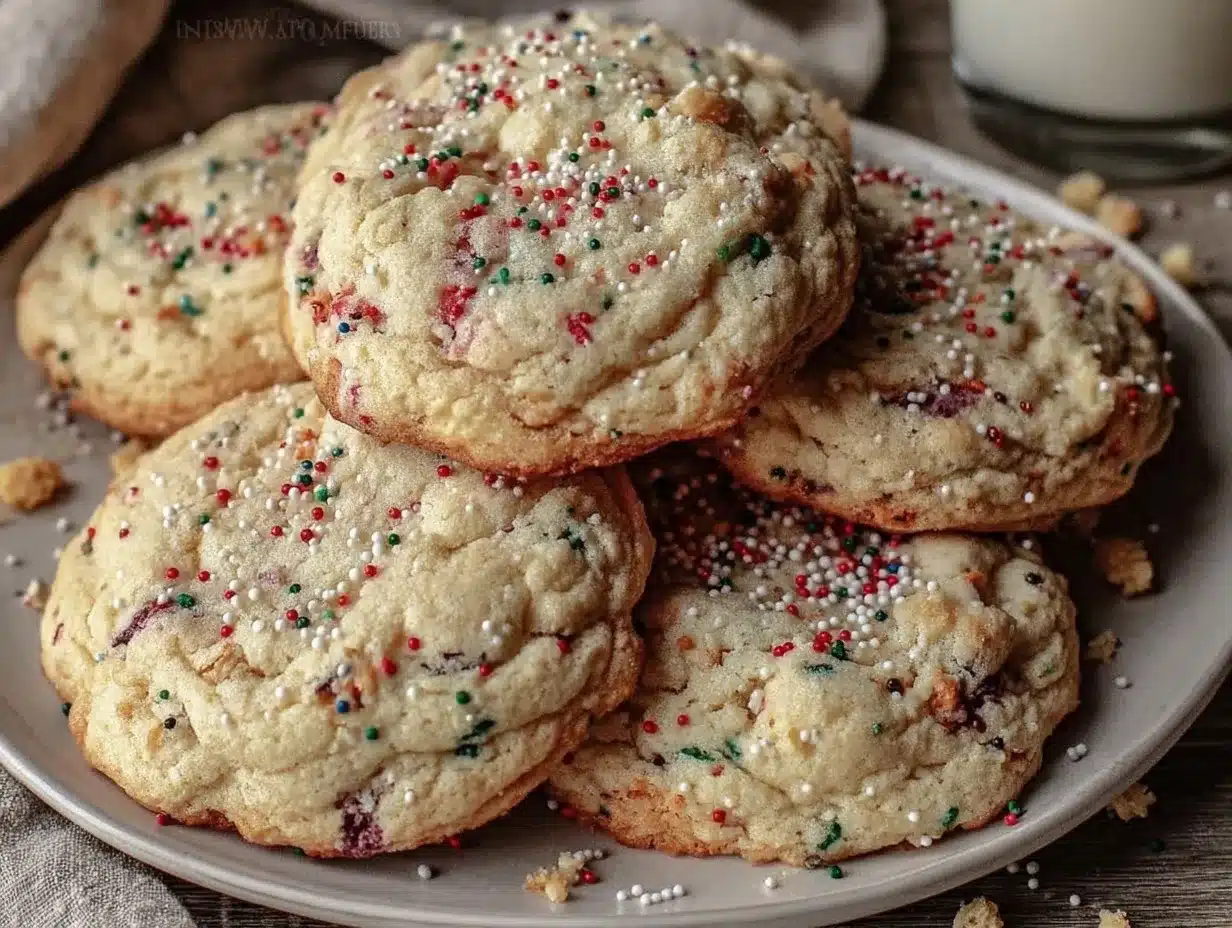
Last Thursday, I was waiting for my car to get an oil change when the quietest person in the waiting room — the plumber who fixes the building’s pipes — started chatting about these soft bakery-style sugar cookies with sprinkles. Honestly, I wasn’t expecting cookie tips from a guy covered in grease, but there I was, balancing a cracked coffee cup, listening as he described exactly how to get that perfect soft texture and the nostalgic sprinkle crunch. He said his daughter’s school was kicking off the new year, and these cookies were the go-to treat that made her classmates’ eyes light up every fall. I remember thinking, “Well, if a plumber trusts this recipe, it’s gotta be good.”
So, I scribbled down the recipe on the back of a receipt, spilled a bit of coffee on it (classic me), and promised myself I’d try it out soon. Maybe you’ve been there — caught off guard by where the best cooking advice shows up. Since then, I’ve made these cookies a handful of times, and each batch brings that same warm, soft bakery feel, perfect for sending kids back to school with a little extra smile. Let me tell you, these aren’t your run-of-the-mill sugar cookies. They’re soft, chewy, and dotted with just the right amount of colorful sprinkles to feel festive without going overboard. It’s the kind of recipe that sticks around because it’s easy, comforting, and just a little magical.
Why You’ll Love This Recipe
Trust me when I say these soft bakery-style sugar cookies with sprinkles are a keeper. After testing this recipe multiple times — from rushed weekday afternoons to relaxed weekend baking sessions — I’ve nailed what makes these cookies stand out.
- Quick & Easy: Comes together in under 30 minutes, perfect for busy back-to-school afternoons or last-minute treat cravings.
- Simple Ingredients: No fancy or hard-to-find items here — just staples you probably already have stocked in your pantry.
- Perfect for School Treats: Great for lunchboxes, classroom parties, or even after-school snacks that kids rave about.
- Crowd-Pleaser: The soft, chewy texture combined with the cheerful sprinkles means both kids and adults can’t resist.
- Unbelievably Delicious: These cookies have that bakery softness that melts in your mouth, yet they hold their shape beautifully.
This recipe isn’t just a standard sugar cookie — it’s the kind of treat that reminds you of those bakery runs you made as a kid, the ones you thought only professionals could create. The secret is the precise balance of butter and sugar, plus a little extra baking powder for that pillowy softness. Plus, adding sprinkles the way the plumber suggested gave it a nostalgic, fun twist. Honestly, it’s the kind of recipe that makes you close your eyes with the very first bite, and that’s why I keep making it year after year as the school bells start ringing again.
What Ingredients You Will Need
This recipe uses simple, wholesome ingredients to deliver bold flavor and that satisfying soft texture without fuss. Most of these are pantry staples, and if you need to swap anything out, I’ve got you covered.
- Unsalted butter, softened (about 1 cup or 227 g) — I prefer Land O Lakes for the richness it adds
- Granulated sugar, 1 cup (200 g) — the sweet base that helps with the chewy texture
- Large egg, room temperature — adds moisture and binds everything together
- Pure vanilla extract, 2 teaspoons — for that warm, classic sugar cookie aroma
- All-purpose flour, 2 ¾ cups (345 g) — the sturdy structure of the cookie
- Baking powder, 1 teaspoon — the secret to that soft, bakery-like rise
- Salt, ¼ teaspoon — balances sweetness and enhances flavor
- Sprinkles, ½ cup (about 75 g) — colorful, festive, and fun! Use your favorite brand or homemade if you like
If you’re aiming for a gluten-free version, swapping the all-purpose flour for a cup-for-cup gluten-free blend works pretty well. For dairy-free, try using a plant-based butter substitute and coconut yogurt as an egg replacement — I tested this once, and it’s surprisingly close to the original. Also, in fall, I sometimes add a pinch of cinnamon or swap sprinkles for chopped nuts for a twist.
Equipment Needed
To bake these soft bakery-style sugar cookies with sprinkles, you don’t need fancy kitchen gadgets, which is part of the charm.
- Mixing bowls — a large one for dry ingredients and a medium for wet
- Electric hand mixer or stand mixer — helps cream the butter and sugar easily, but a sturdy wooden spoon works if you prefer a workout
- Measuring cups and spoons — for accuracy
- Baking sheets — I recommend heavy-duty, non-stick pans to prevent burning
- Parchment paper or silicone baking mats — to keep the cookies from sticking and help with even baking
- Cooling racks — to let cookies cool properly and keep them from getting soggy
Personally, I started baking these with just a wooden spoon and a hand whisk, and it worked fine, though the mixer definitely saves time and effort. If you don’t have silicone mats, parchment paper is a budget-friendly and reusable option. Also, keeping your baking sheets clean and flat really helps cookies bake evenly — warped sheets can cause uneven browning, trust me on that.
Preparation Method
- Preheat your oven to 350°F (175°C). Line two baking sheets with parchment paper or silicone mats to prevent sticking.
- Cream the butter and sugar: In your mixing bowl, beat 1 cup (227 g) softened unsalted butter with 1 cup (200 g) granulated sugar using an electric mixer on medium speed. This should take about 3-4 minutes until the mixture is light and fluffy — kind of like whipped cream but denser.
- Add the egg and vanilla: Crack in 1 large egg (room temperature) and 2 teaspoons pure vanilla extract, then mix until fully combined. The batter might look a bit glossy and thick.
- Combine dry ingredients: In a separate bowl, whisk together 2 ¾ cups (345 g) all-purpose flour, 1 teaspoon baking powder, and ¼ teaspoon salt.
- Mix dry into wet: Gradually add the flour mixture to the wet ingredients, mixing on low speed or folding gently with a spatula. The dough will be soft but not sticky — if it feels too wet, add a tablespoon more flour, but be careful not to overdo it.
- Fold in sprinkles: Gently fold in ½ cup (75 g) of sprinkles. Don’t overmix here, or the colors might bleed too much, turning the dough pastel instead of bright.
- Scoop the dough: Use a cookie scoop or tablespoon to drop dough balls about 2 inches apart on the prepared baking sheets. Flatten each slightly with the palm of your hand or the bottom of a glass for even baking.
- Bake: Place in the preheated oven and bake for 10-12 minutes. The edges should be just starting to turn golden, but the center remains soft — this is your cue that they’re done. If you wait too long, the softness disappears.
- Cool: Let cookies cool on the baking sheet for 5 minutes before transferring them gently to a wire rack to cool completely. This little pause helps them set up without breaking apart.
One time, I got distracted halfway and left the cookies in for 15 minutes — they turned out crispy, which is not what I wanted. So, set a timer! Also, if your kitchen is humid, your dough might be a bit softer, so keep an eye on your baking time. These subtle cues really make a difference in getting that bakery softness you’re after.
Cooking Tips & Techniques
Making these soft bakery-style sugar cookies with sprinkles isn’t rocket science, but a few tricks make a world of difference.
- Butter temperature matters: Use softened, not melted butter. It should be soft enough to press your finger into but not oily or liquid. This helps trap air when creaming and creates that airy texture.
- Don’t overmix the dough: Once you add the flour, mix just until combined. Overworking develops gluten, making cookies tough — and nobody wants that.
- Chill the dough if needed: If your kitchen is warm or the dough feels too sticky, pop it in the fridge for 20 minutes. It firms up and makes scooping easier.
- Sprinkle placement: For extra fun, press a few sprinkles on top of each dough ball before baking to get that pop of color on the surface.
- Watch the baking time: Baking even 1-2 minutes too long can turn a soft cookie into a crisp one. Set timers and check early.
Honestly, I learned these tips the hard way after a few failed batches — one where I thought “more sugar = better” and ended up with flat, greasy cookies. Also, balancing multitasking (like helping with homework while baking) sometimes means you forget a step or two, so keeping everything pre-measured helps me a ton for consistent wins.
Variations & Adaptations
Feel free to put your spin on these soft bakery-style sugar cookies with sprinkles! Here are some variations I’ve tried or recommend:
- Gluten-Free: Swap all-purpose flour with a gluten-free blend (ensure it contains xanthan gum for texture). The cookies remain soft and tasty.
- Flavor Twist: Add a pinch of cinnamon or lemon zest to the dough for a subtle flavor boost without overpowering the classic taste.
- Alternative Sprinkles: Use natural sprinkles made from vegetable juices or swap for mini chocolate chips for a different kind of fun.
- Dairy-Free: Use vegan butter and a flax egg (1 tablespoon ground flaxseed + 3 tablespoons water) instead of the regular egg.
- Baking Method: If you prefer, these dough balls freeze well. Bake them straight from frozen, adding 1-2 extra minutes to the baking time.
I once tried adding crushed peppermint candies for a holiday vibe — it was a hit but a bit messy! Experimenting with these little twists keeps the recipe feeling fresh and personal.
Serving & Storage Suggestions
These soft bakery-style sugar cookies with sprinkles are best enjoyed fresh, but here’s how to make the most of them over time.
- Serving temperature: Serve at room temperature for the best texture. You can warm them slightly in the microwave (10 seconds) if you want that just-baked feel.
- Presentation: Stack them on a pretty plate or arrange in a colorful box for school treats or parties — the sprinkles add a cheerful look without extra effort.
- Complementary pairings: Great with cold milk, hot chocolate, or even a fruity iced tea for after-school snack time.
- Storage: Store in an airtight container at room temperature for up to 5 days. For longer life, freeze the baked cookies in a sealed bag for up to 3 months.
- Reheating tips: Thaw frozen cookies at room temperature or warm gently in the oven at 300°F (150°C) for 5 minutes to revive softness.
Flavors actually deepen after a day, so if you can wait, they taste even better the next day. Just be sure to keep that container sealed tight to lock in moisture.
Nutritional Information & Benefits
Here’s a rough estimate per cookie (based on 24 cookies from this recipe):
| Calories | ~130 kcal |
|---|---|
| Fat | 7 g |
| Carbohydrates | 17 g |
| Protein | 1.3 g |
These cookies offer a quick energy boost, thanks to carbs and sugar, perfect for active school days. Butter provides some fat for satiety and flavor. While not a health food, they’re a delightful treat that can fit into balanced eating when enjoyed in moderation.
For people with dietary concerns, this recipe is flexible — easy to make gluten-free or dairy-free, which is great if you’re baking for classmates with allergies. Just note the sprinkles you use might contain gluten or artificial dyes, so check labels.
Conclusion
Soft bakery-style sugar cookies with sprinkles are a little slice of joy that fits perfectly into back-to-school routines. They’re easy, fun, and remind me of that unexpected chat with a plumber who knew his cookies. Honestly, this recipe makes me feel like I’m sharing a secret bit of happiness with every batch.
Feel free to tweak the sprinkles, play with flavors, or make them your own. I’d love to hear how your cookies turn out or what creative twists you add! Leave a comment below, share your photos, or tell me about your favorite school treat memories.
Now, grab your mixing bowl — and maybe a cup of coffee to keep you company — because these cookies are waiting to become your new go-to easy back-to-school treat.
Frequently Asked Questions
Can I use salted butter instead of unsalted?
Yes, but reduce the added salt in the recipe to about a pinch to avoid over-salting.
Why are my cookies turning out flat?
This usually happens if the butter is too soft or melted, or if you overmix the dough. Chill the dough for 20 minutes and make sure to cream the butter and sugar properly.
Can I make the dough ahead of time?
Absolutely! The dough can be refrigerated for up to 2 days or frozen for up to 3 months. Just thaw before baking.
What’s the best way to store these cookies?
Store them in an airtight container at room temperature for up to 5 days. For longer storage, freeze them after baking.
Can I substitute sprinkles with something else?
Yes, mini chocolate chips, chopped nuts, or dried fruit work great as alternatives, depending on your preference.
For a nostalgic treat that matches the softness of bakery classics, these soft bakery-style sugar cookies are a must-try. And if you’re looking for more kid-friendly recipes, this easy homemade peanut butter cookies recipe might become another favorite.
Pin This Recipe!
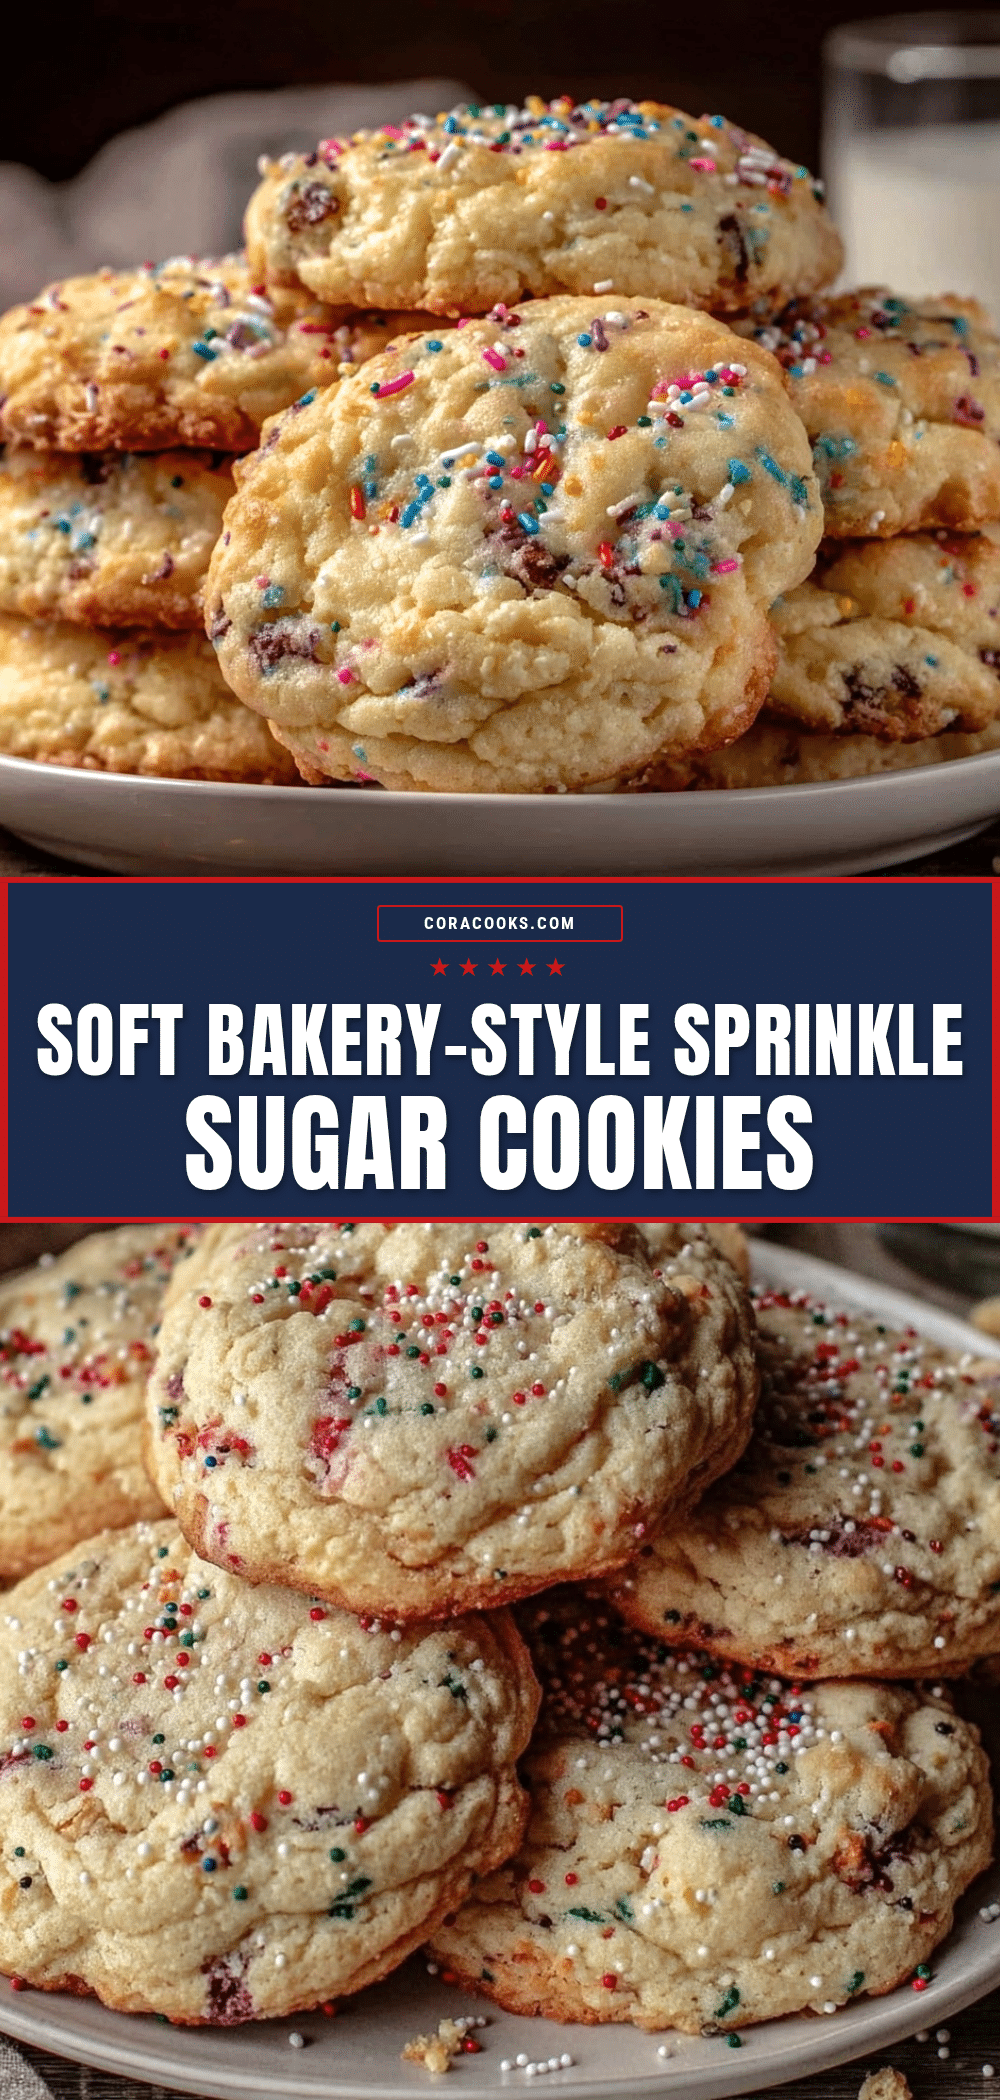
Soft Bakery-Style Sugar Cookies with Sprinkles

These soft bakery-style sugar cookies with sprinkles are chewy, festive, and perfect for back-to-school treats. They have a nostalgic bakery softness and a fun sprinkle crunch.
- Prep Time: 15 minutes
- Cook Time: 12 minutes
- Total Time: 27 minutes
- Yield: 24 cookies 1x
- Category: Dessert
- Cuisine: American
Ingredients
- 1 cup (227 g) unsalted butter, softened
- 1 cup (200 g) granulated sugar
- 1 large egg, room temperature
- 2 teaspoons pure vanilla extract
- 2 ¾ cups (345 g) all-purpose flour
- 1 teaspoon baking powder
- ¼ teaspoon salt
- ½ cup (about 75 g) sprinkles
Instructions
- Preheat your oven to 350°F (175°C). Line two baking sheets with parchment paper or silicone mats to prevent sticking.
- Cream the butter and sugar: In your mixing bowl, beat 1 cup (227 g) softened unsalted butter with 1 cup (200 g) granulated sugar using an electric mixer on medium speed for 3-4 minutes until light and fluffy.
- Add the egg and vanilla: Crack in 1 large egg (room temperature) and 2 teaspoons pure vanilla extract, then mix until fully combined.
- Combine dry ingredients: In a separate bowl, whisk together 2 ¾ cups (345 g) all-purpose flour, 1 teaspoon baking powder, and ¼ teaspoon salt.
- Mix dry into wet: Gradually add the flour mixture to the wet ingredients, mixing on low speed or folding gently with a spatula until dough is soft but not sticky. Add a tablespoon more flour if too wet.
- Fold in sprinkles: Gently fold in ½ cup (75 g) sprinkles without overmixing to avoid color bleeding.
- Scoop the dough: Use a cookie scoop or tablespoon to drop dough balls about 2 inches apart on the prepared baking sheets. Flatten each slightly with the palm of your hand or bottom of a glass.
- Bake: Place in the oven and bake for 10-12 minutes until edges start to turn golden but centers remain soft.
- Cool: Let cookies cool on the baking sheet for 5 minutes before transferring to a wire rack to cool completely.
Notes
Use softened, not melted butter for best texture. Avoid overmixing after adding flour to prevent toughness. Chill dough for 20 minutes if too sticky. Press a few sprinkles on top of dough balls before baking for extra color pop. Watch baking time carefully to keep cookies soft.
Nutrition
- Serving Size: 1 cookie
- Calories: 130
- Fat: 7
- Carbohydrates: 17
- Protein: 1.3
Keywords: soft sugar cookies, bakery-style cookies, sprinkles cookies, back to school treats, easy sugar cookies, chewy cookies