Love this? Save it for later!
Share the inspiration with your friends
“You’re not going to believe this,” my neighbor Jenna said last summer, holding up a plate of sugar cookies decorated like tiny sunflowers. I was halfway through watering my garden when the scent of vanilla and lemon zest drifted over the fence. Honestly, I wasn’t expecting much—just another batch of those overly sweet, crumbly cookies you find everywhere. But those cookies? They were something else.
Jenna’s secret? A recipe she’d scribbled down years ago from a local bakery’s summer special, combined with a royal icing technique she perfected after a few Pinterest mishaps (she showed me a photo of the first batch, which looked like a melted rainbow). I remember the way the sunlight hit those cookies, making the icing shimmer just so. It was a small moment, but it stuck with me. I mean, who knew sugar cookies could taste like a summer afternoon?
Since then, I’ve been on a bit of a mission to recreate that magic in my own kitchen. After some trial and error (okay, some serious icing disasters), I landed on the Perfect Summer Sugar Cookies with Royal Icing recipe that I’m excited to share with you today. Whether you’re a Pinterest fan looking for that flawless cookie decoration or just someone who loves a sweet treat that reminds you of long, lazy summer days, this recipe brings it all together—texture, flavor, and that dreamy icing finish.
Maybe you’ve been there, craving a cookie that’s both soft and sturdy enough to hold your artistic flair. Or maybe you’re just after a charming dessert for your next gathering. Either way, these summer sugar cookies with royal icing will be your new go-to. Let me tell you, once you get the hang of the icing, there’s no going back.
Why You’ll Love This Recipe
After countless batches and frosting experiments, this Perfect Summer Sugar Cookies with Royal Icing recipe stands out because it’s been tested in real kitchens (mine included, which sometimes means flour on the ceiling and icing in my hair). Here’s why it might just become your favorite:
- Quick & Easy: The dough comes together in under 20 minutes, so you won’t be stuck in the kitchen all afternoon.
- Simple Ingredients: You probably already have everything on hand—basic pantry staples like butter, sugar, and eggs.
- Perfect for Summer Parties: These cookies are great for picnics, birthday parties, or just a sunny afternoon treat.
- Crowd-Pleaser: Kids love decorating them, and adults can’t stop nibbling on the perfectly balanced sweetness.
- Unbelievably Delicious: The texture is soft but holds up perfectly under the royal icing, which dries beautifully without cracking.
What makes this sugar cookie recipe different is the balance between a tender bite and a sturdy base for decoration. Plus, the royal icing is the kind that dries quickly, giving you that gorgeous matte finish that looks straight out of a bakery window (without the stress!). I also added a touch of lemon zest in the dough for a subtle summer brightness that pairs perfectly with the sweet vanilla icing.
This recipe isn’t just another sugar cookie — it’s the one that makes you pause and savor that perfect first bite. Whether you’re decorating for a holiday or just because, it’s the kind of cookie that brings a little sunshine to your day.
What Ingredients You Will Need
This recipe uses straightforward, wholesome ingredients to get that perfect soft yet sturdy sugar cookie, topped with smooth royal icing that’s easy to work with. Most are pantry staples, but a few little touches make all the difference.
- For the Sugar Cookies:
- 1 cup (227 g) unsalted butter, softened (I prefer Plugrá for its creaminess)
- 1 cup (200 g) granulated sugar
- 1 large egg, room temperature
- 1 teaspoon pure vanilla extract (quality matters here—look for Nielsen-Massey if you can!)
- 1 teaspoon lemon zest (freshly grated, adds a subtle summer zing)
- 2 ¾ cups (345 g) all-purpose flour
- ½ teaspoon baking powder
- ½ teaspoon salt
- For the Royal Icing:
- 3 cups (375 g) powdered sugar, sifted (sifting is key to smooth icing)
- 2 large egg whites (or 4 tablespoons meringue powder + 5 tablespoons water for a safer, no-raw option)
- 1 teaspoon fresh lemon juice
- Food coloring gels (optional, use AmeriColor or Wilton for vibrant colors)
- 1 teaspoon vanilla or almond extract (optional, for flavor depth)
For substitutions, you can swap all-purpose flour with a gluten-free blend if needed, just make sure it has xanthan gum for structure. For dairy-free, use vegan butter sticks and coconut yogurt in place of egg whites if you’re experimenting with the icing. During summer, fresh lemon zest is ideal, but dried lemon peel works in a pinch.
Equipment Needed
Here’s a quick list of kitchen tools that will make this cookie adventure smooth:
- Mixing bowls (preferably glass or metal for easier icing mixing)
- Electric hand mixer or stand mixer (a game changer for smooth, fluffy cookie dough and icing)
- Measuring cups and spoons (accuracy helps, especially for baking powder and salt)
- Rolling pin (a silicone one is my favorite since dough doesn’t stick as much)
- Cookie cutters (summer shapes like flowers, suns, or simple circles work great)
- Baking sheets lined with parchment paper or silicone mats
- Piping bags and small round tips (Wilton #2 or #3 tips are perfect for precise royal icing work)
- Small bowls or cups for dividing and coloring icing
If you don’t have piping bags, you can use resealable plastic bags with a tiny corner snipped off—honestly, that’s what I did when I first tried this recipe! For budget-friendly options, silicone mats last forever and are worth the investment over parchment paper. Also, keep an extra clean cloth nearby to wipe any icing drips; trust me, it saves you from sticky messes later.
Preparation Method

- Make the Dough: In a large bowl, cream together 1 cup softened unsalted butter and 1 cup granulated sugar using an electric mixer on medium speed until light and fluffy, about 3-4 minutes. This step is crucial for that melt-in-your-mouth texture.
- Add Wet Ingredients: Beat in 1 large egg, 1 teaspoon vanilla extract, and 1 teaspoon lemon zest until just combined. If you overmix here, the cookies can become tough, so keep it gentle.
- Combine Dry Ingredients: In a separate bowl, whisk 2 ¾ cups all-purpose flour, ½ teaspoon baking powder, and ½ teaspoon salt. Gradually add the dry mix to the wet ingredients, mixing on low speed until the dough forms and no flour streaks remain.
- Chill the Dough: Divide dough into two discs, wrap in plastic wrap, and refrigerate for at least 1 hour (up to 24 hours). This step makes rolling easier and prevents spreading during baking.
- Preheat Oven: Set your oven to 350°F (175°C) and line baking sheets with parchment paper or silicone mats.
- Roll Out Dough: On a lightly floured surface, roll one disc of dough to about ¼ inch (6 mm) thickness. If the dough warms and gets sticky, pop it back in the fridge for 10 minutes.
- Cut Shapes: Use your cookie cutters to cut out shapes, placing them about 1 inch (2.5 cm) apart on the baking sheet.
- Bake: Bake for 8-10 minutes, until the edges just start to turn golden. The cookies will look slightly underbaked in the center but will firm up as they cool.
- Cool Completely: Transfer cookies to wire racks and let cool fully before icing—patience here means no melted royal icing!
- Prepare Royal Icing: In a clean bowl, whisk 3 cups sifted powdered sugar with 2 large egg whites and 1 teaspoon lemon juice until stiff peaks form (about 5-7 minutes with a mixer). For a safer version, replace egg whites with meringue powder and water.
- Color & Decorate: Divide icing into small bowls and add gel food coloring as desired. Fill piping bags and decorate cookies with outlines first, then flood the insides with thinner icing for a smooth finish. Let dry at room temperature for at least 4 hours or overnight for best results.
Pro tip: When flooding with icing, use a toothpick or small skewer to pop any air bubbles before it sets. I learned this the hard way after finding tiny holes on my first decorated batch!
Cooking Tips & Techniques
Getting these Perfect Summer Sugar Cookies right isn’t rocket science, but a few tricks make all the difference. Here are some tips I swear by:
- Don’t Skip Chilling: The dough needs to rest in the fridge so it’s easier to roll and cuts cleaner shapes. I’ve skipped this before, and cookies ended up puffy and uneven.
- Use Fresh Ingredients: Fresh lemon zest and quality vanilla extract really lift the flavor. You’d be surprised how much difference it makes.
- Beat Butter & Sugar Well: Creaming until fluffy traps air, giving the cookies a lighter texture. Rushing this step will give you dense cookies.
- Royal Icing Consistency: For outlines, keep icing thicker; for flooding, thin with a tiny bit of water until it flows but doesn’t run off the cookie. I recommend testing your icing on parchment before decorating.
- Practice Piping: Steady hands help, but if you’re nervous, start with simple designs like dots or stripes. I once practiced on parchment for an entire afternoon before feeling confident.
- Timing: Bake cookies in batches so you can decorate fresh batches without icing drying mid-process.
Variations & Adaptations
One of the best things about this recipe is how adaptable it is. Here are some ways to make it your own:
- Flavor Twists: Swap lemon zest for orange or lime for a citrus change, or add a teaspoon of almond extract for a nutty note.
- Gluten-Free Option: Use a 1:1 gluten-free baking flour blend with xanthan gum added. The texture might be slightly different but still delicious.
- Vegan Version: Replace butter with vegan margarine and use aquafaba (chickpea water) whipped to stiff peaks in place of egg whites for the royal icing.
- Seasonal Themes: Change cookie cutters and icing colors for holidays or special occasions—pumpkins and orange icing for fall, or pastel flowers for spring.
- Personal Favorite: I once added finely chopped freeze-dried strawberries to the dough for a subtle fruity surprise—delicious and colorful!
Serving & Storage Suggestions
These Perfect Summer Sugar Cookies are best served at room temperature so the royal icing feels smooth and not sticky. They’re great on their own or paired with a light iced tea or lemonade for a true summer vibe.
To store, keep them in an airtight container layered with parchment paper. They stay fresh for up to a week at room temperature, but for longer storage, freeze them in a sealed container for up to 3 months. When thawing, bring them to room temp before serving to keep the icing intact.
Reheating isn’t necessary, but if you like a soft cookie, a 5-second zap in the microwave does the trick. Just don’t overdo it or the icing might melt.
Fun fact: I find the flavors mellow and deepen if you let the cookies sit a day before decorating, so if you plan ahead, you’re rewarded with even tastier treats.
Nutritional Information & Benefits
Each sugar cookie with royal icing contains approximately 150-180 calories, with about 7-9 grams of fat, 25 grams of carbohydrates, and 1-2 grams of protein. The butter provides a good source of fat for satiety, and the egg adds some protein and moisture to the dough.
While these cookies are a treat, using fresh lemon zest adds a tiny boost of vitamin C, and opting for natural extracts limits artificial additives. For those watching allergens, this recipe contains gluten, dairy, and eggs, but with the variations mentioned, you can make allergy-friendly versions.
Personally, I enjoy these cookies as an occasional summer indulgence that brings joy and creativity to the kitchen—sometimes that’s just as important as the nutrition!
Conclusion
This Perfect Summer Sugar Cookies with Royal Icing recipe has truly become a staple in my warm-weather baking. It’s a recipe that’s easy to make, tastes fantastic, and lets you unleash your decorating skills without stress. I love how it brings a little celebration to any day, whether it’s a casual backyard hangout or a special occasion.
Feel free to tweak the flavors or colors to match your mood or event—this recipe takes well to personalization. Honestly, once you master the royal icing technique, you’ll find yourself looking for reasons to bake these cookies again and again.
If you give this recipe a try, I’d love to hear how it goes! Leave a comment with your decorating triumphs or any adaptations you made. Happy baking, and here’s to many sunny afternoons filled with sugar, laughter, and those perfect little cookies.
FAQs About Perfect Summer Sugar Cookies with Royal Icing
Can I make the dough ahead of time?
Yes! The dough can be refrigerated for up to 24 hours before rolling and baking, which actually improves the texture and flavor.
Is royal icing safe to eat raw?
Traditional royal icing uses raw egg whites, but you can substitute with meringue powder or pasteurized egg whites for safety.
How do I prevent royal icing from cracking?
Keep the icing thickness balanced—not too thick or thin—and allow cookies to dry slowly at room temperature away from drafts.
Can I use this recipe for cut-out shapes other than summer themes?
Absolutely! This dough holds shape well, so it’s perfect for any occasion or themed cookie cutters you want to use.
What’s the best way to store decorated sugar cookies?
Store in an airtight container with parchment paper between layers at room temperature. They keep well for up to a week without losing freshness or decoration quality.
Pin This Recipe!
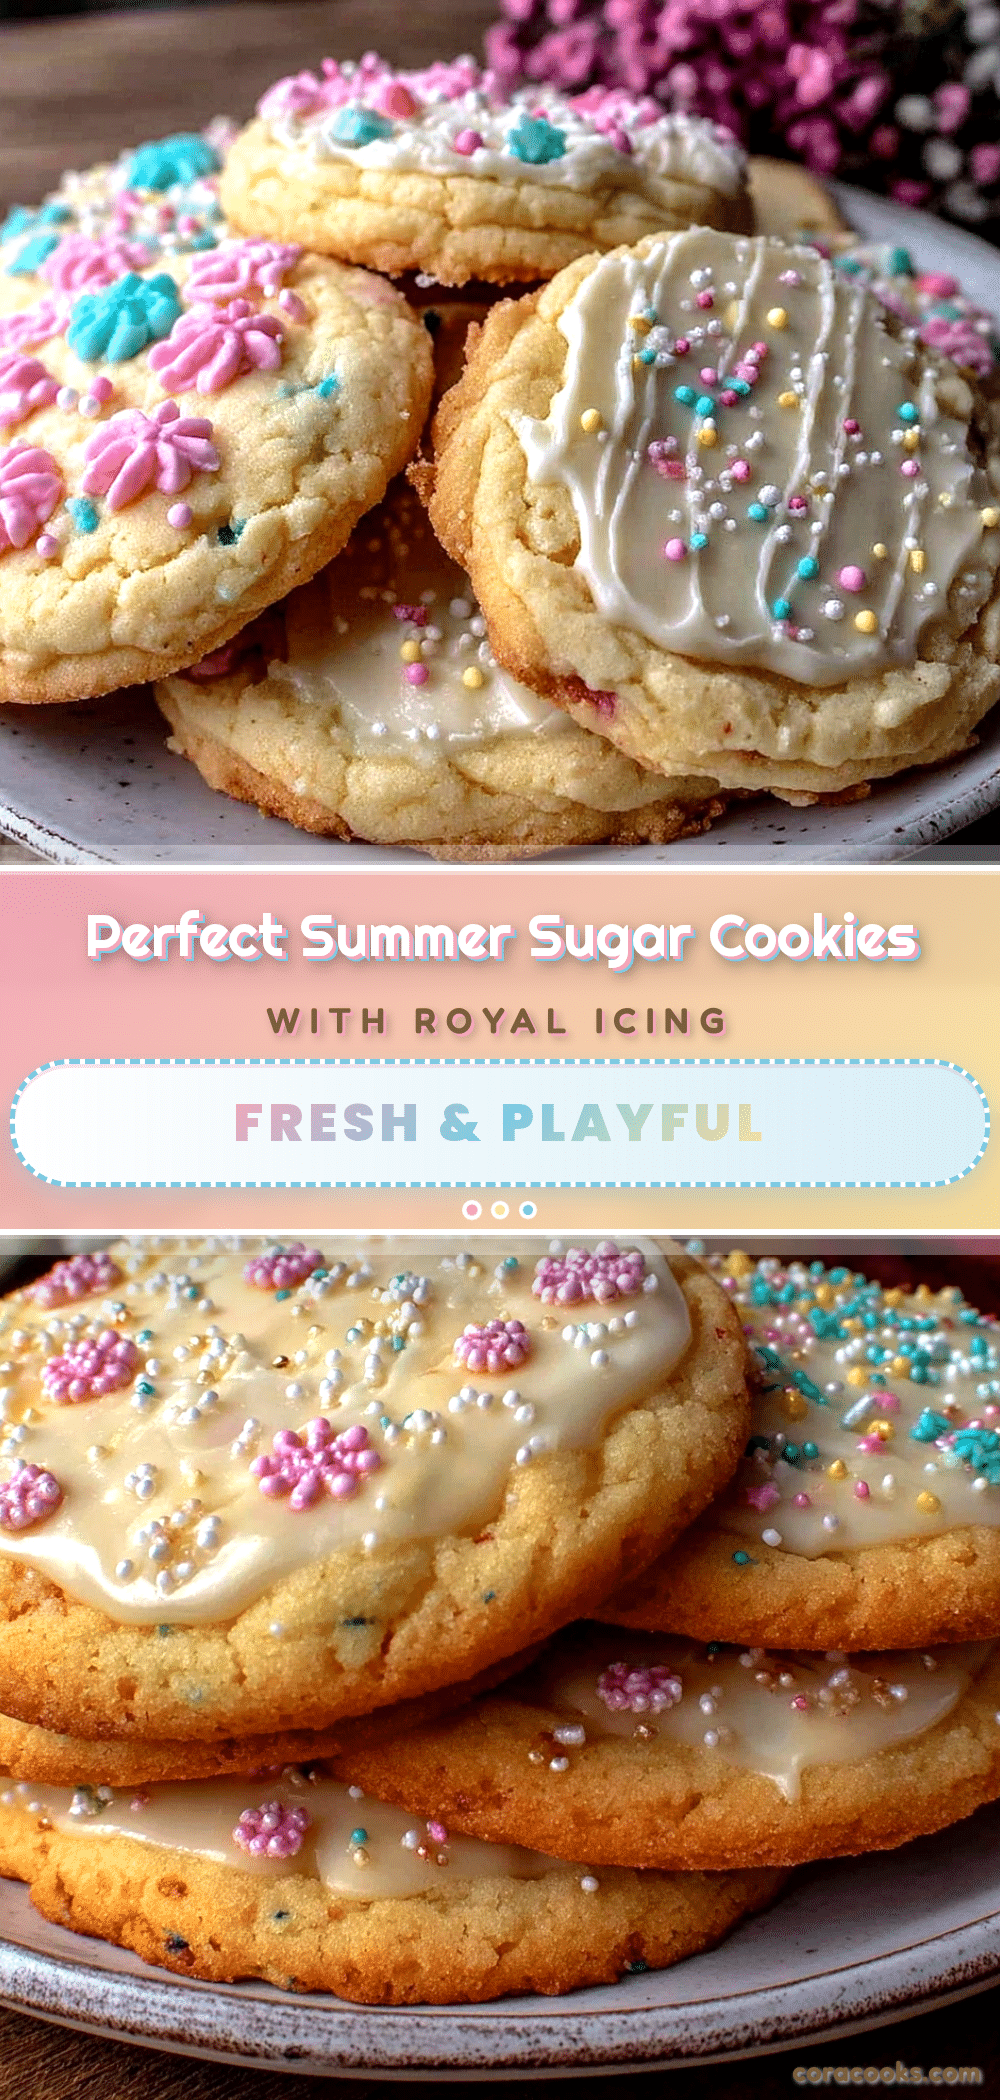
Perfect Summer Sugar Cookies with Royal Icing

A soft yet sturdy sugar cookie recipe perfect for summer parties, topped with smooth royal icing that dries beautifully for flawless decoration.
- Prep Time: 20 minutes
- Cook Time: 8-10 minutes
- Total Time: 1 hour 30 minutes
- Yield: 24 cookies 1x
- Category: Dessert
- Cuisine: American
Ingredients
- 1 cup (227 g) unsalted butter, softened
- 1 cup (200 g) granulated sugar
- 1 large egg, room temperature
- 1 teaspoon pure vanilla extract
- 1 teaspoon lemon zest, freshly grated
- 2 ¾ cups (345 g) all-purpose flour
- ½ teaspoon baking powder
- ½ teaspoon salt
- 3 cups (375 g) powdered sugar, sifted
- 2 large egg whites (or 4 tablespoons meringue powder + 5 tablespoons water)
- 1 teaspoon fresh lemon juice
- Food coloring gels (optional)
- 1 teaspoon vanilla or almond extract (optional)
Instructions
- In a large bowl, cream together 1 cup softened unsalted butter and 1 cup granulated sugar using an electric mixer on medium speed until light and fluffy, about 3-4 minutes.
- Beat in 1 large egg, 1 teaspoon vanilla extract, and 1 teaspoon lemon zest until just combined.
- In a separate bowl, whisk 2 ¾ cups all-purpose flour, ½ teaspoon baking powder, and ½ teaspoon salt.
- Gradually add the dry mix to the wet ingredients, mixing on low speed until the dough forms and no flour streaks remain.
- Divide dough into two discs, wrap in plastic wrap, and refrigerate for at least 1 hour (up to 24 hours).
- Preheat oven to 350°F (175°C) and line baking sheets with parchment paper or silicone mats.
- On a lightly floured surface, roll one disc of dough to about ¼ inch (6 mm) thickness. If dough warms and gets sticky, chill for 10 minutes.
- Use cookie cutters to cut out shapes, placing them about 1 inch (2.5 cm) apart on the baking sheet.
- Bake for 8-10 minutes, until edges just start to turn golden. Cookies will look slightly underbaked in the center but will firm up as they cool.
- Transfer cookies to wire racks and let cool completely before icing.
- In a clean bowl, whisk 3 cups sifted powdered sugar with 2 large egg whites and 1 teaspoon lemon juice until stiff peaks form (about 5-7 minutes). For a safer version, replace egg whites with meringue powder and water.
- Divide icing into small bowls and add gel food coloring as desired.
- Fill piping bags and decorate cookies with outlines first, then flood the insides with thinner icing for a smooth finish.
- Let decorated cookies dry at room temperature for at least 4 hours or overnight for best results.
Notes
Chill dough for at least 1 hour to prevent spreading and make rolling easier. Use fresh lemon zest and quality vanilla extract for best flavor. For royal icing, adjust consistency for outlines (thicker) and flooding (thinner). Use a toothpick to pop air bubbles when flooding. Store cookies in airtight container with parchment paper between layers. Cookies stay fresh up to 1 week at room temperature or 3 months frozen. Let cookies dry slowly at room temperature away from drafts to prevent icing cracks.
Nutrition
- Serving Size: 1 cookie
- Calories: 165
- Sugar: 15
- Sodium: 90
- Fat: 8
- Saturated Fat: 5
- Carbohydrates: 25
- Protein: 2
Keywords: summer sugar cookies, royal icing, sugar cookies recipe, easy sugar cookies, decorated cookies, summer dessert, cookie decorating