Love this? Save it for later!
Share the inspiration with your friends
There used to be this tiny bakery tucked between a laundromat and a vintage shop on Hawthorne Boulevard that made the most incredible chocolate crinkle cookies. When they closed—just a handwritten sign in the window one Tuesday, “Thanks for 12 years”—I honestly felt a little lost. These weren’t just cookies. They were the ones I grabbed on bad days, the ones I brought to parties that disappeared before the other desserts, the ones that made people who swore they didn’t like gluten-free anything ask for the recipe. After seven attempts—including one batch that spread into a single giant cookie sheet—I finally got it. And let me tell you, this version might actually be better than the original.
The trick was realizing that flourless doesn’t mean textureless. These cookies use the cocoa powder and powdered sugar to do the heavy lifting, creating that signature crinkled top and fudgy center without a speck of flour. I mean, the first time I tried making them at home, I used almond flour and ended up with greasy little discs. Not cute. But this version? It’s the one that made my neighbor knock on my door at 9 PM asking what smelled so good. Maybe you’ve been there—chasing a recipe that feels just out of reach. These cookies are the finish line.
They’re quick, they’re ridiculously chocolatey, and they come together in about 20 minutes of active work. The hardest part is waiting for the dough to chill, which, honestly, is a small price to pay for cookies that look like they came from a bakery window. Let me walk you through how to make these little chocolate miracles.
Why You’ll Love This Recipe
Listen, I’ve tested a lot of gluten-free cookie recipes over the years. Some were dry, some were gritty, and some just fell apart the second you looked at them. These flourless chocolate crinkle cookies are none of those things. They’re the real deal, and here’s why you’ll keep coming back to this recipe:
- Quick & Easy: From mixing bowl to oven in under 30 minutes of active time. Perfect for those evenings when you need a chocolate fix, like, yesterday.
- Simple Ingredients: You probably already have everything in your pantry. No specialty flours, no weird gums, no trips to three different stores.
- Perfect for Weeknights: These come together fast enough for a school-night treat but look impressive enough for company. Win-win.
- Crowd-Pleaser: I’ve served these to gluten-free eaters and gluten-loving friends alike, and they disappear at the same speed. Nobody can tell they’re flourless.
- Unbelievably Delicious: The outside is crackly and slightly crisp, the inside is soft and fudgy—it’s the texture combo that cookie dreams are made of.
What makes this recipe different from all the other flourless chocolate cookies out there? It’s the ratio. After way too many trials, I found the perfect balance of cocoa powder, powdered sugar, and eggs that gives you that iconic crinkled top without any flour at all. No weird aftertaste, no gummy texture. Just pure, deep chocolate flavor with a texture that makes you close your eyes after the first bite.
These cookies are comfort food reimagined—faster, simpler, but with the same soul-soothing satisfaction. They’re the kind of recipe that makes you wonder why you ever bothered with flour in the first place.
What Ingredients You Will Need
This recipe uses a short list of simple ingredients to deliver big chocolate flavor without any fuss. The magic happens when you let these pantry staples work together in just the right way.
- 3 cups powdered sugar (also called confectioners’ sugar—this is the base of our “flour” and gives the cookies their structure)
- ¾ cup unsweetened cocoa powder (I prefer Ghirardelli or Hershey’s Special Dark for the richest flavor; natural cocoa powder works best here)
- ½ teaspoon salt (fine sea salt or table salt—don’t skip this, it balances the sweetness)
- 3 large egg whites (room temperature is best; they whip up more evenly than cold ones)
- 1 teaspoon vanilla extract (pure vanilla, not imitation, if you can swing it)
- ¼ cup powdered sugar, extra (for rolling the dough balls before baking—this creates the crinkled look)
Ingredient Tips:
For the cocoa powder, make sure you’re using unsweetened. Dutch-process cocoa will work too, but the cookies will be darker and slightly less crinkly. I’ve tested both, and natural cocoa gives the best crackle.
The egg whites are crucial here—we’re not using whole eggs. This keeps the cookies fudgy rather than cakey. If you have leftover yolks, save them for a custard or lemon curd.
For the powdered sugar, don’t substitute with granulated sugar. The cornstarch in powdered sugar helps with the texture, and the fine grind is what creates that melt-in-your-mouth quality.
Equipment Needed
You don’t need much for these cookies, which is part of their beauty. Here’s what you’ll want to have on hand:
- Large mixing bowl (any medium-to-large bowl works; I use my favorite ceramic one)
- Whisk (for combining the dry ingredients and beating the egg whites)
- Rubber spatula (for scraping down the sides and folding everything together)
- Baking sheet (a standard half-sheet pan works perfectly)
- Parchment paper (non-stick is essential here—these cookies are sticky before baking)
- Small bowl (for the extra powdered sugar for rolling)
- Cookie scoop or tablespoon (for portioning the dough evenly)
- Wire cooling rack (for cooling the cookies properly so they don’t get soggy bottoms)
If you don’t have a cookie scoop, a regular tablespoon works fine. Just make sure you’re measuring roughly the same amount for each cookie so they bake evenly. And honestly, if you don’t have a wire rack, you can cool them on a clean kitchen towel—I’ve done it in a pinch.
Preparation Method
These cookies come together fast, so read through the steps once before you start. The dough needs to chill for at least 30 minutes, so plan ahead a little.
- Preheat your oven to 350°F (175°C). Line a baking sheet with parchment paper and set it aside. Don’t use wax paper—it will stick.
- In your large mixing bowl, whisk together the powdered sugar, cocoa powder, and salt. Make sure there are no lumps. I like to sift the cocoa powder if it seems clumpy, but a good whisking usually does the trick. The mixture should look like dark, powdery snow.
- Add the egg whites and vanilla extract to the dry ingredients. Stir with your rubber spatula until everything comes together. The dough will be thick and sticky—like a very dense brownie batter. Don’t worry if it looks a little dry at first; keep mixing and it will come together.
- Cover the bowl with plastic wrap and refrigerate for at least 30 minutes. This step is non-negotiable. The dough needs to firm up so you can roll it into balls. I’ve tried skipping this, and the cookies spread into flat puddles. Trust me on this one.
- After the dough has chilled, place the extra ¼ cup of powdered sugar in a small bowl. Using a cookie scoop or tablespoon, portion out rounded tablespoons of dough. Roll each portion into a smooth ball between your palms. The dough will be slightly sticky but manageable.
- Roll each dough ball in the powdered sugar until completely coated. Be generous here—the sugar coating is what creates those beautiful crinkles as the cookies bake. I like to roll them twice for extra coverage.
- Place the sugar-coated dough balls on the prepared baking sheet, spacing them about 2 inches apart. These cookies spread a little, but not too much. You should fit about 12 cookies on a standard sheet.
- Bake for 10-12 minutes. The cookies will look puffy and crackled on top. They’ll be soft when you take them out—that’s perfect. Don’t overbake! The edges should look set but the centers will still be slightly soft.
- Let the cookies cool on the baking sheet for 5 minutes. This allows them to set up properly. Then transfer them to a wire cooling rack to cool completely. They’ll firm up as they cool.
- Repeat with the remaining dough. If you’re baking in batches, make sure your baking sheet has cooled down before adding more dough, or the cookies will spread too much.
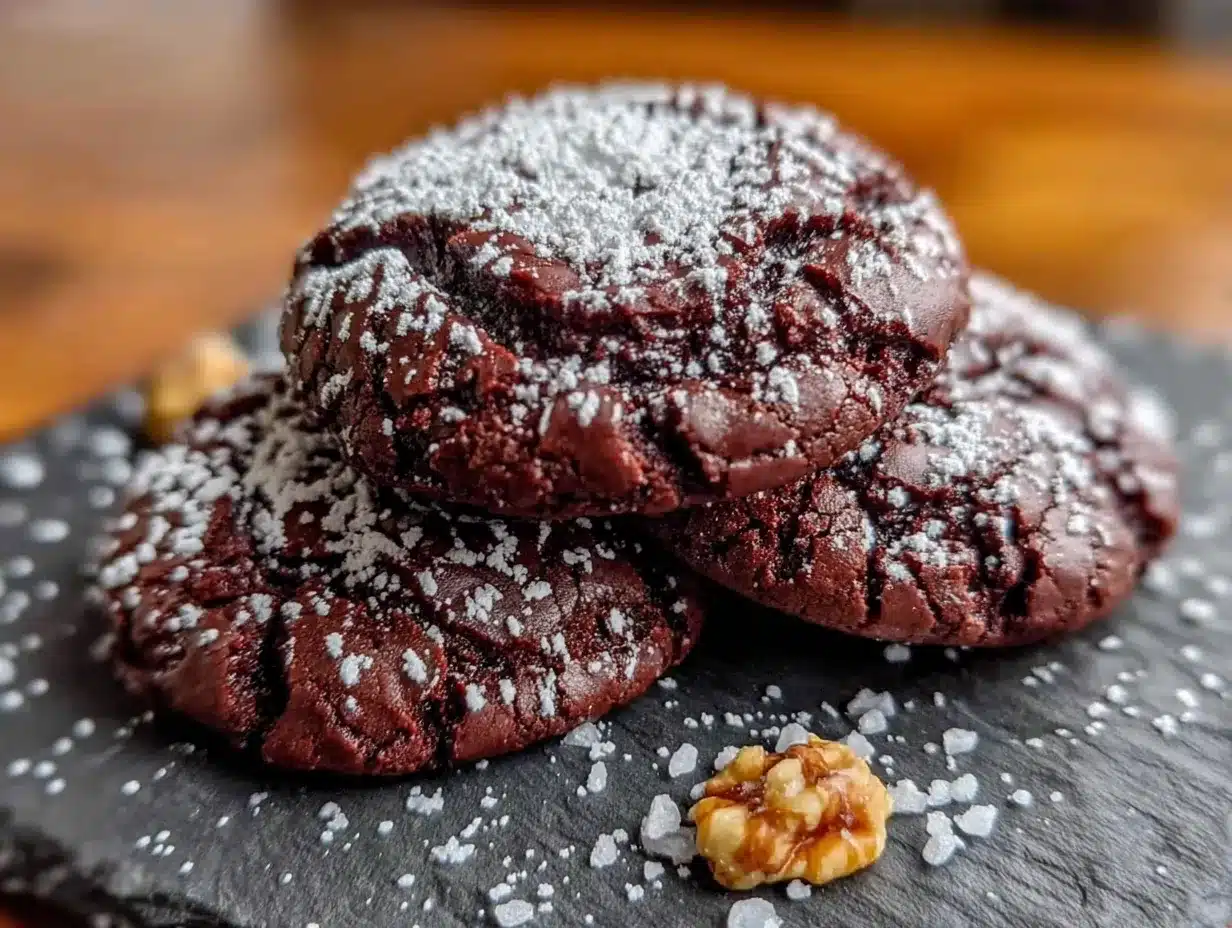
Visual cues: The dough should be thick and fudgy, not runny. When you roll it into balls, it should hold its shape. After baking, the cookies should have a crackled, matte finish with the powdered sugar creating white fissures against the dark chocolate. They’ll feel soft to the touch but should hold together when picked up.
Cooking Tips & Techniques
I’ve made these cookies probably thirty times by now, and I’ve learned a few things the hard way. Here’s what I wish someone had told me the first time:
Don’t skip the chilling step. I know, I know—you’re hungry and you want cookies now. But the dough needs that time in the fridge to firm up. Without it, the cookies spread into thin, crispy discs instead of thick, fudgy rounds. The first time I made these, I was impatient and skipped the chill. They still tasted good, but they looked nothing like crinkle cookies. Lesson learned.
Roll the dough balls generously in powdered sugar. This is what creates the signature crinkled look. If you skimp on the coating, you’ll get smooth cookies with barely any cracks. I like to roll each ball until it looks like a little snowball. The sugar melts slightly in the oven and creates those beautiful white veins against the dark chocolate.
Use a cookie scoop for even sizing. This isn’t just about looks—cookies that are the same size bake evenly. I use a 1-tablespoon scoop and it works perfectly. If you’re eyeballing it, try to make each portion roughly the same size.
Watch the bake time carefully. These cookies go from perfectly done to overbaked very quickly. At 10 minutes, they’ll be softer and fudgier. At 12 minutes, they’ll be slightly firmer with a bit more structure. I prefer 11 minutes for that perfect middle ground. Your oven might run hot or cold, so check at 10 minutes and adjust from there.
Let them cool on the pan. I know it’s tempting to move them immediately, but those 5 minutes on the hot baking sheet are crucial. The cookies continue to set up as they cool. If you move them too soon, they might fall apart.
Variations & Adaptations
One of the best things about this recipe is how easy it is to change up. Here are some variations I’ve tried and loved:
Spicy Mexican Chocolate Crinkles: Add ½ teaspoon of cinnamon and a pinch of cayenne pepper to the dry ingredients. The warmth of the spices pairs beautifully with the deep chocolate flavor. I made these for a friend’s dinner party, and they were gone before the main course.
Mint Chocolate Crinkles: Substitute the vanilla extract with ½ teaspoon of peppermint extract. You’ll get a refreshing, cool finish that’s perfect for the holidays. Just be careful—peppermint extract is strong, so don’t overdo it.
Orange Chocolate Crinkles: Add the zest of one orange to the dough along with the vanilla. The citrus brightens the chocolate and makes these feel a little fancy. I like to serve these with afternoon tea.
Vegan Version: Replace the egg whites with 3 tablespoons of aquafaba (the liquid from a can of chickpeas). Whip it until frothy before adding to the dry ingredients. The texture will be slightly different—a bit more cakey than fudgy—but still delicious. I’ve tested this, and it works surprisingly well.
Double Chocolate Crinkles: Fold in ½ cup of mini chocolate chips after mixing the dough. This adds little pockets of melted chocolate throughout the cookie. Use dark chocolate chips for extra richness.
Serving & Storage Suggestions
These cookies are best served at room temperature, straight from the cooling rack. They’re soft, fudgy, and absolutely irresistible. I like to serve them with a glass of cold milk or a hot cup of coffee—the bitterness of the coffee balances the sweetness of the cookies perfectly.
For a dessert platter, arrange them on a white plate or cake stand to show off that beautiful crinkled texture. They look stunning next to fresh berries or a dusting of extra powdered sugar.
Storage: Keep these cookies in an airtight container at room temperature for up to 5 days. Place a piece of bread in the container to keep them soft—the cookies will absorb moisture from the bread. I learned this trick from my grandmother, and it works like magic.
Freezing: These cookies freeze beautifully. You can freeze the baked cookies in a single layer in a freezer-safe bag for up to 3 months. Thaw at room temperature for about 30 minutes before serving. Or, you can freeze the unbaked dough balls—just roll them in powdered sugar, place them on a baking sheet, freeze until solid, then transfer to a bag. Bake straight from frozen, adding 2-3 minutes to the bake time.
The flavors actually deepen after a day or two in the fridge. I’ve been known to hide a few in the back of the freezer for emergencies. No judgment here.
Nutritional Information & Benefits
These cookies are naturally gluten-free and contain no butter or oil, which makes them lower in fat than traditional cookies. Here’s the approximate nutritional breakdown per cookie (based on 24 cookies):
- Calories: 85
- Fat: 1g
- Carbohydrates: 19g
- Fiber: 1g
- Protein: 2g
- Sugar: 16g
The cocoa powder in these cookies is rich in antioxidants called flavonoids, which can help reduce inflammation and support heart health. Plus, since there’s no butter or oil, these are a lighter option when you’re craving something chocolatey.
These cookies are suitable for gluten-free diets and can be made vegan with the aquafaba substitution mentioned above. They’re also nut-free, which makes them a safe option for school lunches or parties where allergies are a concern.
I’m not a nutritionist, and I believe in balance—these are still cookies, after all. But it’s nice to know that when you reach for one, you’re getting a treat that’s a little kinder to your body than some other options. Everything in moderation, right?
Conclusion
These flourless gluten-free chocolate crinkle cookies have become a staple in my kitchen, and I have a feeling they’ll become one in yours too. They’re quick enough for a weeknight craving, simple enough for beginner bakers, and impressive enough to bring to any gathering. The crackly tops, the fudgy centers, the deep chocolate flavor—it’s everything you want in a cookie, without any of the fuss.
I love that this recipe proves you don’t need fancy ingredients or complicated techniques to make something truly special. Just a few pantry staples, a little patience for the chilling step, and you’re on your way to cookies that taste like they came from a bakery. The first time you pull a tray out of the oven and see those beautiful crinkles, you’ll know exactly what I mean.
Now I want to hear from you! Have you tried these cookies? Did you add any fun variations? Drop a comment below and let me know how they turned out. And if you loved this recipe, share it with a friend who’s been missing chocolate cookies since going gluten-free. Trust me, they’ll thank you.
Happy baking, friends. Go make some crinkles!
Frequently Asked Questions
Can I use whole eggs instead of egg whites?
I don’t recommend it. Whole eggs will make the cookies cakey rather than fudgy. The egg whites give that chewy, brownie-like texture that makes these cookies so special. If you’re trying to use up leftover yolks, save them for a different recipe.
Why did my cookies not crinkle on top?
This usually happens for one of two reasons: either the dough wasn’t chilled long enough, or you didn’t roll the balls generously enough in powdered sugar. Make sure the dough is firm before rolling, and coat each ball thoroughly. The sugar creates the cracks as the cookies expand in the oven.
Can I make these cookies dairy-free?
Yes! This recipe is naturally dairy-free since there’s no butter or milk in the ingredients. Just make sure your cocoa powder is dairy-free (most are, but some specialty blends contain milk solids). The cookies will turn out perfectly without any substitutions.
How do I know when the cookies are done baking?
Look for a puffy, crackled top and set edges. The centers will still look soft and slightly underdone—that’s exactly what you want. If you insert a toothpick, it should come out with a few moist crumbs attached. Overbaking will give you dry, hard cookies.
Can I double this recipe?
Absolutely! This recipe doubles beautifully. Just make sure you have enough space in your fridge for the doubled dough, and bake in batches so your baking sheet doesn’t get overcrowded. The cookies freeze well, so I often make a double batch and stash some in the freezer for later.
Pin This Recipe!
Best Flourless Gluten-Free Chocolate Crinkle Cookies Recipe
These flourless gluten-free chocolate crinkle cookies are quick, ridiculously chocolatey, and come together in about 20 minutes of active work. With a crackly top and fudgy center, they’re the perfect treat for any occasion.
- Prep Time: 20 minutes
- Cook Time: 12 minutes
- Total Time: 1 hour 2 minutes (includes 30 minutes chilling)
- Yield: 24 cookies 1x
- Category: Dessert
- Cuisine: American
Ingredients
- 3 cups powdered sugar
- ¾ cup unsweetened cocoa powder
- ½ teaspoon salt
- 3 large egg whites
- 1 teaspoon vanilla extract
- ¼ cup powdered sugar, extra (for rolling)
Instructions
- Preheat your oven to 350°F (175°C). Line a baking sheet with parchment paper and set it aside.
- In your large mixing bowl, whisk together the powdered sugar, cocoa powder, and salt until no lumps remain.
- Add the egg whites and vanilla extract to the dry ingredients. Stir with a rubber spatula until a thick, sticky dough forms.
- Cover the bowl with plastic wrap and refrigerate for at least 30 minutes.
- After the dough has chilled, place the extra ¼ cup of powdered sugar in a small bowl.
- Using a cookie scoop or tablespoon, portion out rounded tablespoons of dough. Roll each portion into a smooth ball between your palms.
- Roll each dough ball in the powdered sugar until completely coated. Be generous for the best crinkles.
- Place the sugar-coated dough balls on the prepared baking sheet, spacing them about 2 inches apart.
- Bake for 10-12 minutes. The cookies will look puffy and crackled on top; they should be soft when you take them out.
- Let the cookies cool on the baking sheet for 5 minutes, then transfer to a wire cooling rack to cool completely.
- Repeat with the remaining dough, ensuring the baking sheet has cooled down between batches.
Notes
Don’t skip the chilling step—it prevents the cookies from spreading too much. Roll the dough balls generously in powdered sugar for the best crinkled look. Watch the bake time carefully; cookies go from perfectly done to overbaked quickly. Let them cool on the pan for 5 minutes to set properly.
Nutrition
- Serving Size: 1 cookie
- Calories: 85
- Sugar: 16
- Sodium: 50
- Fat: 1
- Carbohydrates: 19
- Fiber: 1
- Protein: 2
Keywords: flourless, gluten-free, chocolate crinkle cookies, easy, fudgy, cocoa, powdered sugar