Love this? Save it for later!
Share the inspiration with your friends
Introduction
There used to be a tiny, cheerful corner bakery in a sleepy neighborhood of Portland that made the most unforgettable fruit roll-ups. When that bakery closed one rainy October afternoon, it felt like a little piece of joy vanished with it. I mean, who knew fruit leather could bring so much happiness? After the closure, I found myself craving those sweet, chewy strips more than ever. So, after about five messy kitchen experiments — including a batch where I set off the smoke alarm — I finally got it.
This easy homemade fruit roll-ups recipe with 3 simple ingredients captures that nostalgic flavor and texture perfectly. Maybe you’ve been there, chasing down a snack memory that just won’t quit. For me, these fruit roll-ups aren’t just a treat; they’re a sweet reminder of sunny mornings spent chatting with the bakery owner, who insisted on using only the freshest fruit. Honestly, making these at home feels like reclaiming a little lost magic, and the best part? You don’t need any fancy gadgets or weird additives.
Let me tell you, the warm, fruity aroma filling the kitchen while these roll-ups dry is enough to make anyone smile. Plus, the whole process is so straightforward that it’s perfect for a fun weekend project or even an after-school snack activity with kids. So, if you’re ready to make your own batch of chewy, fruity goodness with just a handful of ingredients, keep reading — this recipe is your new go-to.
Why You’ll Love This Recipe
After testing countless versions, I can say this recipe nails it every time, and here’s why it stands out:
- Quick & Easy: Comes together in under an hour, with mostly hands-off drying time—perfect for busy days or last-minute snack cravings.
- Simple Ingredients: You likely already have everything in your pantry, which means no last-minute grocery runs.
- Perfect for Kids’ Snacks: These fruit roll-ups are naturally sweet and fun to eat, making them a hit with little ones and a great way to sneak in some fruit.
- Crowd-Pleaser: I’ve brought these to potlucks and family gatherings, and they always disappear fast—no complaints from adults or kids.
- Unbelievably Delicious: The texture is just right—soft, chewy, and bursting with real fruit flavor, unlike the overly sweet, artificial store-bought versions.
What really sets this recipe apart is how it uses just three ingredients, but the magic lies in the technique. Blending the fruit to the perfect smoothness before slow baking gives these roll-ups their signature texture. Plus, I add a tiny pinch of lemon juice to brighten the flavor without overpowering the natural sweetness. Honestly, this recipe isn’t just good—it’s the kind that makes you close your eyes and savor each bite, bringing back those bakery mornings in Portland.
What Ingredients You Will Need
This recipe uses simple, wholesome ingredients to deliver bold flavor and satisfying chewy texture without the fuss. You can easily swap or adjust ingredients to fit what you have on hand.
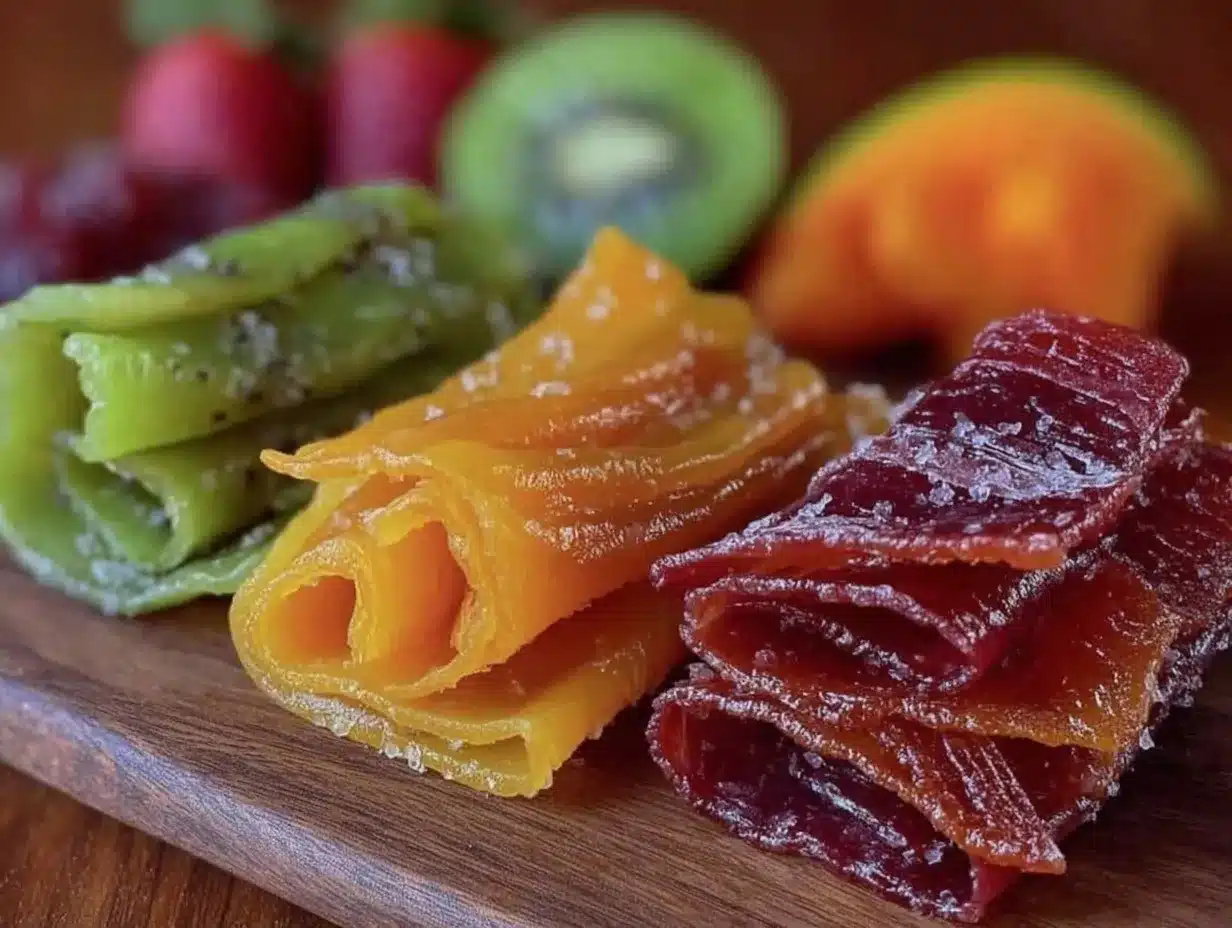
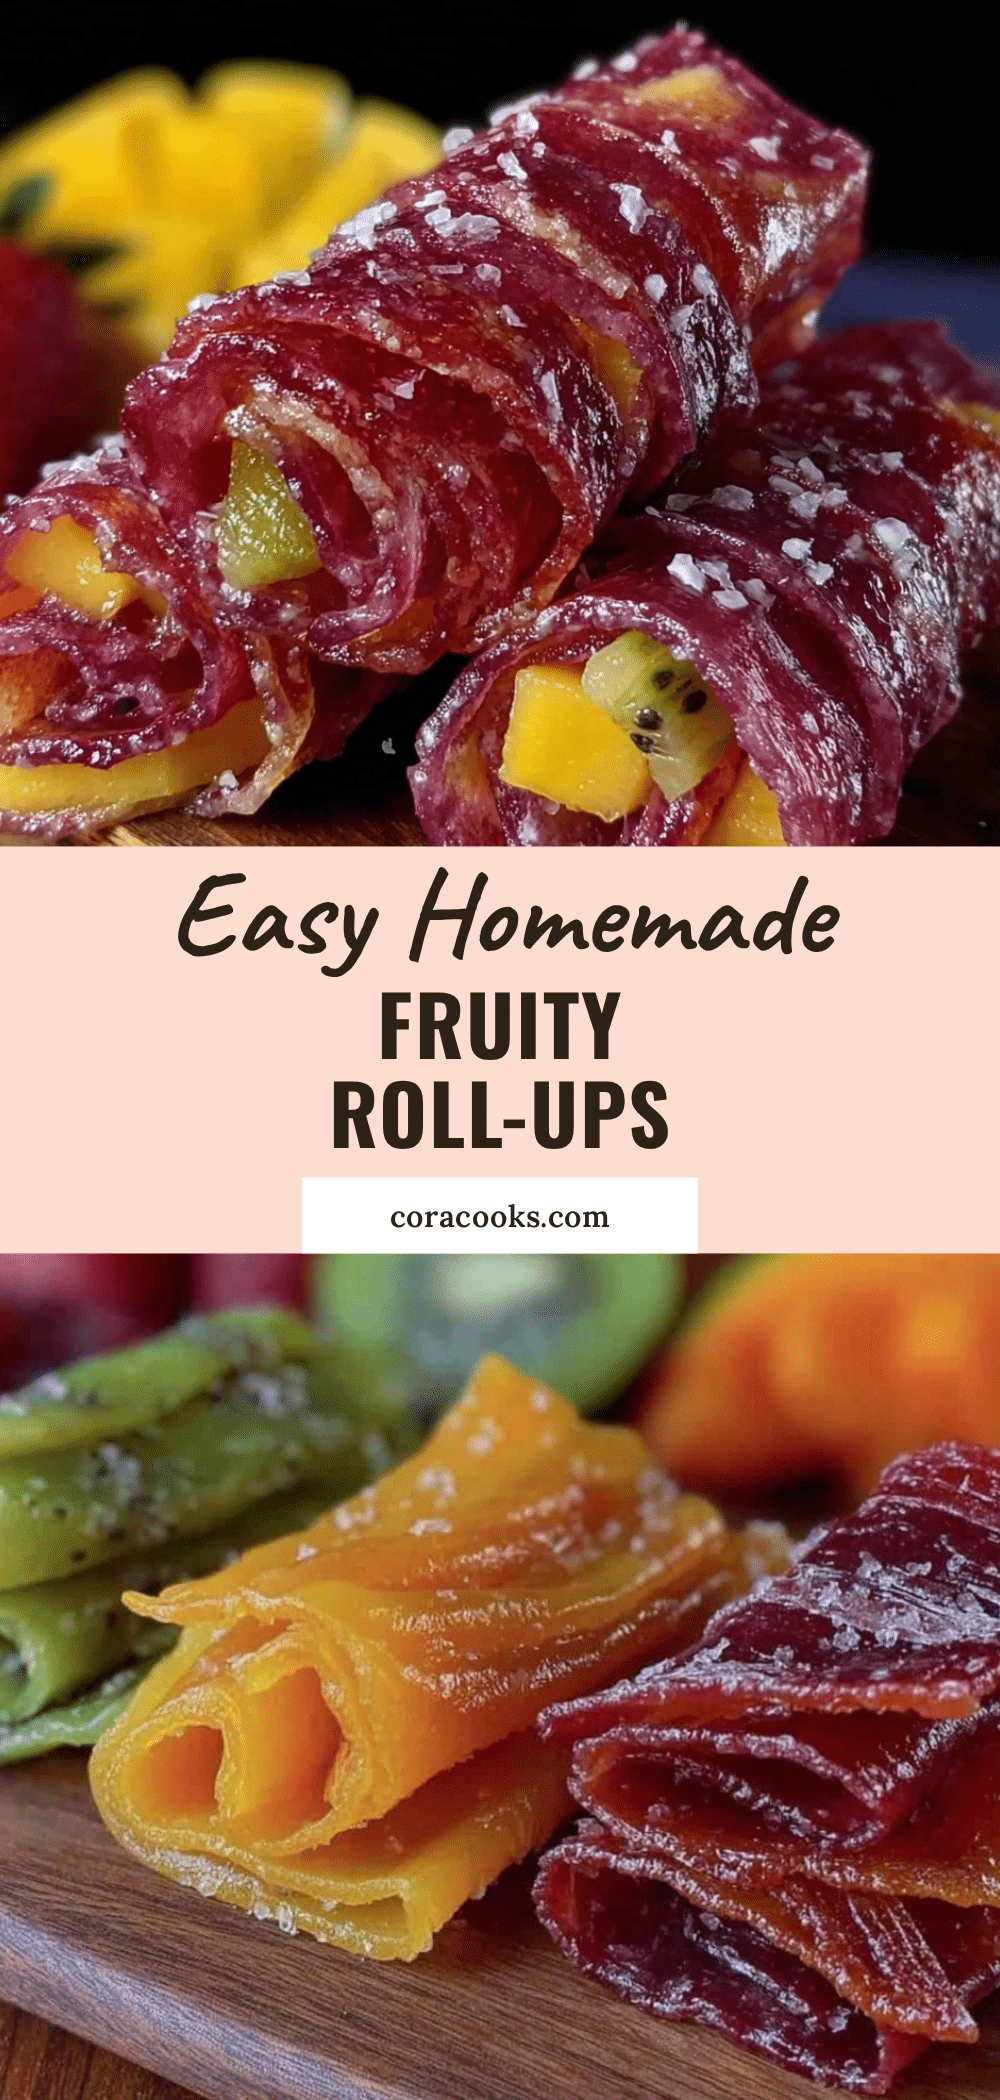
- Fresh fruit (3 cups, about 450 grams): Strawberries, mangoes, or peaches all work beautifully. I usually go for ripe strawberries from the farmer’s market—they give the best natural sweetness.
- Honey or maple syrup (2 tablespoons): Adds a touch of extra sweetness and helps with the chewy texture. I prefer raw honey from local beekeepers for its rich flavor.
- Lemon juice (1 tablespoon): Freshly squeezed, this brightens the fruit flavor and helps preserve the color.
Ingredient tips: You can use frozen fruit if fresh isn’t available—just thaw and drain excess liquid before blending. For a vegan option, swap honey with maple syrup or agave nectar. When picking fruit, choose ripe but firm varieties to avoid excess moisture, which can lengthen drying time.
Equipment Needed
- Blender or food processor: Essential for pureeing the fruit into a smooth, even consistency. I’ve tried both—blenders give a silkier texture, but a good food processor works fine.
- Baking sheet: A rimmed cookie sheet is ideal for spreading the fruit mixture evenly.
- Parchment paper or silicone baking mat: Prevents sticking and makes peeling off the roll-ups a breeze.
- Measuring cups and spoons: For precise ingredient amounts.
- Spatula: Useful for spreading the fruit puree smoothly across the baking sheet.
Don’t worry if you don’t have a silicone mat. Parchment paper is budget-friendly and works perfectly. Also, keep your blender blade sharp by occasionally blending a bit of lemon or ice cubes—makes a difference when pureeing fruit!
Preparation Method
- Preheat your oven to 140°F (60°C): This low temperature helps dehydrate the fruit puree gently without cooking it harshly. If your oven doesn’t go this low, set it to the lowest setting and prop the door open slightly with a wooden spoon to let moisture escape.
- Prepare your baking sheet: Line it with parchment paper or a silicone baking mat. This step is key to easy removal later.
- Wash and chop your fruit: Remove stems and pits. Rough chop to help the blender along.
- Puree the fruit: Place the chopped fruit, honey or maple syrup, and lemon juice into your blender. Blend on high until completely smooth. Pause and scrape down the sides if needed to avoid chunks.
- Spread the puree: Pour the mixture onto your prepared baking sheet. Use a spatula to spread it evenly to about 1/8 inch (3 mm) thickness. Don’t rush this step; an even layer dries more consistently.
- Bake low and slow: Place the sheet in the oven and bake for 4 to 6 hours. Check after 4 hours—when the edges start to peel away and the surface feels tacky but not wet, it’s ready.
- Cool completely: Remove from oven and let cool to room temperature. This helps the roll-ups firm up for easier handling.
- Cut and roll: Use kitchen scissors or a sharp knife to cut into strips. Peel the parchment paper off each strip and roll the fruit leather tightly.
Pro tip: If you notice bubbles during baking, gently poke them with a toothpick to release trapped moisture. Also, avoid thick spreading—too thick means longer drying time and a chewier texture than intended.
Cooking Tips & Techniques
Getting homemade fruit roll-ups just right takes a few insider tricks, which I learned the hard way.
- Puree consistency: Make sure your fruit puree is perfectly smooth. Chunks can cause uneven drying and make the roll-ups tear when peeled.
- Drying temperature: Keep your oven as low as possible. High heat cooks the fruit rather than drying it, resulting in a sticky mess.
- Even spreading is crucial: Use an offset spatula or the back of a spoon to smooth the surface. Uneven thickness means some parts dry too fast while others stay wet.
- Patience with drying time: Resist the urge to speed things up by raising the oven temp. It’s tempting, but low and slow is how you get that perfect chewy texture.
- Storage matters: Once cooled, wrap roll-ups individually in parchment to prevent sticking and keep them fresh longer.
Honestly, my first attempts were full of tears (and a little frustration) because I didn’t spread the puree evenly or underestimated the drying time. But once I embraced the slow bake and smooth puree, success was guaranteed every time.
Variations & Adaptations
Feel free to tailor this recipe to your tastes or dietary needs:
- Fruit combos: Mix berries with mango for a tropical twist, or try apple and cinnamon for a cozy flavor variation.
- Sweetener swaps: Use agave syrup or brown rice syrup to suit vegan or low-glycemic preferences.
- Allergen-friendly: This recipe is naturally gluten-free and dairy-free, making it safe for most diets.
- Cooking method: If you have a dehydrator, set it to 135°F (57°C) and dry for 6 to 8 hours for consistent results.
- Texture tweak: For thinner, crispier roll-ups, spread the puree thinner and bake a little longer.
One time, I added a dash of ground ginger and it gave a surprising zing that my family loved. Don’t be afraid to experiment with spices or herbs for unique flavors!
Serving & Storage Suggestions
These fruit roll-ups are best served at room temperature, fresh from the kitchen or stored in an airtight container. I like to pack them as a lunchtime surprise for my kids—they love unrolling each strip.
Pair them with a glass of cold milk or a cup of herbal tea for a simple snack break. They also make a fun topping for yogurt bowls or oatmeal when torn into bite-sized pieces.
To store, wrap each roll-up individually in parchment paper, then place them in an airtight container or zip-top bag. Keep them in a cool, dry place for up to two weeks, or freeze for longer storage (up to 3 months). When reheating frozen roll-ups, just let them thaw at room temperature—no microwave needed.
Over time, the flavor deepens, and the texture firms up slightly, which some folks prefer. Just avoid exposing them to humidity, or they’ll get sticky.
Nutritional Information & Benefits
Each homemade fruit roll-up is packed with natural fruit sugars and fiber, making it a healthier alternative to store-bought snacks loaded with preservatives and artificial colors. Roughly, one roll-up contains about 70 calories, with minimal fat and a good dose of vitamin C and antioxidants, depending on the fruit used.
Since this recipe uses no added refined sugars and only natural sweeteners like honey or maple syrup, it fits well into balanced diets. It’s gluten-free, dairy-free, and vegan-friendly if you choose plant-based syrup.
Personally, I appreciate how these roll-ups satisfy sweet cravings without the guilt or tummy troubles caused by processed snacks. They’re a little boost of wholesome energy for kids and adults alike.
Conclusion
This easy homemade fruit roll-ups recipe with 3 simple ingredients is truly a keeper. It brings childhood snack memories to life, tastes incredible, and is surprisingly fun to make. Whether you’re new to fruit leather or a seasoned fan, this recipe offers a no-fuss way to enjoy a wholesome treat that kids adore.
Feel free to play around with different fruits and sweeteners to find your favorite combo. Honestly, every batch feels like a small victory—proof that homemade snacks can be both simple and special.
If you give this recipe a try, I’d love to hear how it turns out for you or any creative twists you add. Share your thoughts and photos in the comments below, and let’s keep the homemade snack love going!
Frequently Asked Questions
- Can I use frozen fruit for the fruit roll-ups? Yes! Just thaw the fruit completely and drain any excess liquid before blending to prevent soggy roll-ups.
- How long do homemade fruit roll-ups last? Stored properly in an airtight container at room temperature, they last about two weeks. Freezing can extend this to three months.
- Can I use a dehydrator instead of the oven? Absolutely. Set your dehydrator to 135°F (57°C) and dry for 6 to 8 hours until tacky but not sticky.
- What’s the best fruit for making roll-ups? Strawberries, mangoes, peaches, and berries all work well. Choose ripe, firm fruit for best texture and flavor.
- Why are my fruit roll-ups sticky? They may be under-dried or too thick. Try spreading the puree thinner and drying longer at a low temperature.
Pin This Recipe!
Easy Homemade Fruit Roll-Ups Recipe with 3 Simple Ingredients Perfect for Kids

This easy homemade fruit roll-ups recipe uses just three simple ingredients to create soft, chewy, and naturally sweet fruit leather that’s perfect for kids and nostalgic snack lovers alike.
- Prep Time: 15 minutes
- Cook Time: 4 to 6 hours
- Total Time: 4 hours 15 minutes to 6 hours 15 minutes
- Yield: 8 servings 1x
- Category: Snack
- Cuisine: American
Ingredients
- 3 cups fresh fruit (about 450 grams) – strawberries, mangoes, or peaches
- 2 tablespoons honey or maple syrup
- 1 tablespoon freshly squeezed lemon juice
Instructions
- Preheat your oven to 140°F (60°C). If your oven doesn’t go this low, set it to the lowest setting and prop the door open slightly with a wooden spoon to let moisture escape.
- Line a baking sheet with parchment paper or a silicone baking mat.
- Wash and chop your fruit, removing stems and pits. Rough chop to help the blender along.
- Place the chopped fruit, honey or maple syrup, and lemon juice into your blender. Blend on high until completely smooth, scraping down the sides if needed.
- Pour the fruit puree onto the prepared baking sheet. Use a spatula to spread it evenly to about 1/8 inch (3 mm) thickness.
- Bake in the oven for 4 to 6 hours. Check after 4 hours; when edges start to peel away and the surface feels tacky but not wet, it’s ready.
- Remove from oven and let cool completely to room temperature.
- Cut into strips using kitchen scissors or a sharp knife. Peel the parchment paper off each strip and roll the fruit leather tightly.
Notes
If bubbles form during baking, gently poke them with a toothpick to release moisture. Spread puree evenly and thinly for consistent drying. Store roll-ups individually wrapped in parchment paper in an airtight container to prevent sticking. Use a dehydrator at 135°F (57°C) for 6 to 8 hours as an alternative to oven drying.
Nutrition
- Serving Size: One fruit roll-up st
- Calories: 70
- Sugar: 15
- Sodium: 2
- Fat: 0.2
- Carbohydrates: 18
- Fiber: 1.5
- Protein: 0.3
Keywords: fruit roll-ups, homemade fruit leather, kids snacks, healthy snacks, easy fruit roll-ups, natural sweeteners, gluten-free snacks, vegan snacks