Love this? Save it for later!
Share the inspiration with your friends
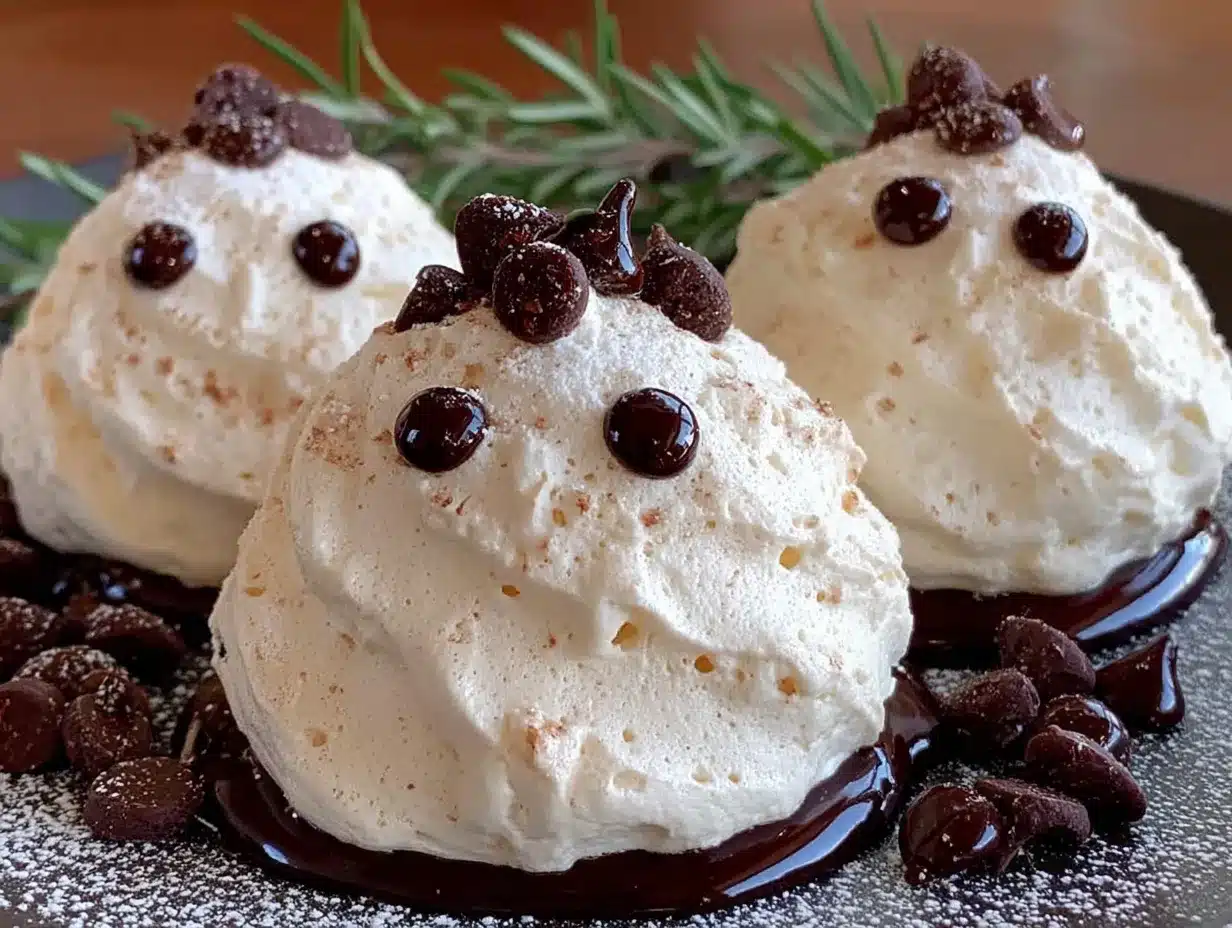
It was 11:47 PM on a rainy Wednesday in late September, and I had a very specific craving for something that felt like a celebration but looked like a ghost. I didn’t have any fancy piping bags or gel food coloring, but I had three egg whites sitting in the fridge from a quiche I’d made earlier and a bag of mini chocolate chips I’d bought for a baking project that never happened. The idea just arrived—what if I made meringue cookies that looked like actual little ghosts? Not the fancy French kind, just simple, sweet, slightly spooky little clouds that would make my kids lose their minds in the morning.
Honestly, I wasn’t even sure it would work. I mean, I’ve made meringue before—plenty of times—but shaping it into ghosts? That felt like a whole different ballgame. I grabbed my stand mixer, prayed the eggs were room temperature enough, and started whipping. The rain was tapping against the window, and I had that weird late-night energy where you just go for it without overthinking. You know that feeling when you’re too tired to second-guess yourself, so you just trust your instincts? That was this night.
I’ll be honest, the first few ghosts looked more like blobs than anything supernatural. But by the third tray, I’d figured out the trick—a gentle flick of the wrist, a quick dot of chocolate for eyes, and boom, I had a whole army of adorable little spirits staring back at me. I left them in the oven overnight (the classic meringue trick), and when I woke up, they were perfect. Crispy, light, and just the right amount of creepy-cute. My daughter literally gasped when she saw them, and my son asked if he could take them to school for show-and-tell. That’s when I knew this recipe was a keeper. These light and airy ghost meringue cookies have become our go-to Halloween treat, and I’m pretty sure they’ll become yours too.
Why You’ll Love This Recipe
Let me tell you why these ghost meringue cookies are about to become your new favorite Halloween tradition. I’ve tested this recipe at least six times (yes, six—my family has been very patient), and every single batch has turned out perfectly. Here’s what makes them special:
- Quick & Easy: The active prep time is only about 20 minutes. The oven does all the hard work while you sleep or watch a movie.
- Simple Ingredients: You probably have everything in your kitchen right now. Egg whites, sugar, vanilla, and chocolate chips. That’s it.
- Perfect for Halloween Parties: These little ghosts are the star of any Halloween gathering. Kids adore them, and adults can’t resist grabbing one (or three).
- Crowd-Pleaser: They’re gluten-free, dairy-free, and naturally low in fat. Everyone can enjoy them without worry.
- Unbelievably Delicious: The texture is pure magic—crispy on the outside, light as air on the inside, with a subtle vanilla sweetness that melts in your mouth.
What makes these ghost meringue cookies different from every other Halloween treat out there? It’s the technique. Most meringue recipes tell you to pipe perfect shapes, but I’ve developed a method that uses a simple spoon drop and a quick chocolate chip placement that creates the most adorable ghost faces without any fancy equipment. No piping bags, no special tips, no stress. Just pure, spooky fun.
This recipe isn’t just good—it’s the kind of treat that makes you close your eyes after the first bite. It’s Halloween comfort food reimagined: lighter, healthier, but with the same soul-soothing satisfaction as your favorite holiday cookies. Perfect for impressing guests without stress, or turning a simple October evening into something memorable.
What Ingredients You Will Need
This recipe uses simple, wholesome ingredients to create something that feels truly special. The magic is in the technique, not the grocery list. Here’s everything you’ll need:
For the Meringue Cookies
- 4 large egg whites, room temperature (this is crucial—cold eggs won’t whip properly)
- 1 cup (200g) granulated sugar (I prefer organic cane sugar for the cleanest flavor)
- 1/2 teaspoon cream of tartar (stabilizes the meringue and helps it hold its shape)
- 1 teaspoon vanilla extract (pure, not imitation—trust me on this)
- Pinch of salt (enhances the sweetness and balances the flavor)
- 1/4 cup mini chocolate chips (for the ghost eyes and mouths)
Ingredient Tips & Substitutions
- Egg whites: Fresh eggs separate better than older ones. If you’re in a pinch, carton egg whites work too—just make sure they’re at room temperature. I’ve used both and honestly can’t tell the difference.
- Sugar: Regular granulated sugar is perfect. Don’t use powdered sugar—it changes the texture completely. I learned that the hard way after a very flat, sad batch of meringue.
- Cream of tartar: If you don’t have it, you can substitute with 1 teaspoon of lemon juice or white vinegar. It helps the egg whites hold their structure, especially on humid days.
- Vanilla extract: For a fun twist, try peppermint extract for a candy cane vibe, or almond extract for a nutty undertone. Just use half the amount since they’re stronger.
- Chocolate chips: Mini chips work best because they’re proportionally perfect for ghost faces. Regular chips can be cut in half if that’s all you have. I’ve also used melted dark chocolate in a piping bag for more detailed faces.
For the Ghost Faces (Optional Variations)
- Black gel food coloring: If you want to paint on faces instead of using chocolate chips
- Edible glitter: For sparkly ghosts (my daughter’s favorite addition)
- Freeze-dried raspberry powder: For a subtle pink blush on the ghosts’ cheeks
I recommend using large, fresh eggs from a trusted brand. The fresher the eggs, the stiffer the peaks. And please, please let them come to room temperature—it makes a world of difference in how quickly and evenly they whip up.
Equipment Needed
You don’t need a professional bakery setup for these ghost meringue cookies. Here’s what you’ll actually use:
- Stand mixer or hand mixer: A stand mixer with a whisk attachment is ideal, but a hand mixer works perfectly too. I’ve made these with both, and the hand mixer just takes a few extra minutes.
- Large glass or metal mixing bowl: Plastic bowls can retain grease, which prevents egg whites from whipping properly. Glass or metal is best.
- Baking sheets: Two large baking sheets lined with parchment paper. Silpat mats work great too—they provide a non-stick surface that helps the meringue release easily.
- Rubber spatula: For folding in the chocolate chips gently. Use a light hand here.
- Cooling rack: For cooling the cookies completely after baking.
- Small spoon or cookie scoop: For dropping the meringue onto the baking sheets. A #50 cookie scoop (about 1.5 tablespoons) works perfectly.
If you don’t have a stand mixer, don’t worry. I made my first batch with a hand mixer and a metal bowl, holding it between my knees while I whipped. It worked perfectly—just took about 12 minutes instead of 8. Budget-friendly tip: thrift stores almost always have hand mixers for under $10. That’s where I found my backup one!
Preparation Method
Alright, let’s make some ghosts! Follow these steps carefully, and you’ll have the cutest Halloween treat on the block.
Step 1: Preheat and Prepare
Preheat your oven to 200°F (95°C). Yes, that’s very low—we’re drying the meringue, not baking it. Line two large baking sheets with parchment paper. If you’re using Silpat mats, great—just make sure they’re completely clean and dry.
Step 2: Separate the Eggs
Carefully separate the egg whites from the yolks while the eggs are still cold—it’s easier. Place the whites in your mixing bowl and let them sit at room temperature for 30 minutes. This is non-negotiable. Cold egg whites don’t whip as high or as stiff, and you’ll end up with flat, sad ghosts. I’ve tested this side by side, and the difference is dramatic.
Step 3: Whip the Egg Whites
Add the cream of tartar and pinch of salt to the egg whites. Start mixing on medium speed until the mixture becomes frothy and bubbly—about 2 minutes. The bubbles should be small and uniform, like a bubble bath.
Step 4: Gradually Add Sugar
With the mixer running on medium-high speed, add the sugar one tablespoon at a time. I know it’s tedious, but this gradual addition is what creates that stable, glossy meringue. If you dump all the sugar in at once, the meringue will deflate. Trust me—I learned this the hard way after a particularly sad batch that looked more like pancake batter than clouds.
Step 5: Whip to Stiff Peaks
Continue whipping on high speed until the meringue forms stiff, glossy peaks. This usually takes about 6-8 minutes with a stand mixer, or 10-12 minutes with a hand mixer. How do you know it’s ready? When you lift the whisk, the meringue should stand up straight without drooping. Also, rub a tiny bit between your fingers—if it feels smooth and not gritty, the sugar has dissolved completely.
Step 6: Add Vanilla
Add the vanilla extract and whip for another 30 seconds until combined. The meringue should be thick, glossy, and look like marshmallow fluff. Give it a taste—it should be sweet but not cloying, with a clean vanilla finish.
Step 7: Shape the Ghosts
Using a small spoon or cookie scoop, drop rounded spoonfuls of meringue onto the prepared baking sheets, spacing them about 2 inches apart. To create the ghost shape, use the back of the spoon to gently pull up a small peak at the top of each dollop. This is the ghost’s head. Don’t worry if they look weird—they’ll puff up slightly in the oven and look more ghost-like.
Step 8: Add the Faces
Gently press two mini chocolate chips into each ghost for eyes, and one for the mouth. Press them in just enough so they stay put—don’t push them all the way through. For a spookier look, you can arrange them in a slight V-shape for an angry ghost face, or round for a surprised one. My kids love making different expressions.
Step 9: Bake Low and Slow
Place the baking sheets in the preheated oven and bake for 1 hour and 30 minutes. Do not open the oven door during this time! The sudden rush of cool air can cause the meringues to crack or deflate. After 90 minutes, turn off the oven but leave the meringues inside to cool completely—at least 2 hours, or overnight if you have the patience.
Step 10: Check for Doneness
The meringues are done when they lift easily off the parchment paper and sound hollow when tapped on the bottom. They should be crisp all the way through, not chewy or sticky. If they’re still soft in the center, return them to the turned-off oven for another 30 minutes.
Cooking Tips & Techniques
After making about a dozen batches of these ghost meringue cookies (not an exaggeration—my family has been very supportive), here are my best tips:
Humidity is the enemy. Meringue hates moisture. If it’s a rainy or humid day, your meringue might end up sticky or weeping. Wait for a dry day, or run a dehumidifier in your kitchen. I once made these during a thunderstorm and ended up with flat, sad puddles instead of ghosts.
Perfect peaks every time. The key to stiff peaks is patience. Don’t rush the sugar addition. And if you think you’ve over-whipped, you probably have—the meringue will look grainy and separated. If that happens, start over. I’ve saved a batch by adding one more room-temperature egg white and re-whipping, but it’s not guaranteed.
Room temperature eggs are everything. Seriously, I cannot stress this enough. Cold eggs take forever to whip and never reach the same volume. Set them out 30 minutes before you start, or place them in a bowl of warm water for 5 minutes if you’re in a rush.
Don’t overmix the chocolate chips. Fold them in gently with a rubber spatula. Overmixing deflates the meringue and makes the ghosts flat. I use a light hand and stop as soon as the chips are distributed.
Storage secrets. These meringues are hygroscopic, which means they absorb moisture from the air. Store them in an airtight container at room temperature for up to 2 weeks. If they get sticky, pop them back in a 200°F oven for 15 minutes to re-crisp.
Variations & Adaptations
One of the best things about these ghost meringue cookies is how easy they are to customize. Here are some of my favorite variations:
Dietary Adaptations
- Vegan: Use aquafaba (the liquid from a can of chickpeas) instead of egg whites. 3 tablespoons of aquafaba equals one egg white. Whip it the same way—it works surprisingly well!
- Sugar-Free: Substitute the granulated sugar with an equal amount of powdered erythritol or monk fruit sweetener. The texture will be slightly different—less crispy, more chewy—but still delicious.
- Nut-Free: This recipe is naturally nut-free, but check your chocolate chips for cross-contamination warnings if you’re serving someone with allergies.
Flavor Twists
- Peppermint Ghosts: Replace the vanilla with 1/2 teaspoon peppermint extract. Add crushed candy canes on top before baking for a festive holiday version.
- Chocolate Meringue: Sift 2 tablespoons of cocoa powder with the sugar before adding. The ghosts will be a pale brown, but they’ll taste like chocolate clouds.
- Lemon Meringue: Add 1 teaspoon of lemon zest and replace the vanilla with lemon extract. These are bright, tangy, and perfect for spring.
Seasonal Variations
- Christmas Ghosts: Use red and green sprinkles instead of chocolate chips for a festive look.
- Valentine’s Day: Add a drop of pink gel food coloring and use heart-shaped sprinkles for the faces.
- Easter: Tint the meringue pastel colors and use mini candy eggs for decoration.
I once tried a pumpkin spice version with cinnamon and nutmeg—it was amazing, but the ghosts ended up looking more like blobs than spirits. Still delicious, just not as cute. Sometimes the best experiments don’t look perfect, but they taste incredible.
Serving & Storage Suggestions
These ghost meringue cookies are best served at room temperature. The texture is perfectly crisp, and the chocolate chips are firm but not hard. Here’s how to make the most of them:
Presentation Ideas:
– Arrange them on a black platter for maximum spooky effect
– Serve them alongside hot cocoa or apple cider for a cozy Halloween treat
– Place them in a glass jar tied with orange ribbon for a ghoulish gift
– Use them as cupcake toppers for a Halloween dessert table
Storage Instructions:
– Store in an airtight container at room temperature for up to 2 weeks
– Do not refrigerate—the moisture will make them sticky
– For longer storage, freeze in a single layer in a freezer-safe bag for up to 3 months
– To re-crisp, place in a 200°F oven for 10-15 minutes
Flavor Development:
These meringues actually improve after a day or two. The flavors meld together, and the texture becomes even more crisp and light. I always make them a day before I plan to serve them. Just keep them in a cool, dry place away from direct sunlight.
Pairing Suggestions:
– With a glass of cold milk (classic and perfect)
– Crumbled over vanilla ice cream for a spooky sundae
– Dipped in melted dark chocolate for an extra indulgent treat
– Served alongside fresh berries for a lighter option
Nutritional Information & Benefits
Per serving (1 ghost meringue cookie, based on 24 cookies):
- Calories: 42
- Total Fat: 0.5g
- Saturated Fat: 0.3g
- Cholesterol: 0mg
- Sodium: 12mg
- Total Carbohydrates: 9g
- Dietary Fiber: 0g
- Sugars: 9g
- Protein: 1g
Health Benefits:
– Low in calories: At only 42 calories per cookie, these are a guilt-free Halloween treat
– Fat-free: Meringue is naturally fat-free (the tiny amount of fat comes from the chocolate chips)
– Gluten-free: Perfect for those with gluten sensitivities or celiac disease
– Dairy-free: No butter, milk, or cream in this recipe
– Egg whites: Provide high-quality protein with zero fat
Dietary Considerations:
– Naturally gluten-free and dairy-free
– Can be made sugar-free with erythritol or monk fruit
– Not suitable for those with egg allergies (unless using aquafaba)
– Always check chocolate chip labels for dairy if serving someone with allergies
I love that these cookies let me enjoy a sweet treat without the heavy feeling that comes with traditional cookies. They’re light, airy, and feel like a little cloud of happiness—perfect for a health-conscious Halloween.
Conclusion
These light and airy ghost meringue cookies have become a staple in my Halloween rotation, and I honestly can’t imagine the season without them. They’re fun to make, adorable to look at, and absolutely delicious to eat. Whether you’re a seasoned baker or someone who’s never made meringue before, this recipe is forgiving, foolproof, and full of personality.
I love how customizable they are—you can make them spooky, silly, or elegant depending on your mood. And the best part? They’re actually good for you compared to most Halloween treats. No butter, no oil, just pure, sweet, airy goodness.
I’d love to see your ghost creations! Tag me in your photos, leave a comment below with your favorite variation, or share this recipe with a friend who needs a little Halloween magic in their life. Trust me, once you make these, you’ll be making them every year. Happy Halloween, and happy baking!
Frequently Asked Questions
Can I make these ghost meringue cookies in advance?
Absolutely! In fact, they’re better when made a day ahead. Store them in an airtight container at room temperature for up to 2 weeks. Just make sure they’re completely cool before storing.
Why did my meringue turn out sticky?
Sticky meringue usually means it wasn’t baked long enough or the humidity was too high. Pop them back in a 200°F oven for 15-20 minutes to dry them out further. Next time, check the weather before baking—dry days are best.
Can I use liquid egg whites from a carton?
Yes, you can! Just make sure they’re at room temperature before whipping. Carton egg whites sometimes have stabilizers that can affect whipping, so add an extra 1/4 teaspoon of cream of tartar to help them hold their shape.
How do I know when the meringue is fully baked?
The meringues should lift easily off the parchment paper and sound hollow when tapped on the bottom. If they’re still soft or sticky, they need more time. Don’t rush the process—low and slow is the key.
Can I freeze these ghost meringue cookies?
Yes! Freeze them in a single layer in a freezer-safe bag for up to 3 months. Thaw at room temperature for 15 minutes before serving. If they seem soft after thawing, re-crisp them in a 200°F oven for 10 minutes.
Pin This Recipe!
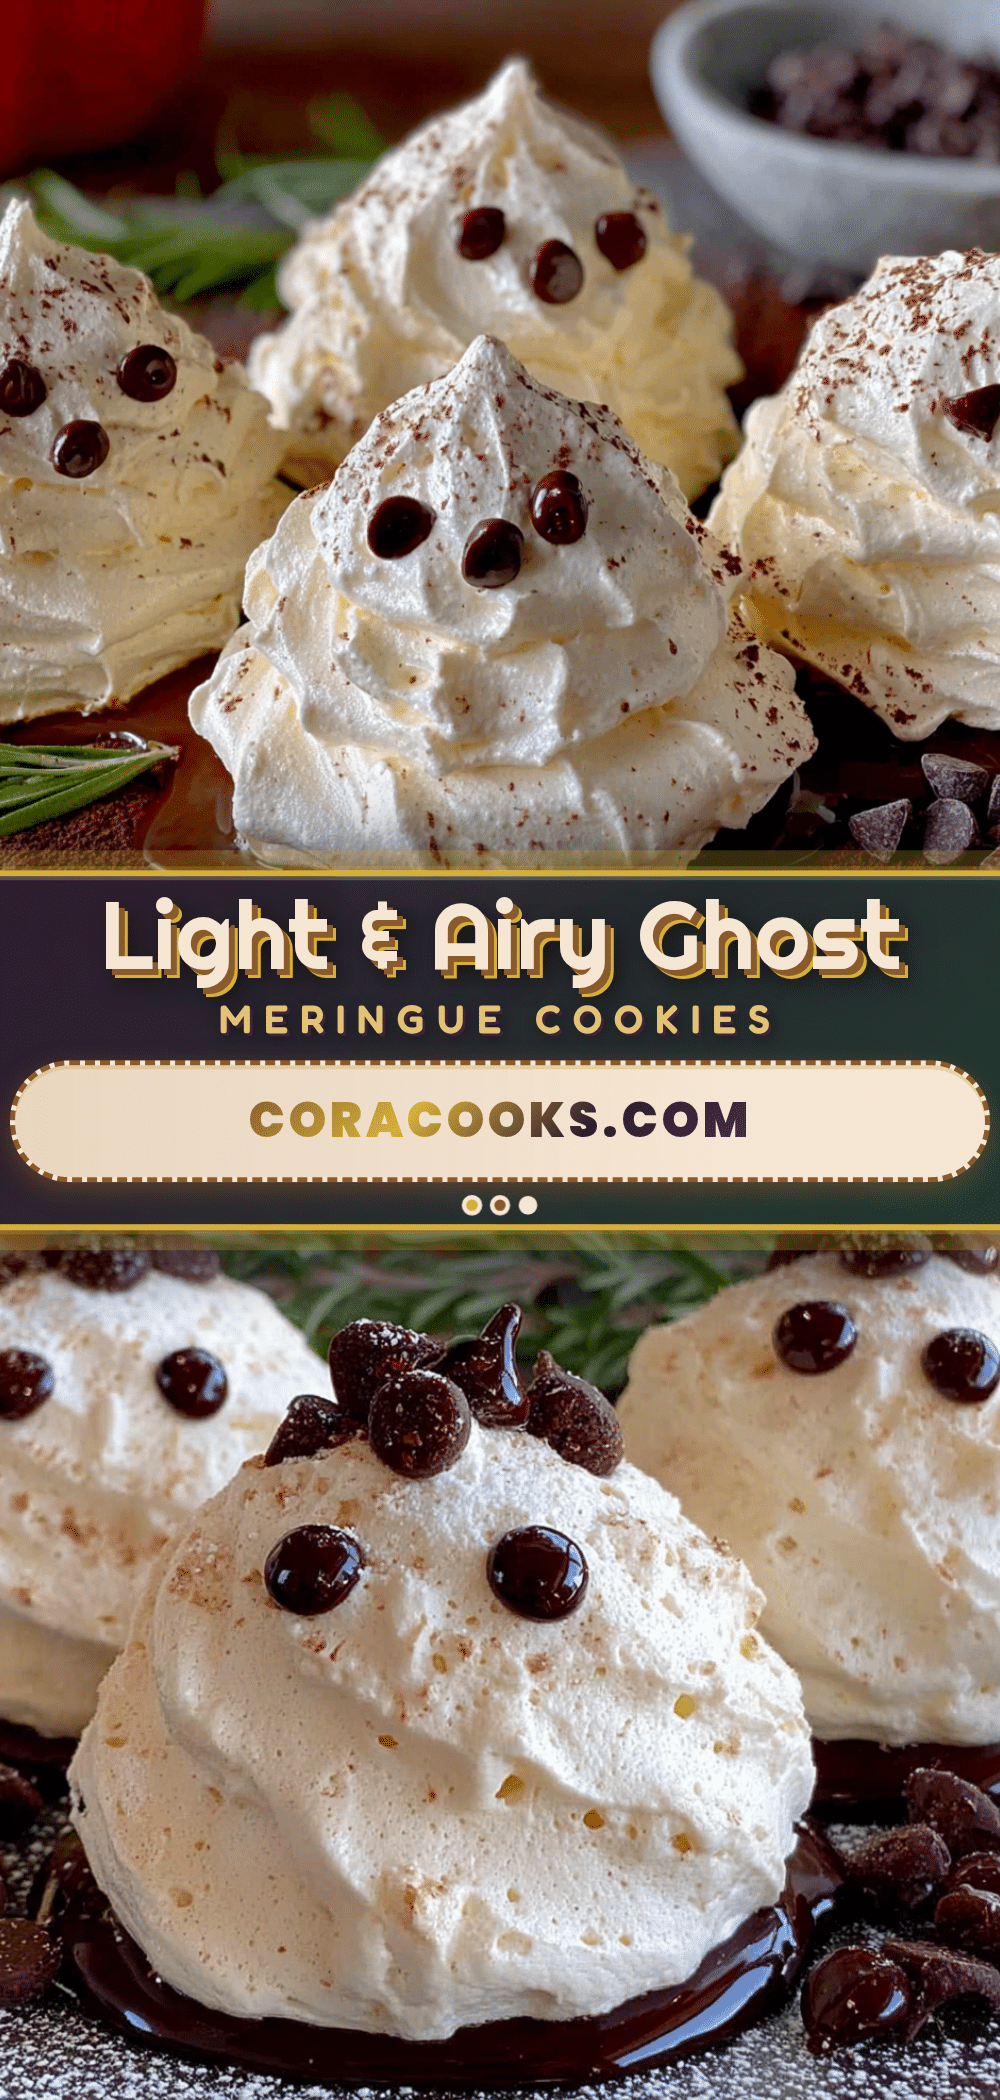
Best Easy Ghost Meringue Cookies for Halloween Fun
These light and airy ghost meringue cookies are the perfect Halloween treat—crispy on the outside, melt-in-your-mouth sweet, and decorated with adorable chocolate chip faces. Made with simple ingredients and no fancy equipment, they’re gluten-free, dairy-free, and a crowd-pleaser for kids and adults alike.
- Prep Time: 20 minutes
- Cook Time: 1 hour 30 minutes
- Total Time: 2 hours (plus cooling time)
- Yield: 24 cookies 1x
- Category: Dessert
- Cuisine: American
Ingredients
- 4 large egg whites, room temperature
- 1 cup (200g) granulated sugar
- 1/2 teaspoon cream of tartar
- 1 teaspoon vanilla extract (pure)
- Pinch of salt
- 1/4 cup mini chocolate chips
Instructions
- Preheat oven to 200°F (95°C). Line two large baking sheets with parchment paper.
- Separate egg whites while cold; place whites in mixing bowl and let sit at room temperature for 30 minutes.
- Add cream of tartar and salt to egg whites. Mix on medium speed until frothy and bubbly, about 2 minutes.
- With mixer on medium-high speed, add sugar one tablespoon at a time, then whip on high speed until stiff, glossy peaks form (6-8 minutes for stand mixer, 10-12 for hand mixer).
- Add vanilla extract and whip 30 seconds until combined.
- Drop rounded spoonfuls of meringue onto prepared baking sheets, spacing 2 inches apart. Use back of spoon to gently pull up a small peak at the top for the ghost’s head.
- Press two mini chocolate chips into each ghost for eyes and one for the mouth.
- Bake for 1 hour 30 minutes without opening the oven door.
- Turn off oven and leave meringues inside to cool completely, at least 2 hours or overnight.
- Check for doneness: meringues should lift easily off parchment and sound hollow when tapped on bottom.
Notes
Humidity is the enemy of meringue—bake on a dry day if possible. Room temperature eggs are crucial for proper whipping. Do not open oven door during baking. Store in airtight container at room temperature for up to 2 weeks. For vegan version, use aquafaba (3 tablespoons per egg white).
Nutrition
- Serving Size: 1 ghost meringue coo
- Calories: 42
- Sugar: 9
- Sodium: 12
- Fat: 0.5
- Saturated Fat: 0.3
- Carbohydrates: 9
- Protein: 1
Keywords: ghost meringue cookies, Halloween cookies, meringue cookies, easy Halloween treats, gluten-free Halloween cookies, dairy-free cookies, ghost cookies