Love this? Save it for later!
Share the inspiration with your friends
Introduction
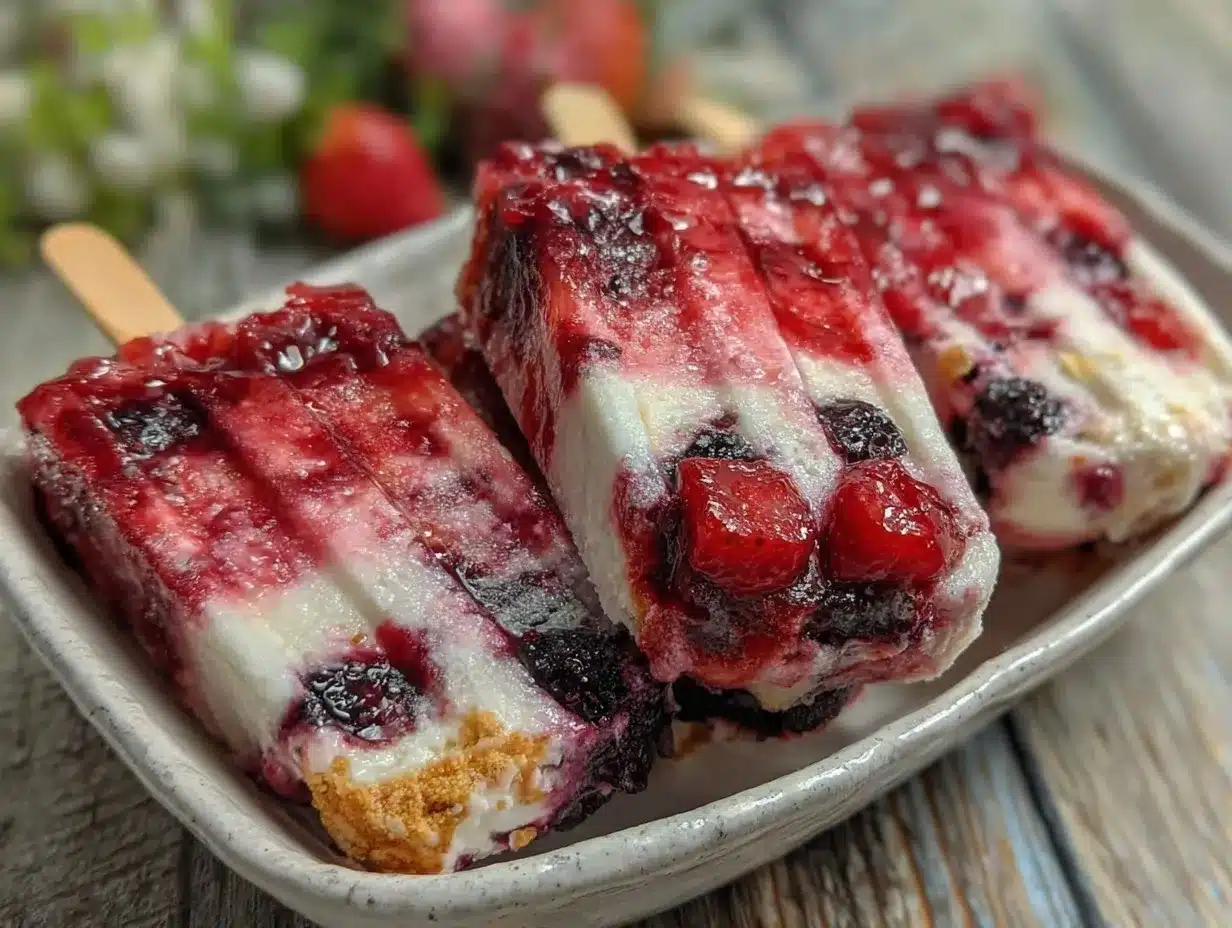
“Last Fourth of July, I found myself rummaging through the freezer in a bit of a panic. The neighborhood block party was starting in less than an hour, and I’d promised something festive but fresh. Honestly, I wasn’t planning anything fancy—just something quick to beat the heat and honor the holiday. Then, as I was digging around, I spotted a forgotten bag of frozen strawberries, a container of blueberries, and a carton of coconut milk. An idea sparked right there in my kitchen, with a little mess on the counter and a cracked popsicle mold that made me laugh.
Maybe you’ve been there—stuck for a last-minute summer treat but wanting to impress without stress. These Refreshing Red White and Blue Popsicles came out so vibrant and tasty that I ended up making a double batch the next weekend. The layers of fruity sweetness and creamy coolness were just the perfect way to chill out on a hot day. Let me tell you, it’s not just about the colors; it’s the way the flavors meld together that keeps me coming back. I’m pretty sure you’ll love how easy and fun they are, especially when kids and neighbors start asking for seconds.”
Why You’ll Love This Recipe
Having made these popsicles dozens of times, I can confidently say this recipe is a summer winner. Here’s why it’s become a staple in my kitchen:
- Quick & Easy: Ready in under 15 minutes of prep, these popsicles are perfect for last-minute celebrations or those spontaneous sunny afternoons.
- Simple Ingredients: No specialty stores required—just fresh or frozen fruit, a little coconut milk, and natural sweetener. You probably have everything already.
- Perfect for Summer Parties: Whether it’s a backyard barbecue, a pool day, or a festive holiday, these popsicles bring a patriotic pop of color and flavor.
- Crowd-Pleaser: Kids love the sweet layers, and adults appreciate the fresh, not-too-sugary taste. They’re fun for all ages.
- Unbelievably Delicious: The creamy white layer balances the tart berries, creating a refreshing treat that’s light but satisfying.
This isn’t just any popsicle recipe. The secret lies in layering the ingredients just right—the berry puree keeps its vibrant punch, while the coconut milk adds a silky texture that melts perfectly. I’ve tested this recipe on friends and family, and it’s always a hit. Honestly, it’s the kind of treat that makes you pause and smile after the first lick. If you want a homemade summer snack that’s both festive and fuss-free, this is your go-to recipe.
What Ingredients You Will Need
This recipe uses simple, wholesome ingredients to deliver bold flavor and satisfying texture without the fuss. Most are pantry staples or easy to find frozen fruits.
- For the Red Layer:
- 1 ½ cups frozen strawberries (or fresh, hulled and sliced)
- 2 tablespoons honey or maple syrup (adjust to taste)
- 1 tablespoon fresh lemon juice (adds brightness)
- For the White Layer:
- 1 cup coconut milk (full-fat for creaminess; use Silk brand for great texture)
- 2 tablespoons powdered sugar or sweetener of choice
- ½ teaspoon pure vanilla extract
- For the Blue Layer:
- 1 ½ cups frozen blueberries (fresh works too)
- 2 tablespoons honey or maple syrup
- 1 tablespoon fresh lemon juice
You can swap the coconut milk for almond or oat milk if you prefer a different flavor or need a dairy-free option. For a lower sugar version, reduce the honey or use a natural sweetener like stevia. When using fresh fruit, slightly reduce the lemon juice to avoid overpowering tartness. I find frozen berries give the best texture and color contrast—especially if you live somewhere with limited fresh fruit options in summer.
Equipment Needed
- Popsicle molds (plastic or silicone work well; I love silicone because the popsicles pop out easier)
- Blender or food processor (for pureeing the fruit layers)
- Measuring cups and spoons
- Mixing bowls
- Spatula or spoon for layering
- Optional: popsicle sticks if your molds don’t include them
If you don’t have popsicle molds, small paper cups with wooden sticks or plastic spoons can work in a pinch. I’ve used mini muffin tins lined with foil and inserted sticks before when molds were missing. Just freeze longer to ensure firmness. For cleaning, a soak in warm water helps with sticky coconut milk residue. Budget-friendly molds are easy to find online or at kitchen stores and make the process way less messy.
Preparation Method
- Prepare the Red Layer:
Place the frozen strawberries, honey, and lemon juice in the blender. Blend until smooth but still slightly textured—about 30 seconds. If the puree is too thick, add a tablespoon of water to help it blend without watering down flavor. Pour the strawberry mixture evenly into the popsicle molds, filling about one-third of each. Tap molds gently on the counter to release air bubbles.
Freeze for 30–40 minutes until the layer is firm but not completely solid.
- Prepare the White Layer:
Mix the coconut milk, powdered sugar, and vanilla extract in a bowl until well combined. Stir gently to avoid creating bubbles. Remove the molds from the freezer and carefully spoon or pour the coconut milk mixture over the red layer, filling molds to two-thirds full.
Freeze for another 30–40 minutes until this layer firms up.
- Prepare the Blue Layer:
Blend the blueberries with honey and lemon juice until smooth. Like the red layer, you want a thick but pourable consistency. Pour the blueberry mix over the white layer, filling the rest of the mold.
Insert popsicle sticks if your molds require it at this stage.
Freeze the popsicles for at least 4 hours, preferably overnight, to fully set.
- Unmolding:
To remove the popsicles, briefly run warm water over the outside of the molds for 10–15 seconds. Gently pull the popsicles free—don’t force it or they might break.
Tip: Plan ahead for freezing times to avoid rushed popsicle making. If you’re short on time, freeze layers partially and use a hairdryer on low heat around the mold edges to speed up unmolding. Expect some drips and a little mess; it’s part of the fun!
Cooking Tips & Techniques
When making layered popsicles, patience is key. Let each layer firm up enough so the colors don’t blend, but not so solid that the next layer won’t stick. I learned this the hard way after a few disappointing runs where the layers mixed into a purple mess.
Using frozen fruit helps keep the purees thick and vibrant, avoiding watery popsicles. If your blender struggles with frozen berries, add a splash of cold water or juice to ease blending without diluting flavor.
Sweetness levels can vary depending on your fruit’s ripeness. Taste each puree before layering and adjust honey or sweetener accordingly. I sometimes swap honey for agave or maple syrup based on what’s on hand or to suit dietary needs.
Multi-task by prepping all purees first, then layering quickly to prevent melting. If you’re making these for a party, assemble in stages—freeze the base layers earlier in the day and add the top layer just before guests arrive.
One last tip: popsicle molds with a tight seal around sticks prevent drips and freezer burn better. If yours don’t have lids, wrap trays in plastic wrap to keep popsicles fresh.
Variations & Adaptations
Feel free to switch things up to keep this recipe fresh and suit your taste or dietary needs:
- Dairy-Free & Vegan: This recipe is naturally dairy-free using coconut milk. For a nut-free option, stick to canned coconut milk instead of almond or oat milk.
- Flavor Twists: Swap the strawberry layer for raspberries or watermelon puree for a different red hue. Blueberry can be replaced with blackberries or a mix of blueberries and purple grapes for a richer color.
- Sugar-Free: Skip the honey and add a bit of mashed ripe banana or use a natural sweetener like monk fruit or stevia, adjusting amounts to taste.
- Adult Version: Add a splash of lemon vodka or rum to the white layer for a boozy twist (freeze well before serving and consume responsibly!).
- Extra Creamy: Stir in a little Greek yogurt into the coconut milk for tang and thickness.
I once made a batch using fresh peaches and blueberries with a hint of mint for a garden party, and it was a total crowd-pleaser—experimenting is half the fun!
Serving & Storage Suggestions
Serve these popsicles straight from the freezer on a warm summer day for instant refreshment. They look fantastic presented in a clear glass vase filled with ice, surrounded by fresh berries for a festive touch.
Complement these popsicles with light summer snacks like watermelon salad, grilled chicken skewers, or a crisp lemonade. They’re also perfect after a sunny beach day or poolside chill session.
Store leftovers in the freezer in an airtight container or zipped bag to avoid freezer burn. For best texture, eat within a week. If you freeze longer, the coconut milk layer might get a bit icy.
Reheating isn’t really needed, but if the popsicles are too hard to bite, leave them on the counter for 5 minutes before serving. Flavors stay fresh, and the layers keep their pretty colors even after a few days.
Nutritional Information & Benefits
Each popsicle is approximately 100-120 calories, depending on sweetener and portion size. They’re light, low-fat, and packed with antioxidants from the berries.
Strawberries and blueberries provide vitamin C and fiber, supporting immune health and digestion. Coconut milk adds healthy fats that give a satisfying creamy texture without dairy allergens.
This recipe is naturally gluten-free, dairy-free, and can be easily adapted for low-sugar or vegan diets. It’s a smart way to enjoy a sweet summer treat without the guilt or artificial ingredients.
Personally, I love that these popsicles offer a little wellness boost alongside fun—perfect for family-friendly snacking that feels both indulgent and nourishing.
Conclusion
Honestly, these Refreshing Red White and Blue Popsicles have become my go-to summer treat—not just for holidays but whenever the heat demands something cool and colorful. They’re simple enough to whip up on a whim, but special enough to make any occasion feel festive. I hope you enjoy customizing this recipe to your taste and making it your own. Maybe you’ll find yourself reaching for these popsicles on a random sunny afternoon, just like I do.
If you try them out, I’d love to hear your twists and favorite flavor combos. Drop a comment below or share your stories—there’s nothing better than hearing how a simple recipe like this brings a little joy and refreshment to your day. So go ahead, grab those berries, and make summer a bit sweeter!
FAQs
Can I use fresh fruit instead of frozen for these popsicles?
Yes! Fresh fruit works well, though frozen berries help keep the puree thick and the popsicles firmer. If using fresh, consider adding a bit of ice or freezing the popsicles a bit longer.
How long should I freeze the popsicles for best results?
Freeze each layer for about 30-40 minutes before adding the next. Once fully assembled, freeze the popsicles for at least 4 hours or overnight for best firmness.
Can I make these popsicles without added sweeteners?
Absolutely. If your fruit is very ripe and sweet, you might not need extra sweetener. You can also substitute sweeteners with mashed banana or leave them out entirely for a more tart treat.
What if I don’t have popsicle molds?
You can use small paper cups or silicone muffin tins. Insert wooden sticks or spoons as handles and freeze as usual. Just be sure to cover the tops with foil or plastic wrap to avoid freezer odors.
How do I prevent the layers from mixing together?
The key is to let each layer partially freeze until firm but not rock solid before adding the next. This helps keep clean, distinct layers and a pretty color contrast.
For a fun twist on summer treats, this recipe pairs nicely with the crispy garlic chicken I shared last month—both are perfect for backyard gatherings. And if you want a refreshing drink to go alongside, check out the homemade lemonade with a twist recipe that’s equally easy and crowd-pleasing.
Pin This Recipe!

Refreshing Red White and Blue Popsicles
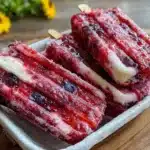
These vibrant and tasty layered popsicles combine fruity sweetness and creamy coconut milk for a perfect homemade summer treat that’s quick and easy to make.
- Prep Time: 15 minutes
- Cook Time: 5 hours
- Total Time: 5 hours 15 minutes
- Yield: 8 popsicles 1x
- Category: Dessert
- Cuisine: American
Ingredients
- 1 ½ cups frozen strawberries (or fresh, hulled and sliced)
- 2 tablespoons honey or maple syrup (adjust to taste)
- 1 tablespoon fresh lemon juice
- 1 cup coconut milk (full-fat for creaminess; Silk brand recommended)
- 2 tablespoons powdered sugar or sweetener of choice
- ½ teaspoon pure vanilla extract
- 1 ½ cups frozen blueberries (fresh works too)
- 2 tablespoons honey or maple syrup
- 1 tablespoon fresh lemon juice
Instructions
- Prepare the Red Layer: Place the frozen strawberries, honey, and lemon juice in the blender. Blend until smooth but still slightly textured—about 30 seconds. If the puree is too thick, add a tablespoon of water to help it blend without watering down flavor. Pour the strawberry mixture evenly into the popsicle molds, filling about one-third of each. Tap molds gently on the counter to release air bubbles.
- Freeze for 30–40 minutes until the layer is firm but not completely solid.
- Prepare the White Layer: Mix the coconut milk, powdered sugar, and vanilla extract in a bowl until well combined. Stir gently to avoid creating bubbles. Remove the molds from the freezer and carefully spoon or pour the coconut milk mixture over the red layer, filling molds to two-thirds full.
- Freeze for another 30–40 minutes until this layer firms up.
- Prepare the Blue Layer: Blend the blueberries with honey and lemon juice until smooth. Like the red layer, you want a thick but pourable consistency. Pour the blueberry mix over the white layer, filling the rest of the mold.
- Insert popsicle sticks if your molds require it at this stage.
- Freeze the popsicles for at least 4 hours, preferably overnight, to fully set.
- Unmolding: To remove the popsicles, briefly run warm water over the outside of the molds for 10–15 seconds. Gently pull the popsicles free—don’t force it or they might break.
Notes
Use frozen fruit for best texture and color contrast. Let each layer freeze until firm but not rock solid before adding the next to prevent mixing. If you don’t have molds, use small paper cups or silicone muffin tins with sticks. To speed up unmolding, run warm water briefly around the mold edges. Adjust sweetness to taste and experiment with fruit substitutions or add a boozy twist for adults.
Nutrition
- Serving Size: 1 popsicle
- Calories: 110
- Sugar: 14
- Sodium: 15
- Fat: 5
- Saturated Fat: 4.5
- Carbohydrates: 18
- Fiber: 3
- Protein: 1
Keywords: popsicles, summer treats, red white and blue, patriotic dessert, coconut milk popsicles, berry popsicles, dairy-free, vegan, gluten-free