Love this? Save it for later!
Share the inspiration with your friends
Introduction
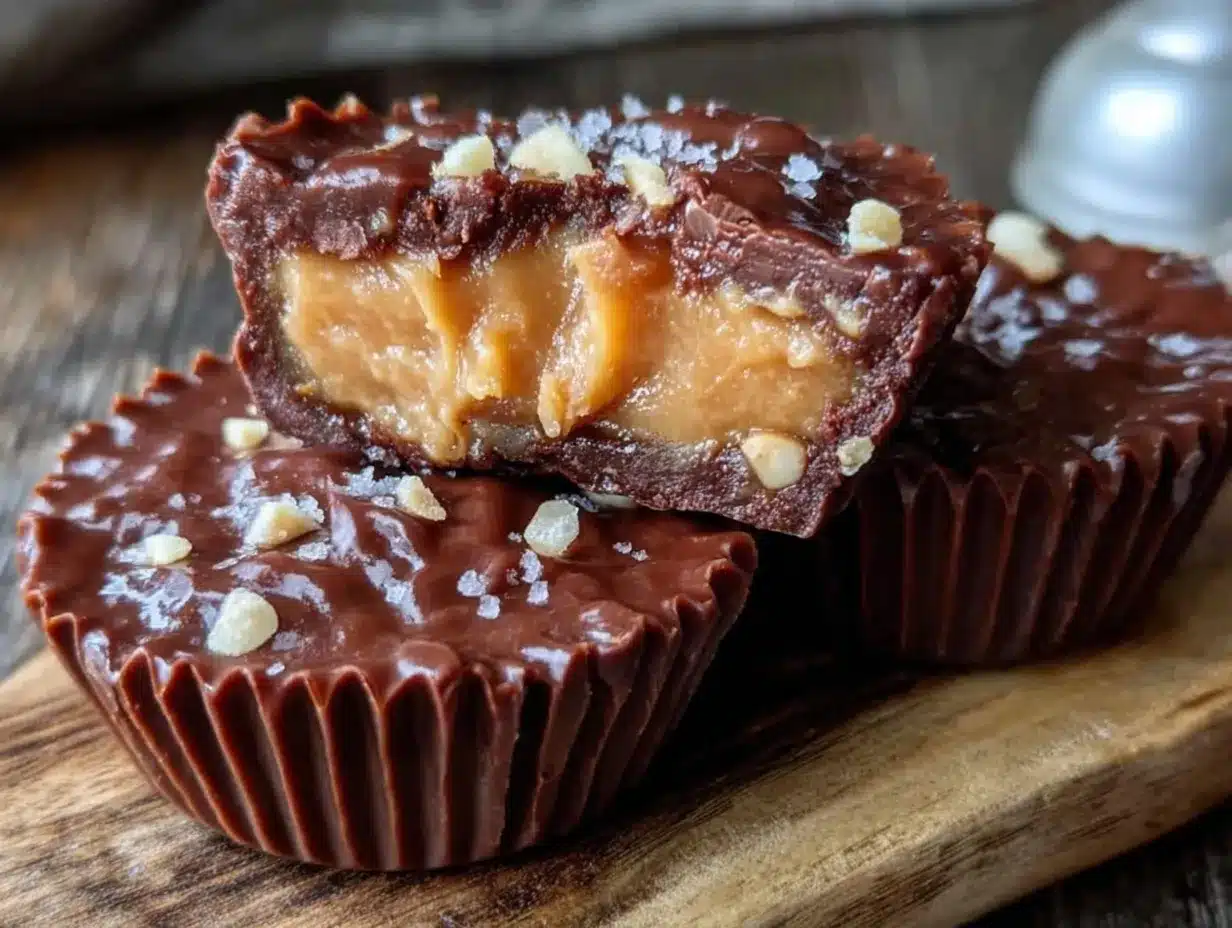
“You won’t believe this started as a midnight kitchen experiment,” I said to my roommate, holding up a slightly misshapen peanut butter cup. It was 1:37 AM on a random Wednesday, and honestly, I was just craving something sweet but low on carbs. The fridge was practically empty except for some almond flour, peanut butter, and a few other essentials. I figured, why not try whipping up a keto-friendly version of those classic peanut butter cups I used to devour as a kid?
The funny thing is, I totally forgot to set a timer, and halfway through, I realized I’d left my notes on the counter and almost mixed up the filling ingredients. The kitchen looked like a peanut butter tornado had hit it, but the result? Absolutely worth the chaos. This easy keto peanut butter cups recipe with a creamy 3-ingredient filling became my go-to sweet treat for when I want indulgence without the sugar crash.
Maybe you’ve been there too—needing a quick, satisfying snack that fits your keto lifestyle but doesn’t taste like cardboard. Honestly, this recipe checks all those boxes and then some. Let me tell you, the rich chocolate shell paired with that smooth, dreamy filling is pure magic. If you’ve ever thought keto desserts were boring, this will change your mind. Plus, it’s simple enough to whip up even if you’re not a seasoned baker.
Why You’ll Love This Recipe
This easy keto peanut butter cups recipe is one I’ve tested time and again to get just right, and it’s family-approved (even by the peanut butter skeptics). Here’s why it stands out:
- Quick & Easy: Ready in under 30 minutes, perfect for those last-minute sweet cravings or busy weeknights.
- Simple Ingredients: Uses pantry staples you probably already have—no hunting down weird keto products.
- Perfect for Snacking or Gifting: Great for keto friends or anyone who loves a rich, satisfying treat.
- Crowd-Pleaser: Always gets compliments at potlucks or family gatherings, no one guesses it’s keto!
- Unbelievably Delicious: The creamy 3-ingredient filling is silky smooth, balancing perfectly with the dark chocolate shell.
What makes this recipe different? Well, the filling isn’t just peanut butter and sweetener slapped together. I blend in a bit of cream cheese and vanilla extract to get that ultra-smooth texture that melts in your mouth. It’s not overly sweet, just the right touch to satisfy your sweet tooth while keeping carbs low. Honestly, it’s the kind of treat that makes you close your eyes after the first bite and say, “Yep, this is the one.”
What Ingredients You Will Need
This recipe uses simple, wholesome ingredients to deliver bold flavor and satisfying texture without any fuss. You can find everything at your local grocery store or your favorite keto-friendly market.
- For the Chocolate Shell:
- 1 cup unsweetened baking chocolate (preferably 70% cocoa or higher; I recommend Ghirardelli for a smooth melt)
- 2 tbsp coconut oil (adds shine and helps the chocolate set firmly)
- 1-2 tbsp erythritol or preferred keto sweetener (adjust to taste)
- For the Creamy Filling:
- ½ cup natural peanut butter, smooth (look for no added sugar or oils; Justin’s brand works well)
- ¼ cup cream cheese, softened (full fat for best texture)
- 1 tsp vanilla extract (just a splash to brighten flavors)
- Optional: a pinch of salt if your peanut butter is unsalted
If you want to switch things up, try almond butter instead of peanut butter, or use a sugar-free maple syrup if you prefer liquid sweetener in the filling. For dairy-free options, use coconut cream in place of cream cheese—though the texture will be slightly different, it’s still delicious!
Equipment Needed
- Microwave-safe bowl or double boiler: For melting chocolate gently without burning.
- Muffin tin or silicone candy molds: Silicone molds work great for easy release; if you don’t have molds, a lined mini muffin tin works fine.
- Spoon or small spatula: For spreading and layering chocolate and filling.
- Mixing bowl and hand mixer or fork: To blend the creamy filling ingredients until smooth.
- Refrigerator space: To chill and set the cups properly.
If you don’t own a hand mixer, no worries—just stir the filling vigorously with a fork or whisk until smooth, it might take a bit longer but it works. For melting chocolate, I prefer the double boiler method to avoid scorching, but the microwave on 30-second intervals with stirring works too.
Preparation Method
- Prepare your molds: Line a mini muffin tin with paper liners or grease silicone molds lightly with coconut oil. This makes removing the peanut butter cups easier.
- Melt the chocolate shell: In a microwave-safe bowl, combine 1 cup unsweetened baking chocolate, 2 tbsp coconut oil, and 1-2 tbsp erythritol. Microwave in 30-second bursts, stirring in between, until smooth and glossy. (About 2-3 minutes total.)
- Form the chocolate base: Spoon about 1 tbsp of the melted chocolate into each mold, spreading it evenly across the bottom and slightly up the sides. Pop the tray into the fridge for 10 minutes to firm up.
- Make the creamy filling: While the chocolate sets, mix ½ cup smooth natural peanut butter, ¼ cup softened cream cheese, and 1 tsp vanilla extract in a bowl. Beat until the mixture is silky and well combined. Taste and add a pinch of salt if needed.
- Layer the filling: Once the chocolate bases are firm, add about 1 tbsp of the creamy peanut butter filling on top of each. Flatten gently with the back of a spoon.
- Seal with chocolate: Cover the filling with another tablespoon of melted chocolate, making sure to seal the edges. This keeps the filling nicely encased.
- Chill to set: Refrigerate the peanut butter cups for at least 30 minutes until fully firm and set.
- Serve and enjoy: Carefully peel off liners or pop out from molds. Keep stored in the fridge for best texture and freshness.
If you find the chocolate thickens too much while working, just warm it slightly again but don’t overheat, or it may seize. Also, try to work quickly when layering so the chocolate doesn’t harden before you finish.
Cooking Tips & Techniques
There are a few little tricks I learned after messing up my first batch (spoiler: the filling was lumpy and the chocolate cracked). Here’s what works best:
- Use room temperature cream cheese: It blends into the peanut butter far more smoothly, no lumps or gritty texture.
- Don’t rush the chocolate setting: Letting the chocolate chill well between layers prevents cracking and keeps the cups neat.
- Temper the chocolate if possible: If you want a shiny finish and snap, tempering makes a difference. But if you’re short on time, melting gently works just fine.
- Choose a keto sweetener you like: Some erythritol brands can have a cooling effect; monk fruit blends tend to be milder. Adjust to your taste.
- Multitasking tip: While the chocolate chills, whip up the filling to save time and keep things moving smoothly.
I remember one time I skipped chilling the base layer, and the filling sank right through—lesson learned! Taking your time really pays off, especially with layered treats like this.
Variations & Adaptations
This recipe is super adaptable—here are some ideas I’ve tried or thought up for mixing things up:
- Nut-Free Version: Swap peanut butter for sunflower seed butter to avoid allergens, especially great if you’re making these for a crowd.
- Chocolate Variations: Use white chocolate (keto-friendly varieties only) for a sweeter shell, or swirl in some cinnamon for a warm twist.
- Flavor Boosters: Add a pinch of cayenne or chili powder to the chocolate for a spicy kick, or mix in a little espresso powder for mocha vibes.
- Seasonal Twist: Add crushed peppermint candy or orange zest to the filling for holidays.
- Dairy-Free Filling: Use full-fat coconut cream instead of cream cheese; whip it to a fluffy texture before mixing in peanut butter and vanilla.
Once, I tossed in a tablespoon of sugar-free caramel sauce into the filling—unexpectedly good but a little messier. If you like experimenting, this recipe is forgiving and fun!
Serving & Storage Suggestions
These keto peanut butter cups are best served chilled—they hold their shape and have a satisfying snap when you bite in. You can let them sit out for 5-10 minutes before eating if you prefer a softer texture.
Pair them with a hot cup of coffee or a glass of unsweetened almond milk for a perfect afternoon treat. They also make thoughtful homemade gifts—just pack them in a pretty box lined with parchment.
For storage, keep them in an airtight container in the refrigerator for up to two weeks. They freeze well too; just thaw in the fridge overnight before enjoying. Reheating isn’t necessary, but if you want a softer filling, leave at room temperature for a short while.
Over time, the flavors meld beautifully, making leftovers even better the next day—if you have any, that is!
Nutritional Information & Benefits
Each keto peanut butter cup contains approximately:
| Calories | Fat | Carbohydrates | Fiber | Net Carbs | Protein |
|---|---|---|---|---|---|
| 120 kcal | 11 g | 4 g | 2 g | 2 g | 4 g |
Thanks to the natural fats from peanut butter and coconut oil, these cups provide sustained energy without spiking blood sugar. Peanut butter is a good source of healthy fats and protein, while the cream cheese adds creaminess and richness without excess carbs.
This treat fits nicely into a low-carb, ketogenic lifestyle and is gluten-free. Just watch for nut allergies if you’re serving a crowd. Personally, I appreciate how this recipe satisfies my sweet tooth while keeping me on track with my nutrition goals.
Conclusion
Honestly, this easy keto peanut butter cups recipe with its creamy 3-ingredient filling is a keeper. It’s simple, quick, and tastes way better than any store-bought keto snack I’ve found. Whether you’re new to keto or a seasoned pro, these little cups deliver the perfect balance of indulgence and health-conscious ingredients.
Feel free to tweak the filling or chocolate to your liking—make it your own. I still make a batch every couple of weeks, especially when I need a reliable sweet fix that won’t derail my progress.
If you try it, I’d love to hear how you customized yours or if you ran into any funny kitchen mishaps (because, believe me, I’ve had plenty!). Drop a comment below and share your thoughts. Happy snacking!
FAQs
Can I use crunchy peanut butter for the filling?
Yes, but the filling won’t be as smooth. If you like a bit of texture, go for it, but I recommend smooth for the creamiest results.
How long do these keto peanut butter cups last?
They keep well in the fridge for up to two weeks and freeze nicely for up to three months.
Is there a sugar-free alternative to erythritol?
Yes, monk fruit sweetener or stevia blends work well. Just adjust the amount to your taste since sweetness levels vary.
Can I make this recipe vegan?
Swap cream cheese for coconut cream and use dairy-free chocolate. The texture might differ slightly but still delicious.
Do I need to temper the chocolate?
Not necessarily. Tempering helps with shine and snap but gently melting the chocolate is fine for home use.
Pin This Recipe!
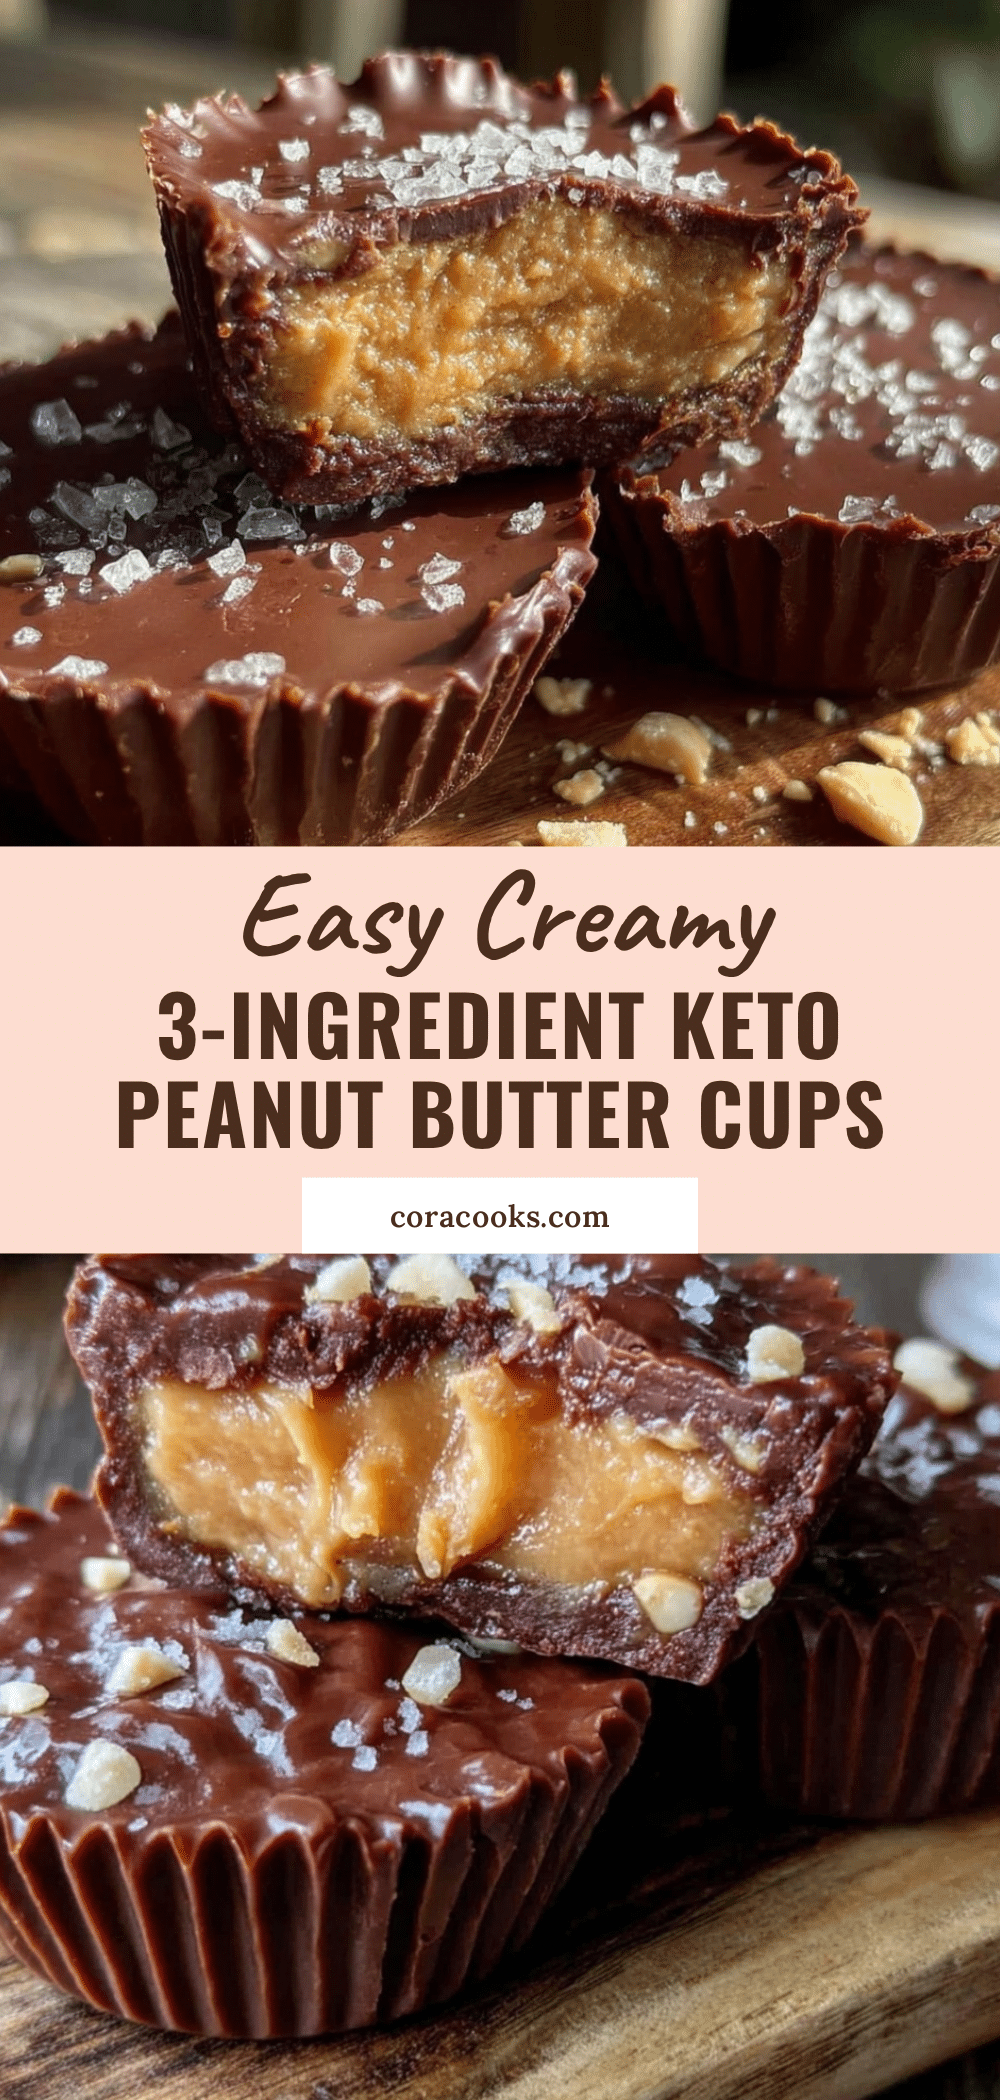
Easy Keto Peanut Butter Cups Recipe with Creamy 3-Ingredient Filling
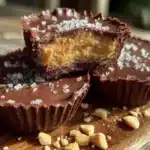
A quick and easy keto-friendly peanut butter cups recipe featuring a creamy 3-ingredient filling and a rich chocolate shell, perfect for satisfying sweet cravings without the sugar crash.
- Prep Time: 10 minutes
- Cook Time: 20 minutes
- Total Time: 30 minutes
- Yield: 12 servings 1x
- Category: Dessert
- Cuisine: American
Ingredients
- 1 cup unsweetened baking chocolate (preferably 70% cocoa or higher)
- 2 tbsp coconut oil
- 1–2 tbsp erythritol or preferred keto sweetener
- 1/2 cup natural peanut butter, smooth (no added sugar or oils)
- 1/4 cup cream cheese, softened (full fat)
- 1 tsp vanilla extract
- Optional: a pinch of salt if peanut butter is unsalted
Instructions
- Prepare your molds: Line a mini muffin tin with paper liners or grease silicone molds lightly with coconut oil.
- Melt the chocolate shell: In a microwave-safe bowl, combine 1 cup unsweetened baking chocolate, 2 tbsp coconut oil, and 1-2 tbsp erythritol. Microwave in 30-second bursts, stirring in between, until smooth and glossy (about 2-3 minutes total).
- Form the chocolate base: Spoon about 1 tbsp of the melted chocolate into each mold, spreading it evenly across the bottom and slightly up the sides. Refrigerate for 10 minutes to firm up.
- Make the creamy filling: Mix 1/2 cup smooth natural peanut butter, 1/4 cup softened cream cheese, and 1 tsp vanilla extract in a bowl. Beat until silky and well combined. Add a pinch of salt if needed.
- Layer the filling: Once the chocolate bases are firm, add about 1 tbsp of the creamy peanut butter filling on top of each. Flatten gently with the back of a spoon.
- Seal with chocolate: Cover the filling with another tablespoon of melted chocolate, making sure to seal the edges.
- Chill to set: Refrigerate the peanut butter cups for at least 30 minutes until fully firm and set.
- Serve and enjoy: Carefully peel off liners or pop out from molds. Store in the refrigerator for best texture and freshness.
Notes
Use room temperature cream cheese for smooth filling. Let chocolate chill well between layers to prevent cracking. Temper chocolate if possible for shiny finish but gentle melting works fine. Adjust sweetener to taste. Work quickly when layering chocolate to avoid hardening.
Nutrition
- Serving Size: 1 peanut butter cup
- Calories: 120
- Fat: 11
- Carbohydrates: 4
- Fiber: 2
- Protein: 4
Keywords: keto peanut butter cups, low carb dessert, keto snack, sugar-free chocolate, creamy peanut butter filling, keto dessert recipe