Love this? Save it for later!
Share the inspiration with your friends
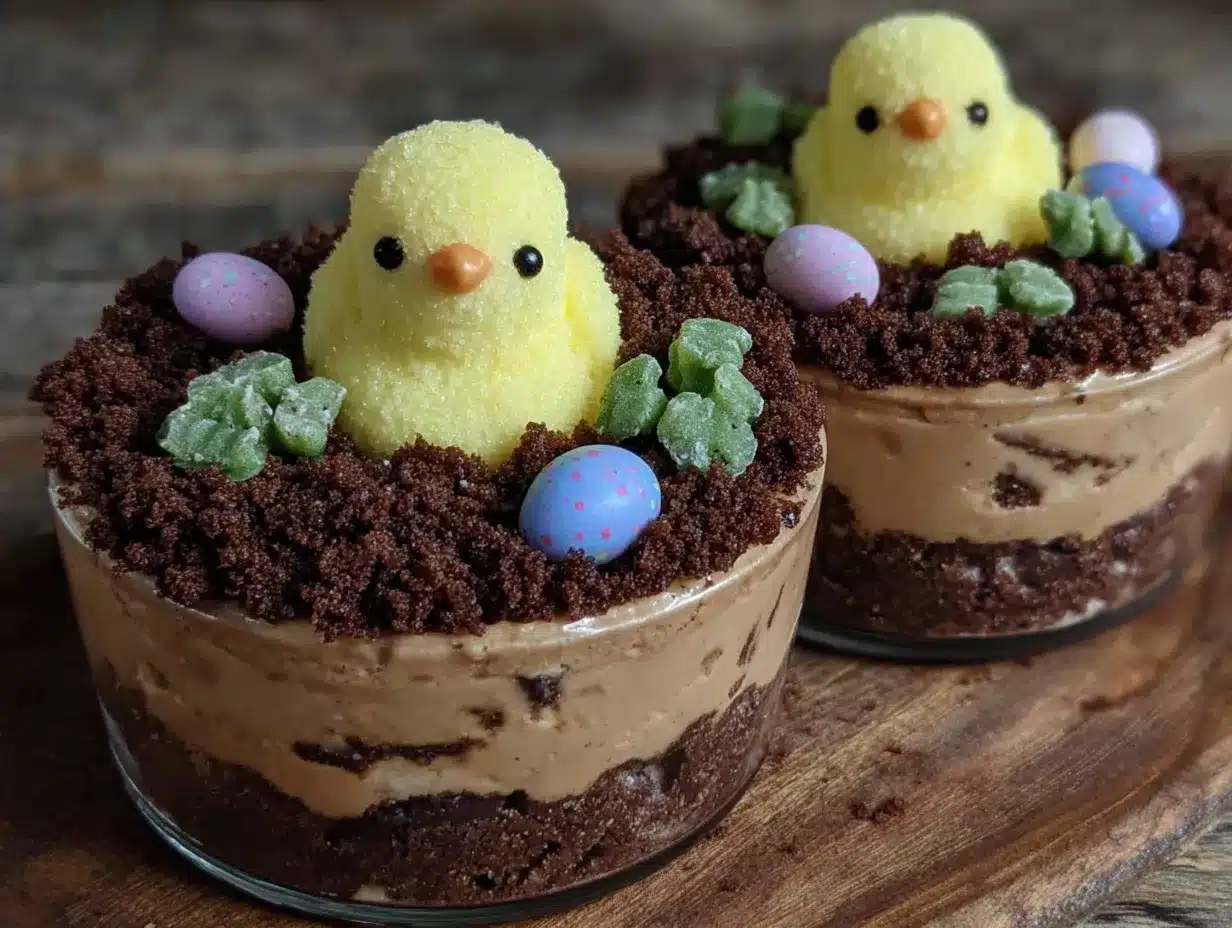
“You know that feeling when you walk into a party and the dessert table just makes you stop in your tracks?” That happened to me last spring at a friend’s casual Easter brunch. Among all the fancy pastries and colorful candies, these playful little cups caught my eye — Easy Easter Nest Dirt Cups with Oreo Soil and Peeps Chicks perched on top. Honestly, I wasn’t expecting much beyond a fun kid-friendly treat, but as soon as I tasted one, I was hooked. The contrast of creamy pudding, crumbly Oreo “soil,” and sugary marshmallow chicks was delightfully nostalgic and surprisingly satisfying.
Funny thing is, I found myself trying to recreate that moment in my own kitchen the very next weekend. I had a cracked mixing bowl, a half-empty container of pudding, and a slightly chaotic afternoon ahead (because, well, toddlers don’t exactly wait patiently). But the mess, the laughs, and the sweet result made it all worth it. Maybe you’ve been there — scrambling to whip up something last-minute that ends up stealing the show? That’s exactly what these Easy Easter Nest Dirt Cups are: simple, fun, and a little bit magical.
So whether you’re planning an Easter gathering, a springtime treat for the kids, or just craving a whimsical dessert, this recipe will feel like a little celebration in every spoonful. Let me tell you why these dirt cups have stuck around in my rotation (and why they just might in yours too)!
Why You’ll Love This Recipe
After making these Easy Easter Nest Dirt Cups more times than I can count, I can confidently say they’re a winner for so many reasons. I mean, they’re not only kid-approved but also a breeze to put together—even if your kitchen looks like a tiny tornado just passed through.
- Quick & Easy: Ready in under 20 minutes. Perfect for last-minute Easter celebrations or when you need a cheerful dessert fast.
- Simple Ingredients: No obscure items here—just pudding, Oreos, and those iconic Peeps chicks you find at every springtime store.
- Perfect for Kids’ Parties: The playful look and sweet taste always get little hands reaching for seconds (and adults too, honestly).
- Crowd-Pleaser: Even people who usually shy away from overly sweet desserts find these just right—balanced between creamy and crunchy.
- Unbelievably Delicious: That Oreo crumb “soil” adds just the right texture and chocolate punch, making every bite a little adventure.
What sets this recipe apart? I like to gently crush the Oreos by hand instead of blitzing them in a food processor. It keeps the soil chunky and rustic, which makes the nests look more authentic. Plus, layering the pudding just right so it peeks through the “soil” every now and then is a little trick I picked up from watching a local baker’s Instagram stories. This recipe isn’t just sweet; it’s got character. It’s the kind of dessert that makes you smile before you even taste it—and that’s why it keeps popping up at my table.
What Ingredients You Will Need
This recipe uses simple, wholesome ingredients to create a fun and festive dessert without the fuss. Most are pantry staples or easy to grab from your local store during Easter season.
- Vanilla pudding mix: Instant pudding works best for quick setup (I like Jell-O brand for its creamy texture).
- Milk: 2 cups (480 ml) whole or 2% milk for rich flavor; can substitute almond or oat milk if dairy-free.
- Oreos: About 20 sandwich cookies, crushed (regular or Golden Oreos—both work well; I prefer regular for the chocolatey “soil” effect).
- Peeps chicks: One pack (about 10 chicks) to decorate the nests—choose your favorite colors!
- Whipped topping: 1 cup (240 ml), store-bought or homemade, to add fluffiness and nest-like appearance.
- Optional garnishes: Mini chocolate eggs, shredded coconut (to mimic grass), or edible flowers for an extra festive touch.
If you want to customize, you can swap Oreos for gluten-free cookies or use sugar-free pudding mix. For a dairy-free version, coconut milk and dairy-free whipped topping work nicely. I once tried mixing in a spoonful of peanut butter into the pudding for a richer flavor twist—it was surprisingly good!
Equipment Needed
- Mixing bowl: A medium to large bowl for mixing pudding (glass or plastic both work fine; I prefer glass because it doesn’t stain).
- Whisk or electric mixer: To blend pudding mix and milk smoothly without lumps.
- Measuring cups and spoons: For accuracy, especially when measuring liquids and dry ingredients.
- Spatula: Useful for folding whipped topping into pudding gently.
- Small cups or dessert glasses: For serving—anything from clear plastic cups to small mason jars makes the layers visible and pretty.
- Rolling pin or plastic bag: To crush Oreos; a gentle hand crush keeps the cookie chunks rustic.
Don’t have a whisk? A fork works too! And if you’re short on dessert cups, small bowls or even cupcake liners can do the trick. I’ve learned that sometimes the simplest tools bring the best results, so no need to buy fancy equipment for these dirt cups.
Preparation Method
- Prepare the pudding: In a mixing bowl, whisk together the instant vanilla pudding mix and 2 cups (480 ml) of milk until smooth and thickened, about 2 minutes. Let it sit for 5 minutes to fully set.
- Crush the Oreos: Place the Oreos in a large resealable plastic bag. Using a rolling pin or your hands, crush them into coarse crumbs—aim for a mixture of fine crumbs and small chunks to mimic soil texture.
- Fold in whipped topping: Gently fold 1 cup (240 ml) of whipped topping into the set pudding until combined and fluffy. This step gives the pudding a lighter texture that holds up nicely under the cookie crumbs.
- Assemble the cups: Spoon a layer of Oreo crumbs into the bottom of each serving cup, filling about one-third of the way. Then add a layer of the pudding mixture, followed by another layer of Oreo crumbs on top.
- Create the nests: Use a spoon to gently press the top Oreo layer down and shape a slight hollow or nest in the center for the Peeps chicks.
- Decorate: Place one or two Peeps chicks in each nest, arranging them so they look like little baby birds in their cozy homes. Add optional mini chocolate eggs or shredded coconut around the chicks for extra flair.
- Chill and serve: Refrigerate the cups for at least 30 minutes before serving to allow flavors to meld and the pudding to firm up a bit more. Serve chilled and watch everyone smile!
Quick tip: If you find the Oreo crumbs too coarse, give them a few more gentle crushes. But don’t go all powdery—texture is key here. Also, if your pudding thickens too fast, just whisk in a tablespoon of milk to loosen it.
Cooking Tips & Techniques
Making these Easy Easter Nest Dirt Cups is straightforward, but a few tricks can make your dessert shine. First, don’t rush the pudding setting time. Instant pudding thickens quickly, but letting it rest in the fridge while you prep other ingredients results in a creamier, more stable texture.
When crushing Oreos, I learned that over-processing them into fine powder loses the “soil” charm. Hand-crushing preserves chunkiness, which makes the nests look more natural (and adds a satisfying crunch).
Folding the whipped topping into the pudding instead of stirring vigorously keeps the mixture airy and light. I used to mix it too aggressively, ending up with a dense pudding that felt heavy on the palate.
For decorating, placing the Peeps chicks carefully is essential—they’re delicate and can crumble if pressed too hard. I like to use tweezers for precise placement when making larger batches.
Lastly, these cups are best served chilled but not frozen. Freezing changes the texture of the pudding and Oreo crumbs, making the dessert less enjoyable.
Variations & Adaptations
Want to switch things up? Here are a few ideas to customize your dirt cups:
- Chocolate Lover’s Nest: Use chocolate pudding instead of vanilla for a richer, deeper flavor profile.
- Fruit-Infused: Add a layer of fresh berries (like raspberries or sliced strawberries) between the pudding and Oreo crumbs for a pop of color and freshness.
- Nut-Free Version: Substitute whipped topping with coconut cream to keep it dairy-free and allergen-friendly.
- Healthy Twist: Use Greek yogurt mixed with a little honey instead of pudding for a tangy, protein-packed version.
- Seasonal Adaptation: Swap Peeps chicks with miniature candy eggs or jelly beans for a more neutral springtime treat.
Personally, I once tried layering crushed graham crackers with cinnamon instead of Oreos for a “garden dirt” flavor that surprised everyone at a potluck. It’s fun to experiment and find what your family loves best!
Serving & Storage Suggestions
These dirt cups are best served chilled to keep the pudding creamy and the Oreo crumbs crunchy. I like to serve them straight from the fridge, especially on warm spring days. Present them in clear cups or mason jars to showcase the layers—trust me, the visual is half the fun!
Pair these cups with light beverages like iced tea or lemonade to balance the sweetness. For a brunch, they complement savory dishes like quiches or fresh fruit salads quite nicely.
To store, cover the cups tightly with plastic wrap or lids and refrigerate for up to 2 days. The Oreo soil will soften a bit over time but still tastes delicious. Avoid freezing, as it alters the texture.
When reheating (if you must), let the cups come to room temperature and stir gently before serving, though honestly, they’re best cold.
Nutritional Information & Benefits
Each serving of these Easy Easter Nest Dirt Cups contains approximately 250 calories, with 5 grams of protein and moderate sugar content from the pudding and Peeps. The Oreos add a bit of indulgence but also provide fiber from the cookie crumbs.
Using milk provides calcium and vitamin D, and opting for low-fat or plant-based milk can reduce saturated fat. While this dessert is a treat, it’s a fun way to enjoy festive flavors without going overboard.
The playful presentation encourages kids to try new textures and enjoy a sweet snack in moderation. For allergy concerns, swapping ingredients as mentioned earlier keeps the recipe accessible to most diets.
Conclusion
If you’re looking for a dessert that brings smiles, nostalgia, and a touch of whimsy to your Easter or spring celebrations, these Easy Easter Nest Dirt Cups are a no-brainer. They’re simple to make, fun to eat, and perfect for involving kids in the kitchen (mess and all!).
Feel free to tweak the toppings or pudding flavors to match your family’s taste. Honestly, once you try this recipe, it becomes one of those sweet staples that pops up year after year.
Give it a go, share your version, and maybe even surprise your guests with these charming nests. I’d love to hear how you make them your own—drop a comment or share your tips!
Happy Easter and happy munching!
FAQs
Can I make these dirt cups ahead of time?
Yes! You can assemble them a few hours ahead and keep them refrigerated. Just add the Peeps chicks right before serving to keep them looking fresh.
What if I can’t find Peeps chicks?
No worries! Mini marshmallow eggs, jelly beans, or even small fruit pieces make great alternatives for decorating the nests.
Can I use homemade pudding instead of instant?
Absolutely! Homemade pudding works well but may require longer chilling time to set properly before assembling the cups.
Are these dirt cups gluten-free?
Traditional Oreos contain gluten, so for a gluten-free version, use certified gluten-free sandwich cookies or substitute with crushed gluten-free graham crackers.
How do I keep the Oreo soil crunchy?
Serve the cups chilled and avoid assembling too far in advance. Crushing the Oreos by hand rather than blending helps keep chunks intact for better texture.
By the way, if you enjoy fun, kid-friendly desserts, you might also like my easy no-bake chocolate peanut butter bars or the colorful rainbow fruit parfaits, both perfect for spring gatherings.
Pin This Recipe!
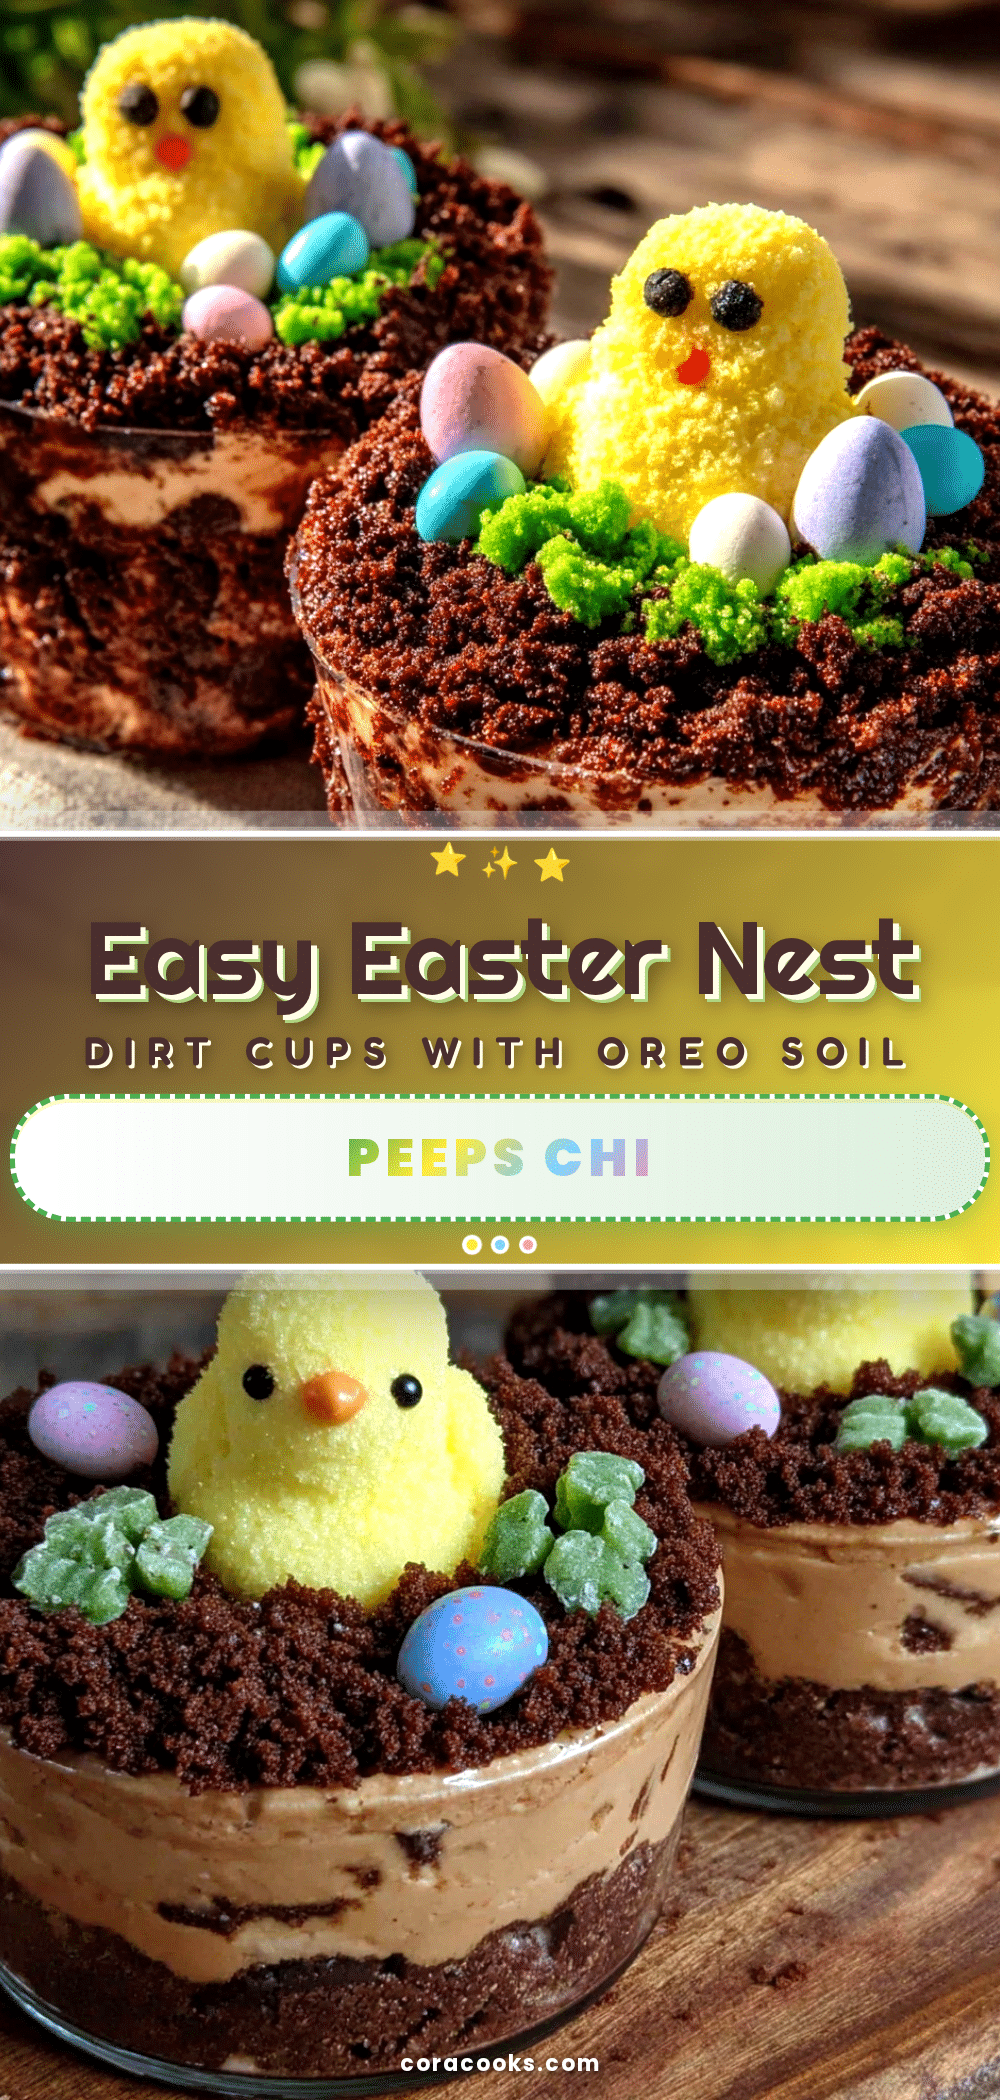
Easy Easter Nest Dirt Cups Recipe with Oreo Soil and Peeps Chicks for Kids

A fun and kid-friendly dessert featuring creamy vanilla pudding layered with chunky crushed Oreos as soil and decorated with colorful Peeps chicks, perfect for Easter or spring celebrations.
- Prep Time: 10 minutes
- Cook Time: 0 minutes
- Total Time: 40 minutes
- Yield: 10 servings 1x
- Category: Dessert
- Cuisine: American
Ingredients
- 1 package instant vanilla pudding mix
- 2 cups (16 fl oz) whole or 2% milk (can substitute almond or oat milk for dairy-free)
- About 20 Oreo sandwich cookies, crushed (regular or Golden Oreos)
- 1 pack Peeps chicks (about 10 chicks)
- 1 cup (8 fl oz) whipped topping, store-bought or homemade
- Optional garnishes: mini chocolate eggs, shredded coconut, edible flowers
Instructions
- In a mixing bowl, whisk together the instant vanilla pudding mix and 2 cups (16 fl oz) of milk until smooth and thickened, about 2 minutes. Let it sit for 5 minutes to fully set.
- Place the Oreos in a large resealable plastic bag. Using a rolling pin or your hands, crush them into coarse crumbs—aim for a mixture of fine crumbs and small chunks to mimic soil texture.
- Gently fold 1 cup (8 fl oz) of whipped topping into the set pudding until combined and fluffy.
- Spoon a layer of Oreo crumbs into the bottom of each serving cup, filling about one-third of the way. Then add a layer of the pudding mixture, followed by another layer of Oreo crumbs on top.
- Use a spoon to gently press the top Oreo layer down and shape a slight hollow or nest in the center for the Peeps chicks.
- Place one or two Peeps chicks in each nest, arranging them so they look like little baby birds in their cozy homes. Add optional mini chocolate eggs or shredded coconut around the chicks for extra flair.
- Refrigerate the cups for at least 30 minutes before serving to allow flavors to meld and the pudding to firm up a bit more. Serve chilled.
Notes
Hand-crush Oreos to keep chunky texture for authentic soil look. Let pudding set fully before folding in whipped topping. Chill cups at least 30 minutes before serving. Avoid freezing to maintain texture. Peeps chicks are delicate; use tweezers for precise placement if desired. For gluten-free, use certified gluten-free cookies. Dairy-free options include almond/oat milk and dairy-free whipped topping.
Nutrition
- Serving Size: 1 cup (one dirt cup)
- Calories: 250
- Sugar: 25
- Sodium: 180
- Fat: 10
- Saturated Fat: 4
- Carbohydrates: 38
- Fiber: 2
- Protein: 5
Keywords: Easter dessert, dirt cups, Oreo pudding cups, Peeps chicks dessert, kid-friendly dessert, no-bake dessert, spring dessert