Love this? Save it for later!
Share the inspiration with your friends
“You gotta try my dad’s smash burger,” my coworker Mark said one afternoon, sliding a greasy paper wrapper across the breakroom table. Honestly, I wasn’t expecting much—just another run-of-the-mill burger. But the moment I bit into that crispy, melty masterpiece, I was hooked.
Turns out, Mark’s dad isn’t just any weekend griller. He’s got this knack for smashing ground beef into thin patties on a scorching hot griddle, building layers of flavor with perfectly browned edges and cheese that oozes just right. It’s simple, yet every bite feels like a revelation.
I remember that day vividly—the faint sizzle still echoing in my ears, the unmistakable aroma of caramelized onions wafting through the office, and the slight mess the burger made as cheese dripped onto my fingers. Maybe you’ve been there, caught off guard by a humble burger that turns out to be unforgettable. This recipe for Crispy Dad’s Famous Smash Burgers with Melty Cheese is exactly that kind of game-changer.
After several attempts and tweaking the technique myself, I finally nailed the balance between crispy edges and juicy center. Let me tell you, this burger isn’t just about satisfying hunger; it’s about savoring a moment. Whether you’re feeding a crowd or just craving that perfect melty cheeseburger, this recipe stays with you long after the last bite.
Why You’ll Love This Recipe
Let me share why these Crispy Dad’s Famous Smash Burgers with Melty Cheese are my go-to whenever the craving hits or guests drop by unannounced.
- Quick & Easy: From prep to plate in under 25 minutes—perfect for those busy weeknights or spontaneous cookouts.
- Simple Ingredients: No need for fancy or hard-to-find items. Just quality ground beef, cheese, and a few pantry staples.
- Perfect for Any Occasion: Whether it’s a casual family dinner, a backyard party, or even a cozy solo treat, these burgers hit the spot.
- Crowd-Pleaser: Kids, adults, picky eaters—you name it. Everyone raves about the crunch and gooey cheese combo.
- Unbelievably Delicious: The magic lies in the smash technique that creates crispy edges and juicy insides, paired with cheese that melts right into every nook.
This isn’t just another burger recipe—it’s a lovingly tested method passed down and perfected through trial, error, and plenty of hungry tummies. The secret? Pressing the meat just right, using a hot griddle, and layering cheese at the perfect moment. I promise, once you make these, you’ll understand why they’re famous in our circle.
What Ingredients You Will Need
This recipe uses straightforward, wholesome ingredients to deliver bold flavor and that signature crispy texture without fuss. Most are pantry staples or easy to source at any grocery store.
- Ground Beef (80/20 blend): 1 pound (450g) – The fat content is key for juicy, flavorful patties. I usually go with local grass-fed beef when available.
- Salt and Freshly Ground Black Pepper: To season the patties just before cooking.
- Cheese Slices: 4 slices of American or sharp cheddar cheese – melts beautifully for that gooey finish.
- Soft Burger Buns: 4, lightly toasted – I recommend potato buns for their tenderness and slight sweetness.
- Butter: 2 tablespoons, softened – For toasting buns to golden perfection.
- Optional Toppings: Thinly sliced onions, pickles, lettuce, tomato slices, ketchup, mustard, or your favorite burger sauce.
Quick tip: If you want a slightly healthier twist, you can swap out American cheese for Swiss or provolone, though the meltiness varies slightly. Also, for a gluten-free option, grab buns made from almond flour or enjoy the burgers wrapped in lettuce leaves.
Equipment Needed
- Cast Iron Skillet or Heavy Griddle: Essential for even heat distribution and achieving that signature crust. I’ve tried non-stick pans, but they just don’t get the same sear.
- Sturdy Metal Spatula: A wide, flat spatula helps you smash the patties evenly and flip without breaking them.
- Kitchen Tongs: Handy for lifting buns and adjusting toppings.
- Small Bowl or Brush: For spreading butter on buns.
If you don’t own a cast iron skillet yet, don’t sweat it. A heavy stainless steel pan can work in a pinch. Just make sure it’s preheated well to get that crispy crust. Personally, I find my Lodge cast iron skillet indispensable—it’s seasoned over years and adds a subtle depth of flavor. Plus, it’s budget-friendly and lasts forever with proper care.
Preparation Method
- Preheat your skillet or griddle: Place your cast iron skillet on medium-high heat and let it get really hot—about 5 minutes. You want it screaming hot to get that crispy sear.
- Prepare the beef: Divide 1 pound (450g) of ground beef into 4 equal balls (around 4 ounces or 115g each). Don’t overwork the meat; keep it loose for tenderness.
- Butter and toast the buns: While the skillet heats, spread softened butter on the cut sides of the buns. Toast them in a separate pan or after cooking the patties, about 1-2 minutes until golden brown.
- Smash the patties: Place one beef ball onto the hot skillet. Using your spatula, press down firmly for 10-15 seconds until the patty is about ¼ inch (6mm) thick. Hold the pressure—this is what creates those crispy edges!
- Season: Sprinkle salt and pepper on the exposed side immediately after smashing.
- Cook the first side: Let the patty cook undisturbed for 2-3 minutes. You’ll see juices bubbling up and edges crisping nicely.
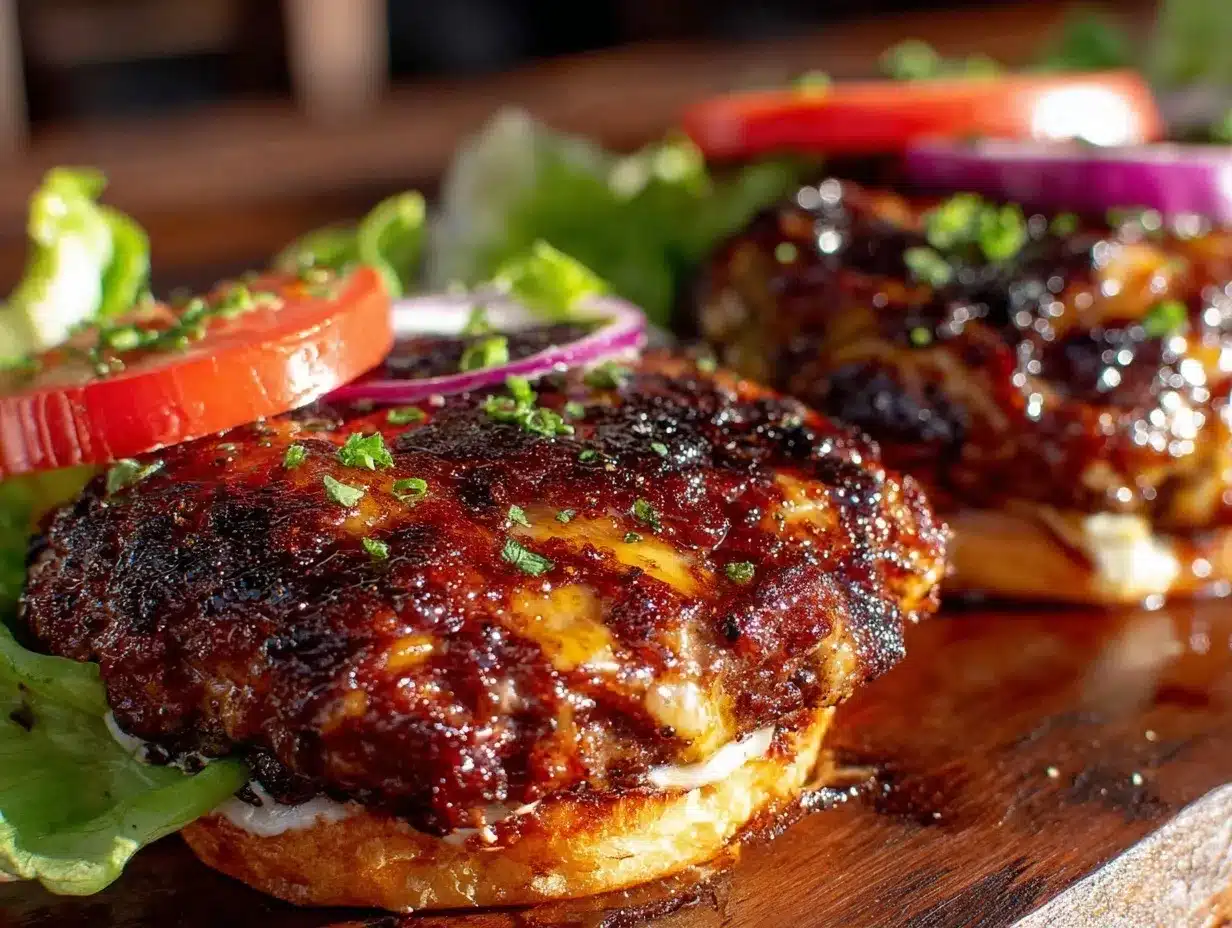
- Flip and add cheese: Flip the patty gently with your spatula. Quickly place a slice of cheese on top. Cook another 1-2 minutes until the cheese melts and the burger is cooked through.
- Assemble the burger: Place the patty with melted cheese on the toasted bun bottom. Add your preferred toppings—maybe some tangy pickles or fresh lettuce.
- Serve immediately: Top with the bun crown and enjoy the melty, crispy goodness while it’s hot.
Pro tip: Don’t overcrowd the skillet; cook in batches if needed to maintain high heat. Also, a little mess is part of the fun—don’t stress if cheese drips or patties stick a bit. It’s all part of the authentic experience!
Cooking Tips & Techniques
Getting the perfect smash burger is part technique, part instinct. Here’s what I’ve learned along the way:
- Use cold beef: Keep your ground beef chilled until right before cooking. Warm meat won’t hold together as well and won’t create that crisp crust.
- Press firmly but not too thin: Smash enough to get a crispy edge but avoid making the patty paper-thin. About ¼ inch thickness is ideal.
- Don’t press after flipping: Once flipped, let the burger cook undisturbed to keep juices inside.
- Layer your cheese fast: Add cheese immediately after flipping so it melts perfectly while the second side cooks.
- Control your heat: Too low and you’ll miss the crust; too high and the burger burns before cooking through. Medium-high on cast iron works best.
I once tried to rush and smashed with too little pressure—resulted in a sad, thick patty with no crispy bits. Lesson learned! Also, multitasking helps: while one batch cooks, toast buns and prep toppings to keep the flow going.
Variations & Adaptations
Feel free to tweak this recipe to suit your tastes or dietary needs:
- Cheese swaps: Try pepper jack for a spicy kick or Swiss for a nuttier flavor.
- Seasoning blends: Add garlic powder, smoked paprika, or a dash of cayenne to the beef before smashing for extra depth.
- Vegetarian version: Use plant-based burger patties like Beyond or Impossible and follow the same smashing technique on a griddle.
- Cooking method: For outdoor grilling, use a flat top grill and smash with a heavy spatula or burger press.
- Gluten-free: Swap regular buns for gluten-free varieties or serve wrapped in lettuce.
One time, I tested a bacon jam spread on these burgers—game changer! The sweet-savory combo with the crispy edges was unforgettable. Don’t be afraid to get creative.
Serving & Storage Suggestions
Serve these burgers hot, fresh off the skillet, with your favorite sides—think crispy fries, coleslaw, or even a tangy pickle spear. A cold soda or craft beer pairs nicely too.
If you have leftovers (rare, but it happens!), wrap burgers tightly in foil and refrigerate for up to 2 days. Reheat gently in a skillet over medium heat to preserve crispiness—microwaving will make them soggy.
Flavor-wise, these burgers are best enjoyed immediately, as the cheese is meltiest and the crust crispiest. That said, flavors meld nicely if you prepare toppings or sauces ahead and assemble at serving.
Nutritional Information & Benefits
Estimated per burger (without toppings): approximately 450 calories, 30g protein, 30g fat, and 2g carbs.
Ground beef provides a good source of iron and vitamin B12, important for energy and overall health. Choosing leaner blends can reduce fat content if desired. Cheese adds calcium and protein.
This recipe is naturally gluten-free if served without regular buns or with gluten-free alternatives, and can fit into a low-carb lifestyle by swapping buns for lettuce wraps.
Personally, I find this burger a satisfying, balanced indulgence that fuels me without overdoing it—perfect after a long day when comfort food is exactly what you need.
Conclusion
These Crispy Dad’s Famous Smash Burgers with Melty Cheese have become a staple in my kitchen and one of those rare recipes I keep coming back to. They’re simple, fast, and deliver that unbeatable combo of crunch and gooey cheese that just hits the spot.
Don’t hesitate to make this recipe your own by adjusting toppings, cheese types, or seasoning to fit your flavor cravings. Honestly, once you master the smash technique, you’ll wonder why you ever settled for ordinary burgers.
Give it a try and let me know how your burgers turn out—I’d love to hear about your favorite twists or any happy accidents you discover along the way. Happy cooking, and may your next burger be crispy, melty, and unforgettable!
FAQs
- What kind of beef is best for smash burgers? An 80/20 ground beef blend works best because it has enough fat to keep the patties juicy and develop a crispy crust.
- Can I use a regular frying pan instead of cast iron? Yes, but cast iron or a heavy griddle gives better heat retention and crust formation.
- How do I prevent the patties from sticking to the skillet? Make sure your pan is hot before adding the meat and avoid moving the patty too soon. A well-seasoned cast iron skillet also helps.
- Can I prepare the patties ahead of time? It’s best to form and smash the patties just before cooking for maximum freshness and crust.
- What cheese melts best on smash burgers? American cheese melts perfectly for that classic gooey texture, but cheddar, pepper jack, and Swiss are great alternatives.
Pin This Recipe!
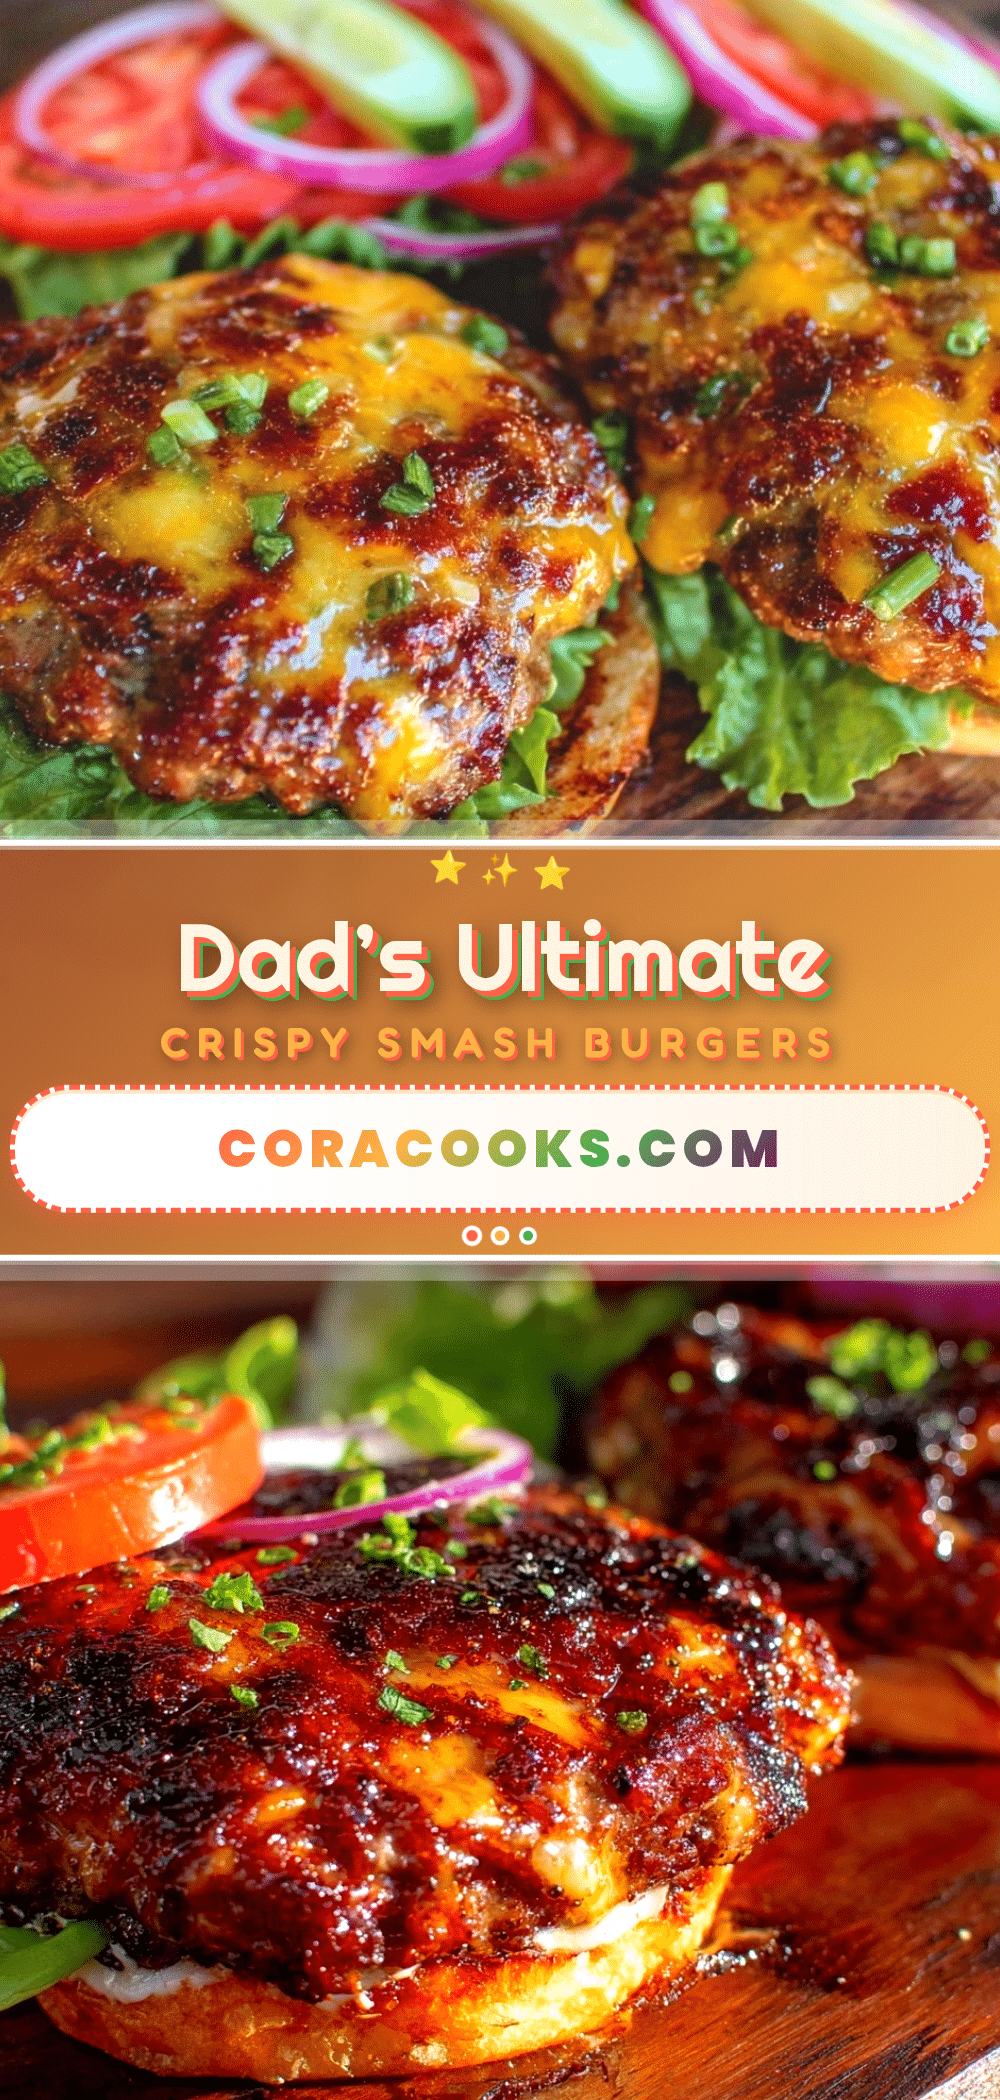
Crispy Dad’s Famous Smash Burgers with Melty Cheese

A quick and easy smash burger recipe featuring crispy edges, juicy centers, and perfectly melted cheese. Perfect for busy weeknights or casual gatherings.
- Prep Time: 10 minutes
- Cook Time: 10-15 minutes
- Total Time: 20-25 minutes
- Yield: 4 servings 1x
- Category: Main Course
- Cuisine: American
Ingredients
- 1 pound (450g) ground beef (80/20 blend)
- Salt and freshly ground black pepper, to taste
- 4 slices American or sharp cheddar cheese
- 4 soft burger buns, lightly toasted (potato buns recommended)
- 2 tablespoons butter, softened
- Optional toppings: thinly sliced onions, pickles, lettuce, tomato slices, ketchup, mustard, or favorite burger sauce
Instructions
- Preheat your cast iron skillet or heavy griddle on medium-high heat for about 5 minutes until very hot.
- Divide the ground beef into 4 equal balls (about 4 ounces or 115g each), keeping the meat loose and not overworked.
- Spread softened butter on the cut sides of the buns and toast them in a separate pan or after cooking the patties for 1-2 minutes until golden brown.
- Place one beef ball onto the hot skillet. Using a sturdy metal spatula, press down firmly for 10-15 seconds until the patty is about 1/4 inch (6mm) thick to create crispy edges.
- Season the exposed side immediately with salt and pepper.
- Cook the patty undisturbed for 2-3 minutes until juices bubble up and edges crisp.
- Flip the patty gently and quickly place a slice of cheese on top. Cook for another 1-2 minutes until cheese melts and burger is cooked through.
- Place the patty with melted cheese on the toasted bun bottom. Add preferred toppings.
- Top with the bun crown and serve immediately.
Notes
Use cold ground beef for best crust formation. Press firmly but avoid making patties too thin. Do not press after flipping. Cook in batches if needed to maintain high heat. For gluten-free, use gluten-free buns or lettuce wraps. Cheese can be swapped for Swiss, provolone, or pepper jack for variations.
Nutrition
- Serving Size: 1 burger
- Calories: 450
- Fat: 30
- Carbohydrates: 2
- Protein: 30
Keywords: smash burger, crispy burger, melty cheese burger, quick burger recipe, easy dinner, cast iron skillet burger