Love this? Save it for later!
Share the inspiration with your friends
The winter I turned thirty-two, I found myself in a tiny apartment kitchen with a bag of sorghum flour and a deep, stubborn ache for the gingerbread cookies my grandmother used to make. I had just been diagnosed with celiac disease, and the holidays felt like they were slipping away, one butter-laden, gluten-filled cookie at a time. Honestly, I was a little bitter about it. I mean, who wants to give up that perfectly spiced, soft-in-the-middle gingerbread cookie?
So I did what any slightly desperate, recipe-obsessed person would do. I started testing. Batch after batch of sad, crumbly discs that tasted like cardboard dusted with ginger. I was about to give up and just make a batch for my family to enjoy while I sulked with a rice cake when my neighbor, an older woman named Clara who grew up in a tiny village in Germany, knocked on my door. She had a plate of the most beautiful, perfectly domed cookies I had ever seen. They weren’t gingerbread, but they were gluten-free. She watched me struggle with my latest failed attempt and didn’t say anything at first. Then she just pointed at my bowl and said, “You are fighting the flour. You have to be gentle with it.”
She didn’t give me a formal lesson. We just stood in my tiny kitchen, and she told me about how her mother used to mix dough by feel, not by exact measurements. That conversation, the way she talked about the warmth of the spices and the patience required for a good cookie, was the real gift. This recipe for cozy gluten-free gingerbread cookies is the result of that conversation and about a dozen more tests after she went home. It’s not a traditional recipe from her village—it’s my adaptation, a bridge between her wisdom and my pantry. Maybe you’ve been there, trying to recreate a memory with a completely different set of ingredients. That first bite of these cookies, soft, spicy, and finally holding together, felt like coming home. That’s why I keep making them.
Why You’ll Love This Recipe
Let’s face it, gluten-free baking can be a minefield. You never know if you’re going to get a rock or a puddle. But these cozy gluten-free gingerbread cookies are different. They are the real deal, the kind that makes you forget they are gluten-free entirely. I’ve tested this recipe more times than I care to count, and I can tell you with confidence that it works.
- Perfectly Soft & Chewy: No one wants a dry, crumbly gingerbread cookie. This recipe delivers that soft, almost cake-like center with a slightly crisp edge that is pure comfort.
- Simple Ingredients: You don’t need a pantry full of exotic flours. This recipe uses a simple, reliable gluten-free flour blend that you can find at any grocery store. No fancy trips required.
- That Classic Gingerbread Flavor: The blend of molasses, ginger, cinnamon, and cloves is spot on. It fills your kitchen with the most incredible, cozy aroma that screams “the holidays are here.”
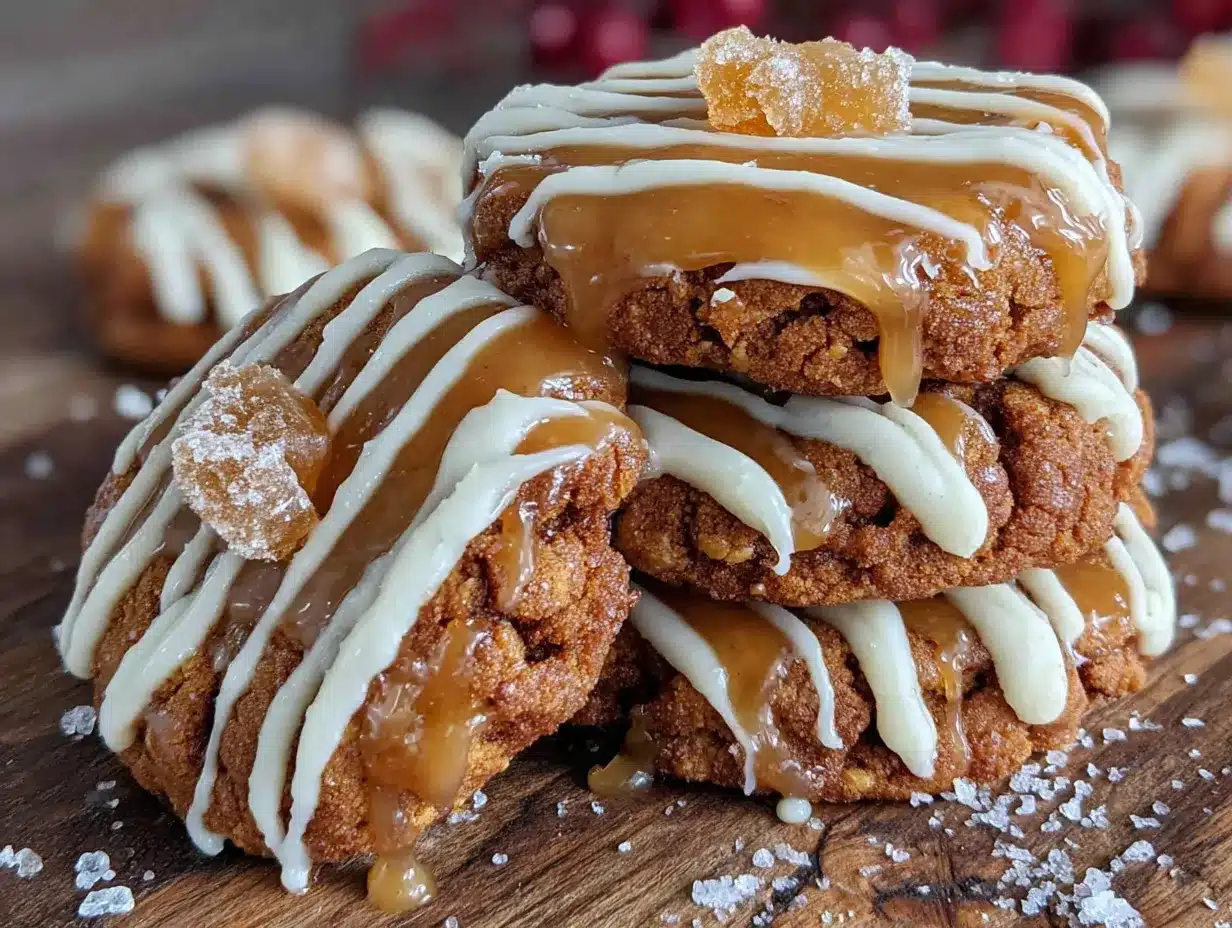
- The Dreamy Cream Cheese Icing: This isn’t a stiff, sugary royal icing. It’s a tangy, creamy, slightly sweet cream cheese icing that cuts through the warm spices perfectly. It’s the kind of icing you want to eat with a spoon.
- Crowd-Pleaser: I have served these to gluten-free friends and gluten-loving skeptics alike. They disappear every single time. No one believes they are gluten-free until I tell them.
What makes this recipe my best version? It’s the technique. Instead of just dumping the flour in, we cream the butter and sugar until it’s truly light and fluffy. This creates the structure that gluten usually provides, giving you a cookie that holds its shape and has a beautiful, tender crumb. It’s comfort food reimagined—healthier in the sense that it’s safe for a gluten-free diet, but with the same soul-soothing satisfaction that a perfect gingerbread cookie brings. It’s perfect for a cozy evening at home, a cold winter afternoon, or a rough day that just needs fixing with a cookie and a warm drink.
What Ingredients You Will Need
This recipe uses simple, honest ingredients to create a cookie that is deeply flavorful and perfectly textured. Most of these are pantry staples, and I’ve included notes on my favorite brands and substitutions to make this work for you.
For the Gingerbread Cookies
- Unsalted Butter (1/2 cup / 113 grams), softened: I always use unsalted butter so I can control the salt level. Let it sit out for at least 30 minutes to get truly soft, not melted.
- Brown Sugar (1/2 cup / 100 grams), packed: Light or dark brown sugar works. Dark brown sugar will give a deeper molasses flavor. It adds moisture and that signature chewiness.
- Molasses (1/2 cup / 170 grams): This is the heart of the gingerbread flavor. I recommend using a mild or unsulfured molasses like Grandma’s or Brer Rabbit. Do not use blackstrap molasses; it is too bitter and strong.
- Large Egg (1), room temperature: A room-temperature egg blends into the creamed butter and sugar much more smoothly, creating a better emulsion.
- Gluten-Free All-Purpose Flour Blend (2 1/4 cups / 315 grams): This is crucial. I have tested this with Bob’s Red Mill 1-to-1 Baking Flour (blue bag) and King Arthur Flour Measure for Measure. Both work perfectly. Do not use a single flour like almond or coconut flour; you need a blend with xanthan gum for structure.
- Ground Ginger (1 1/2 teaspoons): The star of the show! Freshly ground ginger is nice, but the ground stuff is perfectly fine here.
- Ground Cinnamon (1 teaspoon): Adds warmth and sweetness.
- Ground Cloves (1/2 teaspoon): A little goes a long way. It adds that deep, almost peppery warmth.
- Baking Soda (1 teaspoon): This helps the cookies spread and become tender.
- Salt (1/4 teaspoon): Balances the sweetness and enhances the spices.
For the Cream Cheese Icing
- Cream Cheese (4 ounces / 113 grams), softened: Use full-fat block cream cheese for the best flavor and texture. The spreadable kind in a tub has too much water and will make your icing runny.
- Unsalted Butter (2 tablespoons / 28 grams), softened: Adds richness and stability to the icing.
- Powdered Sugar (1 1/2 cups / 180 grams): Sift it if it’s lumpy for the smoothest icing.
- Vanilla Extract (1/2 teaspoon): Pure vanilla extract makes a difference.
- Milk (1-2 tablespoons): Use any milk you like—dairy or non-dairy. This is just to thin the icing to your desired consistency for drizzling or spreading.
Equipment Needed
You don’t need a professional bakery setup for these cookies, but a few key tools will make your life much easier.
- Electric Hand Mixer or Stand Mixer: Creaming the butter and sugar properly is essential. You can do it by hand with a wooden spoon, but it takes some serious elbow grease. I prefer my trusty hand mixer for this small batch.
- Large Mixing Bowls: One for the wet ingredients, one for the dry.
- Baking Sheets: Standard half-sheet pans work great. Line them with parchment paper for easy cleanup and to prevent sticking.
- Cookie Scoop (about 1.5 tablespoons): This ensures all your cookies are the same size, so they bake evenly. A game-changer for consistency.
- Cooling Rack: Crucial for letting the cookies cool completely before icing them. If you ice them while they are warm, the icing will melt into a puddle.
- Piping Bag or Ziploc Bag: For a pretty drizzle, I use a small piping bag with a small round tip. A Ziploc bag with the corner snipped off works perfectly fine too.
Preparation Method
Alright, let’s get baking! This process is straightforward, but I’ve added all my little notes to help you avoid the mistakes I made in my first dozen attempts.
- Preheat and Prep: Preheat your oven to 350°F (175°C). Line two baking sheets with parchment paper. This is non-negotiable for gluten-free cookies; they can be a little fragile, and parchment helps them release perfectly.
- Cream the Butter and Sugar: In a large bowl, beat the softened butter and brown sugar together with your hand mixer on medium speed for about 3-4 minutes. You want it to look light, fluffy, and pale in color. This step is where you build the structure for a soft cookie. Don’t rush it! Scrape down the sides of the bowl once.
- Add the Wet Ingredients: Beat in the molasses and the room-temperature egg until everything is fully combined. The mixture might look a little separated or curdled at this point—that’s totally normal, especially with molasses. Don’t panic.
- Whisk the Dry Ingredients: In a separate, medium bowl, whisk together the gluten-free flour, ground ginger, cinnamon, cloves, baking soda, and salt. Whisking ensures the spices and leavener are evenly distributed so you don’t get a mouthful of baking soda in one bite.
- Combine Wet and Dry: Gradually add the dry ingredients to the wet mixture, mixing on low speed just until combined. You’ll have a very stiff, slightly sticky dough. Do not overmix! Overworking gluten-free dough can make the cookies tough. Stop as soon as you don’t see any more streaks of flour.
- Chill the Dough (Important!): Cover the bowl with plastic wrap and refrigerate the dough for at least 1 hour. I know you are eager, but this step is vital. Chilling the dough solidifies the fat, which prevents the cookies from spreading into flat, thin pancakes in the oven. It also allows the flavors to meld together. I often chill mine for 2 hours or even overnight.
- Scoop and Bake: Once chilled, use your cookie scoop to portion out balls of dough (about 1.5 tablespoons each). Place them about 2 inches apart on your prepared baking sheets. You don’t need to roll them perfectly round; a rustic look is part of the charm. Bake for 10-12 minutes. The edges should be set and look slightly cracked, but the centers will still look soft and puffy. They will continue to set as they cool on the pan.
- Cool Completely: Let the cookies cool on the baking sheet for 5 minutes. This allows them to firm up so they don’t break when you move them. Then, transfer them to a wire cooling rack to cool completely. This is the hardest part—the waiting. But trust me, you cannot ice a warm cookie.
- Make the Icing: While the cookies are cooling, make the icing. In a medium bowl, beat the softened cream cheese and butter together until smooth and creamy. Gradually beat in the powdered sugar and vanilla extract. Add milk, 1 tablespoon at a time, until you reach a consistency that is thick but drizzles slowly off a spoon.
- Ice the Cookies: Once the cookies are completely cool, drizzle or spread the icing over the top. If you want that classic bakery look, transfer the icing to a piping bag and drizzle it back and forth. Let the icing set for about 15-20 minutes before serving or storing.
Cooking Tips & Techniques
I’ve learned a few things the hard way so you don’t have to. Here are my best tips for perfect cozy gluten-free gingerbread cookies every single time.
- The Flour Blend Matters: I cannot stress this enough. Different gluten-free blends absorb liquid differently. If you use a blend without xanthan gum, your cookies will likely spread and crumble. Stick with a 1-to-1 blend that includes a binder. I’ve had the best luck with Bob’s Red Mill 1-to-1.
- Don’t Skip the Chill: This is the number one mistake I made early on. The dough is very soft and sticky from the molasses. If you bake it without chilling, the cookies will spread into thin, crispy discs. Chilling for at least an hour makes the dough easy to handle and gives you thick, soft cookies.
- Watch the Oven Time: Gluten-free baked goods can go from perfectly soft to dry and crumbly very quickly. Start checking at the 10-minute mark. The edges should be set, but the center will look slightly underdone. They will continue baking from the residual heat of the pan as they cool.
- Room Temperature Ingredients: I know it’s a pain, but using room-temperature butter, egg, and cream cheese creates a smooth, emulsified batter and icing. Cold ingredients can cause the batter to curdle or the icing to be lumpy. Set them out on the counter about 30 minutes before you start.
- Icing Consistency: If your icing is too thick to drizzle, add a tiny splash more milk. If it’s too thin and runs right off the cookie, add a bit more powdered sugar. You want it to hold its shape for a few seconds on the cookie before slowly settling.
Variations & Adaptations
This recipe is a fantastic base for customization. Here are a few ways I’ve played around with it to keep things interesting.
- Spice It Up (or Down): If you love a serious ginger kick, add an extra 1/2 teaspoon of ground ginger. For a milder cookie, reduce the cloves to 1/4 teaspoon. I once added a pinch of black pepper for a little warmth, and it was surprisingly delicious.
- Dairy-Free Adaptation: You can easily make these dairy-free. Use a high-quality vegan butter stick (like Miyoko’s or Country Crock Plant Butter) in place of the regular butter in the cookie dough. For the icing, use a vegan cream cheese block (like Violife or Tofutti) and vegan butter. The texture will be slightly different, but still very good.
- Add Some Texture: Fold in 1/2 cup of chopped pecans or walnuts to the dough after mixing. The crunch is lovely against the soft cookie. You could also add 1/2 cup of mini chocolate chips for a gingerbread-chocolate combo.
- Cut-Out Cookies: This dough works brilliantly for cut-out cookies! After chilling the dough for 2 hours, roll it out between two sheets of parchment paper to about 1/4-inch thickness. Cut out your shapes and bake for 8-10 minutes. The edges will be slightly crisper, but they hold their shape wonderfully.
- No Icing? No Problem: These cookies are fantastic on their own with just a sprinkle of coarse sugar before baking. In fact, I often make a batch without icing for a less sweet, more snackable cookie.
Serving & Storage Suggestions
These cookies are best enjoyed in a state of pure coziness. Serve them slightly warm or at room temperature, drizzled with that tangy cream cheese icing. They are the perfect companion to a hot cup of coffee, a steaming mug of chai tea, or a tall glass of cold milk. Honestly, they are also pretty incredible crumbled over a bowl of vanilla ice cream for a quick dessert.
Storage: Store the iced cookies in a single layer in an airtight container in the refrigerator. They will keep well for up to 5 days. The cream cheese icing needs to stay chilled. Let them sit at room temperature for about 10 minutes before serving to take the chill off.
Freezing: You have two options here. First, you can freeze the unbaked cookie dough balls. Scoop them onto a baking sheet and freeze until solid, then transfer them to a freezer bag. You can bake them straight from frozen, adding 1-2 minutes to the baking time. Second, you can freeze the baked, un-iced cookies for up to 3 months. Thaw them at room temperature, then make the icing fresh. The flavor of these cookies actually gets deeper and more complex after a day or two in the fridge!
Nutritional Information & Benefits
While these are definitely a treat, they are made with real, whole ingredients. Here is an approximate nutritional breakdown per cookie (based on 24 cookies with icing):
- Calories: 185
- Fat: 9g
- Carbohydrates: 26g
- Protein: 2g
- Fiber: 1g
- Sugar: 18g
The molasses provides a good source of iron, calcium, and magnesium, which is a nice little bonus. Ginger is known for its anti-inflammatory properties and can help settle an upset stomach. Plus, by making them gluten-free, we’ve made them accessible to those with celiac disease or gluten sensitivities without sacrificing any of the joy. For me, the biggest benefit is the emotional one—the feeling of sharing a safe, delicious, homemade treat with the people I love.
Conclusion
These cozy gluten-free gingerbread cookies with cream cheese icing are more than just a recipe. They are a little piece of winter comfort that everyone can enjoy. They are proof that a dietary restriction doesn’t have to mean giving up the foods that make us feel warm and happy. I love that I can make a batch and share them with all my friends and family, regardless of their dietary needs, and no one feels left out.
I really hope you give these a try. Don’t be afraid to make them your own—add more spice, skip the icing, or double the batch to share. The best recipes are the ones that feel good to make and even better to eat. If you make them, I would absolutely love to hear about it! Leave a comment below and tell me how they turned out, or share a photo on social media and tag me. Happy baking, friends!
Frequently Asked Questions
Can I use a different gluten-free flour blend?
Yes, but it’s risky. I highly recommend using a blend that contains xanthan gum or guar gum, as this provides the structure that gluten would normally give. Blends like Bob’s Red Mill 1-to-1 or King Arthur Measure for Measure are my top picks. If you use a single flour like almond or coconut, the cookies will not hold together.
Why did my cookies spread into flat pancakes?
This is almost always because the dough was not chilled long enough. The butter needs to be cold and solid when it goes into the oven. If it’s warm, it melts too quickly and the cookies spread. Also, make sure you are using a gluten-free blend with a binder.
Can I make the dough ahead of time?
Absolutely! You can make the dough and keep it in the refrigerator for up to 3 days. Just make sure it’s tightly covered so it doesn’t dry out. You can also freeze the dough balls for up to 3 months as mentioned in the storage section.
My cream cheese icing is too runny. What went wrong?
There are two common culprits. First, your cream cheese may have been too soft or even melted. Second, you might have used the spreadable cream cheese from a tub, which has a higher water content. Always use a block of full-fat cream cheese, and make sure it’s just softened, not warm.
Can I use this recipe for a gingerbread house?
No, I wouldn’t recommend it. This recipe is designed to be soft and chewy, which is perfect for eating but not for structural support. For a gingerbread house, you need a sturdier, crispier dough that holds its shape when cut and assembled.
Pin This Recipe!

Cozy Gluten-Free Gingerbread Cookies with Cream Cheese Icing

These soft and chewy gluten-free gingerbread cookies are perfectly spiced and topped with a tangy cream cheese icing. They are a cozy, crowd-pleasing treat that everyone can enjoy, regardless of dietary restrictions.
- Prep Time: 15 minutes
- Cook Time: 12 minutes
- Total Time: 1 hour 27 minutes (includes 1 hour chilling)
- Yield: 24 cookies 1x
- Category: Dessert
- Cuisine: American
Ingredients
- 1/2 cup (113 grams) unsalted butter, softened
- 1/2 cup (100 grams) brown sugar, packed
- 1/2 cup (170 grams) molasses (mild or unsulfured, not blackstrap)
- 1 large egg, room temperature
- 2 1/4 cups (315 grams) gluten-free all-purpose flour blend (with xanthan gum, e.g., Bob’s Red Mill 1-to-1 or King Arthur Measure for Measure)
- 1 1/2 teaspoons ground ginger
- 1 teaspoon ground cinnamon
- 1/2 teaspoon ground cloves
- 1 teaspoon baking soda
- 1/4 teaspoon salt
- 4 ounces (113 grams) cream cheese, softened (full-fat block)
- 2 tablespoons (28 grams) unsalted butter, softened
- 1 1/2 cups (180 grams) powdered sugar, sifted if lumpy
- 1/2 teaspoon vanilla extract
- 1–2 tablespoons milk (dairy or non-dairy)
Instructions
- Preheat oven to 350°F (175°C). Line two baking sheets with parchment paper.
- In a large bowl, beat softened butter and brown sugar with an electric mixer on medium speed for 3-4 minutes until light, fluffy, and pale. Scrape down the sides once.
- Beat in molasses and room-temperature egg until fully combined (mixture may look slightly curdled).
- In a separate medium bowl, whisk together gluten-free flour, ground ginger, cinnamon, cloves, baking soda, and salt.
- Gradually add dry ingredients to wet mixture, mixing on low speed just until combined. Dough will be stiff and slightly sticky. Do not overmix.
- Cover bowl with plastic wrap and refrigerate dough for at least 1 hour (or up to overnight).
- Using a cookie scoop (about 1.5 tablespoons), portion dough into balls and place 2 inches apart on prepared baking sheets.
- Bake for 10-12 minutes, until edges are set and slightly cracked but centers still look soft. Cool on baking sheet for 5 minutes, then transfer to a wire rack to cool completely.
- For the icing: In a medium bowl, beat softened cream cheese and butter until smooth and creamy. Gradually beat in powdered sugar and vanilla extract. Add milk 1 tablespoon at a time until desired drizzling consistency is reached.
- Once cookies are completely cool, drizzle or spread icing over tops. Let icing set for 15-20 minutes before serving or storing.
Notes
Chilling the dough is essential to prevent spreading. Use a gluten-free flour blend with xanthan gum for best results. For dairy-free, use vegan butter and vegan cream cheese. Cookies can be frozen unbaked or baked (without icing) for up to 3 months.
Nutrition
- Serving Size: 1 cookie
- Calories: 185
- Sugar: 18
- Sodium: 150
- Fat: 9
- Saturated Fat: 5
- Carbohydrates: 26
- Fiber: 1
- Protein: 2
Keywords: gluten-free gingerbread cookies, cream cheese icing, soft gingerbread, gluten-free Christmas cookies, gingerbread recipe