Love this? Save it for later!
Share the inspiration with your friends
The oven timer was supposed to go off at seven, but at six-thirty, I realized I had forgotten to take the chicken out of the freezer. It was solid as a rock. Honestly, I stared at that frozen breast and felt my stomach drop, because dinner was supposed to be a relaxed evening with my sister, not a panic-induced scramble. I grabbed the microwave, hit defrost, and prayed to whatever kitchen gods were listening that it wouldn’t turn into rubber.
While the chicken thawed in that sad, spinning dance, I decided to pivot. I had a bag of brie that needed using up and a box of cookie cutters I’d bought for a party that never happened. I mean, let’s face it, I had no plan. I just had ingredients and a deadline. I started slicing cheese, grabbing crackers, and throwing things on a board. It was supposed to be a quick snack while I waited for the chicken to be edible.
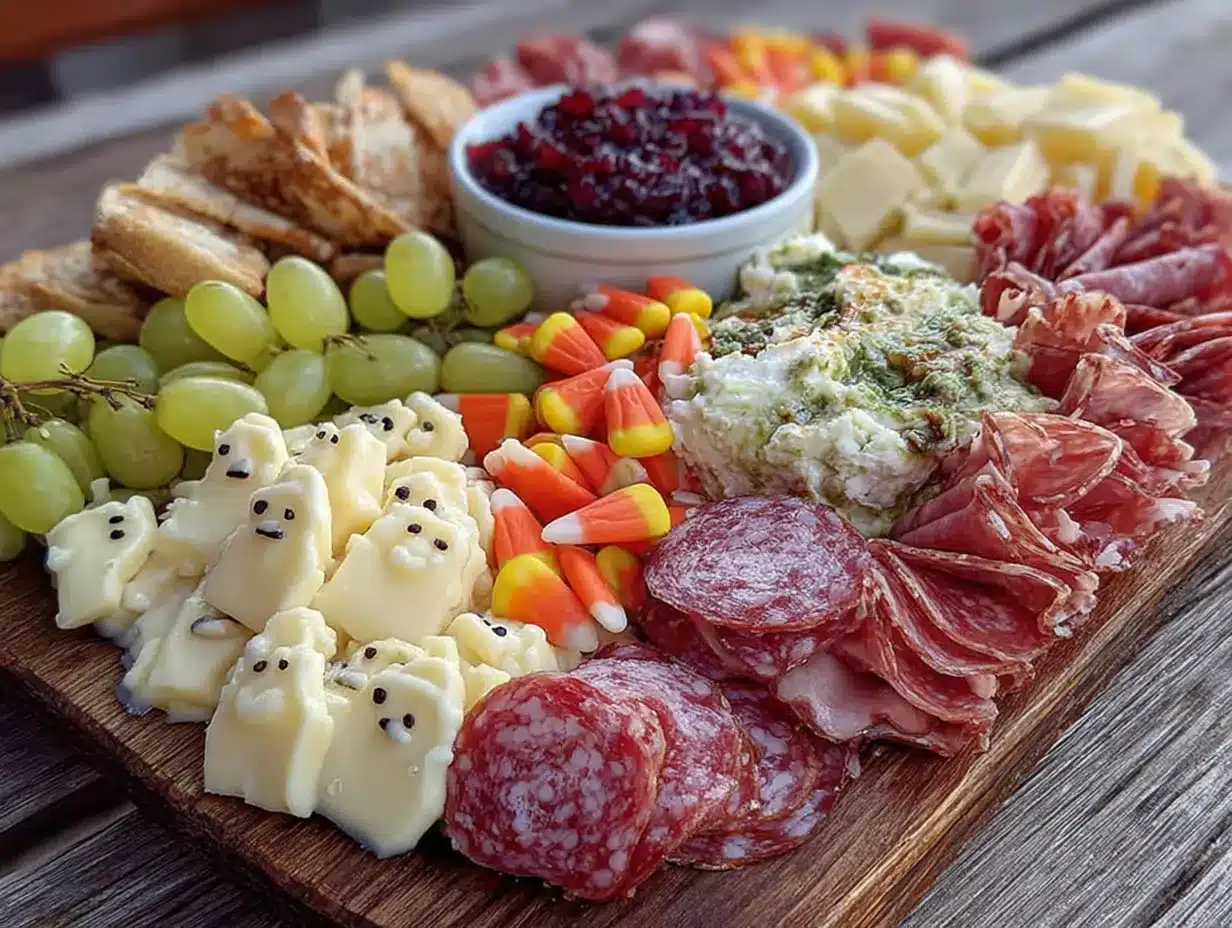
But then I saw the moon. I cut a circle out of the brie, added two olive eyes, and suddenly, the board looked less like a disaster cleanup and more like something magical. My sister walked in, saw the little cheese ghosts, and stopped complaining about the delayed dinner. She actually laughed. That night, the chicken was fine, but everyone remembered the board. It wasn’t about the main course anymore; it was about that moment of creativity when things go wrong.
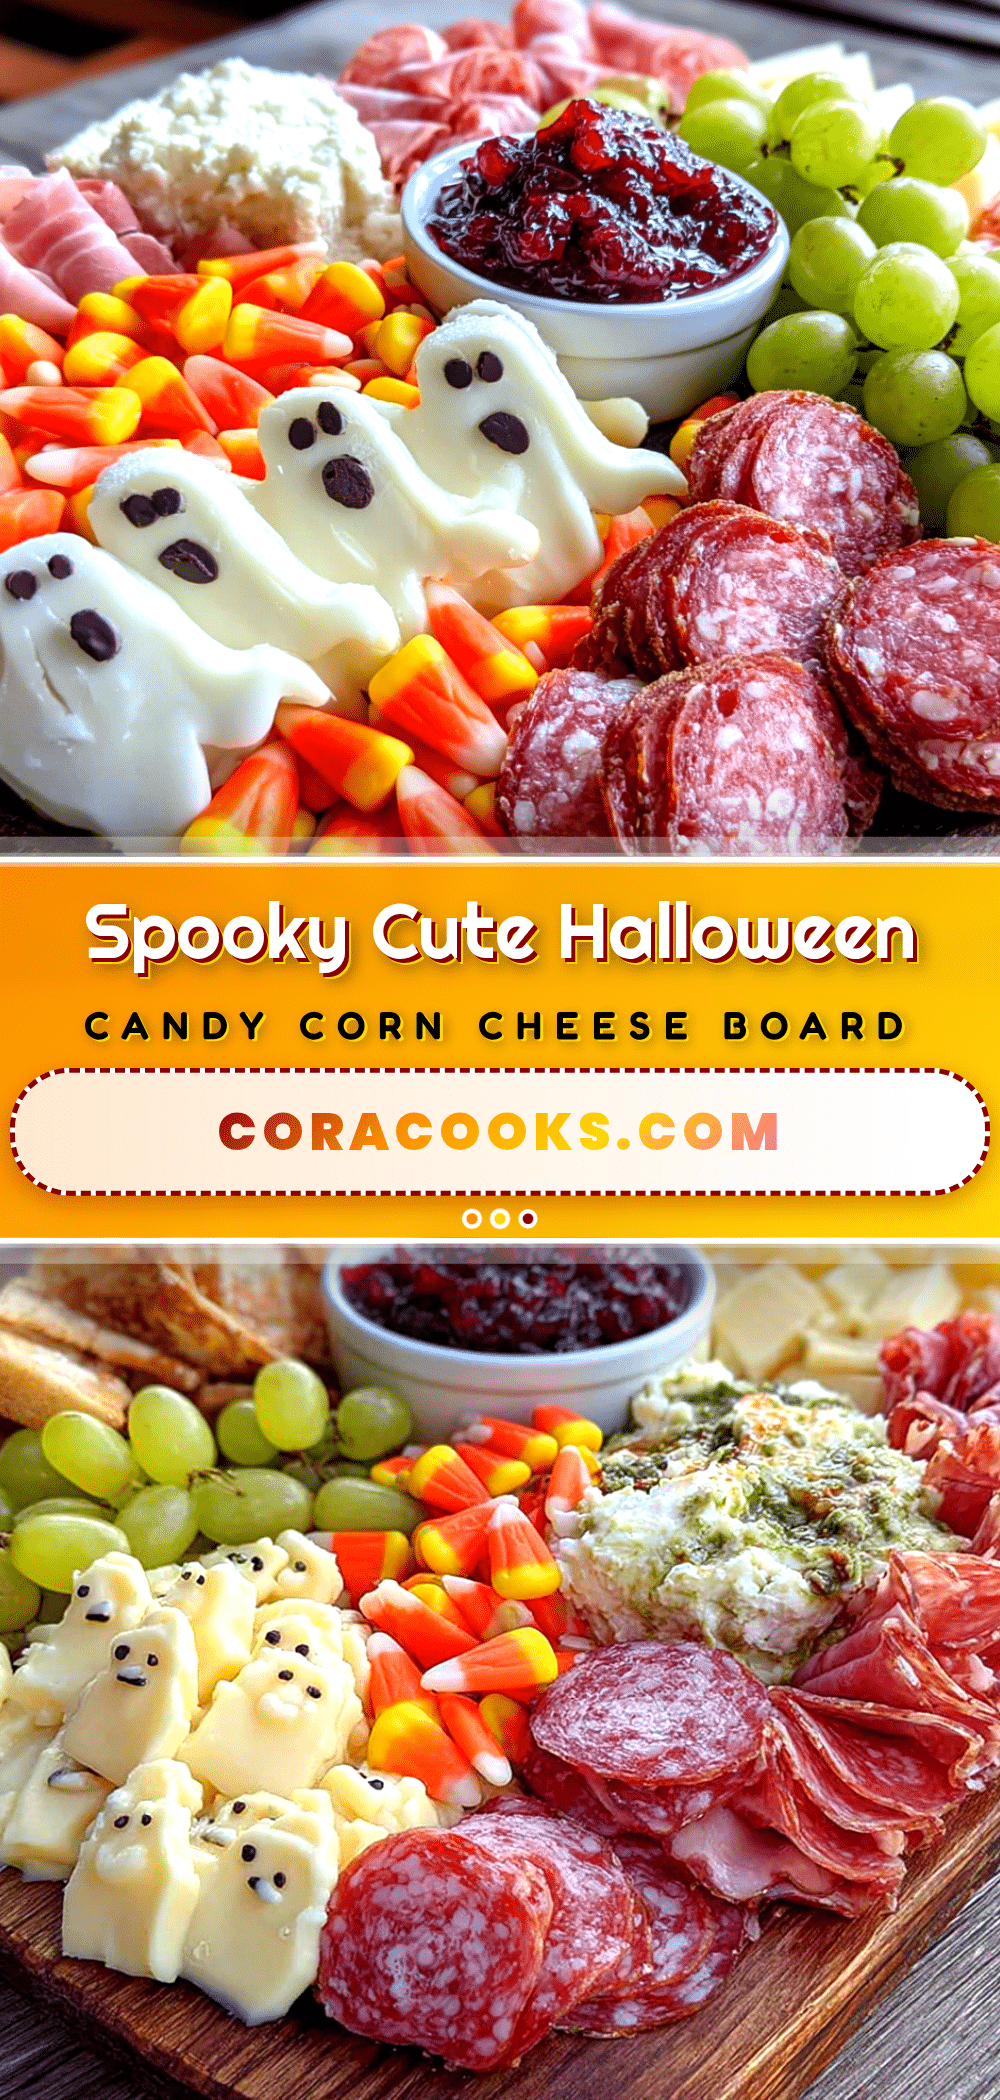
I’ve made this Halloween Charcuterie Board with Cheese Ghosts a dozen times since then. It’s become my go-to for any autumn gathering where I don’t want to spend hours cooking. You know that feeling when you’re stressed, and then you make something silly that makes everyone else relax? That’s this recipe. It’s simple, it’s spooky, and it’s honestly the best way to save a chaotic evening.
Why You’ll Love This Recipe
There is something deeply satisfying about assembling a charcuterie board that looks like it came from a high-end boutique, even when you threw it together in twenty minutes. This recipe isn’t just about throwing snacks on a plate; it’s about creating an experience. I’ve tested dozens of cheese combinations and board layouts, and this specific setup hits the sweet spot between impressive and effortless. It’s the kind of dish that makes you look like a hostess with the mostess, without the stress.
- Quick & Easy: You can assemble this entire board in under fifteen minutes. It’s perfect for those busy weeknights when you want to host but don’t have the energy to cook a full meal.
- Simple Ingredients: You likely have most of these items in your fridge or pantry already. Cream cheese, brie, crackers, and fruit are staples. No fancy grocery trips needed.
- Perfect for Halloween: Whether it’s a trick-or-treat station, a pre-party snack, or a cozy movie night, this board fits the spooky season perfectly.
- Crowd-Pleaser: Kids love the cute cheese ghosts, and adults love the high-quality cheese and wine pairings. It bridges the gap between sweet and savory effortlessly.
- Unbelievably Delicious: The combination of creamy brie, salty crackers, and sweet fruit is a texture and flavor combo that is next-level comfort food.
What makes this recipe different from the rest is the attention to detail in the presentation. Most people just slice cheese and call it a day. But by taking the time to shape the cheese and arrange the colors, you create a visual feast that demands attention. It’s not just another version of a snack board; it’s your best version. It’s the kind of recipe that makes you close your eyes after the first bite and feel like you’re in a movie. It’s comfort food reimagined—fun, festive, but with the same soul-soothing satisfaction.
What Ingredients You Will Need
This recipe uses simple, wholesome ingredients to deliver bold flavor and satisfying texture without the fuss. The beauty of a charcuterie board is its flexibility, but for the best Halloween Charcuterie Board with Cheese Ghosts, you want a mix of textures: soft, hard, crunchy, and chewy. Here is what you need to pull it off.
For the Cheese Ghosts
- Brie cheese: One small wheel or several rounds, rind on. I recommend Le Chou or a local artisanal brie for the creamiest texture. The rind is edible and adds a nice earthy note.
- Black olives: Sliced or whole. I prefer kalamata olives for a slightly tangier flavor, but black olives work for the eyes.
- Cream cheese: A small tub. This helps adhere the olive eyes if the brie is too dry.
For the Board Base
- Crackers: A variety of shapes. Water crackers, sesame seed crackers, and pretzel crisps add different crunch levels. Look for brands like Triscuit for a sturdy base that won’t break under cheese.
- Cheddar cheese: Sharp cheddar, cut into cubes or sticks. The orange color adds a nice pop against the white brie.
- Prosciutto or Ham: Folded slices of cured meat add saltiness and protein. Prosciutto is elegant, while ham is more kid-friendly.
For the Accents
- Grapes: Red and green grapes. They are easy to eat and add a juicy element.
- Apples or Pears: Sliced thinly. Use Honeycrisp apples for a crisp snap or Bosc pears for a soft melt.
- Dried Cranberries or Apricots: These add a chewy sweetness and a deep red color that fits the Halloween theme.
- Walnuts or Pecans: Toasted nuts add richness and a nice crunch. Skip these if serving to those with nut allergies.
You can swap ingredients based on what you find at the store. In summer, swap in fresh berries instead of dried fruit. Use almond flour crackers for a gluten-free option, or swap the prosciutto for smoked tofu if you need a vegan alternative. The key is to keep the colors vibrant and the textures varied.
Equipment Needed
You don’t need much to pull this off, which is part of the appeal. A large wooden board or a clean marble slab works best. Wood adds warmth and rustic charm, while marble keeps the cheese cool longer. If you don’t have a dedicated board, a large platter or even a clean sheet of parchment paper on a baking tray works fine.
You’ll need a sharp cheese knife. A serrated knife is best for slicing the brie without crushing it. For the cheddar and meats, a standard chef’s knife or utility knife is perfect. I’ve ruined good brie by using a dull knife, so make sure yours is sharp. If you don’t have a cheese knife, a small paring knife works for shaping the ghosts.
A small bowl for the olives and a spoon for spreading cream cheese are helpful. I also recommend having a paper towel handy, just in case the cheese gets too soft and messy. Budget-friendly options include using a large cutting board from your kitchen, which saves money and still looks great. Just wipe it down well before serving.
Preparation Method
- Prepare the Cheese Base (5 minutes): Take the brie wheel and slice it into thick rounds, about half an inch thick. If you have a small wheel, you might get three or four slices. Place these on your board. If the brie is very soft, you might need to chill it for ten minutes first to make it easier to handle.
- Shape the Cheese Ghosts (5 minutes): This is the fun part. Take a slice of brie and use a small round cutter or a knife to cut out a circle. Then, use the knife to trim the bottom into a wavy, sheet-like shape. It doesn’t have to be perfect; the imperfections make it look like a ghost. If the cheese is too crumbly, mix a little cream cheese with the brie to help it hold its shape. Place the ghosts on the board.
- Add the Eyes (2 minutes): Take a slice of black olive and cut it into small pieces for the eyes. Place two pieces on each cheese ghost. If the olives aren’t sticking, use a tiny dab of cream cheese as glue. Press them gently into the brie. This step is quick, so do it right before serving to keep the olives from drying out.
- Arrange the Crackers (3 minutes): Place your crackers in piles or fanned out around the board. Mix different types to create visual interest. Leave space for the cheeses and fruits. The crackers should be easy to reach for guests.
- Add the Meats and Hard Cheeses (3 minutes): Fold the prosciutto or ham into loose rosettes and place them on the board. Cut the cheddar into cubes or sticks and arrange them in clusters. The contrast between the white brie ghosts and the orange cheddar looks striking.
- Fill in with Fruits and Nuts (5 minutes): Scatter the grapes, apple slices, and dried fruit around the board. Use the red cranberries and green grapes to add pops of color. Sprinkle the nuts in the empty spaces. This step ties the board together and makes it look abundant.
- Final Touches: Step back and look at the board. Is there too much white? Add more cheddar or nuts. Is it too crowded? Remove a few crackers. Adjust as needed. The goal is a balanced, inviting display.
Cooking Tips & Techniques
The secret to a great charcuterie board is temperature. Cheese tastes best at room temperature, so take it out of the fridge about thirty minutes before serving. If the cheese is too cold, the flavors are muted. I once served a board straight from the fridge, and my guests complained it tasted bland. Lesson learned.
When cutting the brie ghosts, work quickly. The warmer the kitchen, the softer the cheese. If you find the brie is too messy to handle, try using a smaller portion of cheese for each ghost. Also, don’t worry about perfect symmetry. The charm of this Halloween Charcuterie Board with Cheese Ghosts is its playful, slightly spooky look. Imperfections add character.
Another tip is to group similar items together. Put all the crackers in one area, all the fruits in another. This makes it easier for guests to navigate the board. It also looks more organized and professional. I always try to use odd numbers when arranging items, as it looks more natural to the eye.
If you are making this ahead of time, keep the board covered in the fridge. But remember to take it out thirty minutes before serving to let the cheese warm up. The olives on the ghosts should be added right before serving to prevent them from oxidizing and turning brown.
Variations & Adaptations
This recipe is highly adaptable. If you want a vegan version, swap the brie for a vegan brie alternative, which has come a long way in recent years. Brands like Violife or Miyoko’s work well. Use vegan crackers and skip the prosciutto, replacing it with marinated artichoke hearts or roasted red peppers.
For a gluten-free option, use gluten-free crackers and ensure your olives and nuts are certified gluten-free. Many crackers now come in gluten-free varieties, so you don’t have to sacrifice crunch. You can also use rice cakes or apple slices as a base for the cheese.
If you want to change the flavor profile, try using goat cheese instead of brie for the ghosts. Goat cheese is tangier and holds its shape well. You can also add spicy elements like jalapeño slices or hot honey drizzle for a kick. I’ve tried adding a drizzle of hot honey over the cheddar and figs, and it was a hit with the adults.
For a kid-friendly version, use mild cheddar and sweet crackers. You can also use candy eyes instead of olives for the ghosts, though this makes it much sweeter. It’s a fun way to get kids interested in trying cheese.
Serving & Storage Suggestions
Serve this board at room temperature for the best flavor. Pair it with a crisp white wine like Sauvignon Blanc or a light red like Pinot Noir. For non-alcoholic options, sparkling apple cider or iced tea works well. The acidity in the wine or cider cuts through the richness of the cheese.
Any leftovers can be stored in the refrigerator. Keep the cheese in an airtight container or wrapped in parchment paper and plastic wrap. The crackers should be stored in a sealed bag to maintain crunch. The fruit and nuts can be kept in separate containers. The cheese ghosts will hold up well for a day, but the olives may lose their firmness.
When reheating or serving leftovers, let the cheese come back to room temperature. Cold cheese can be waxy and unappealing. The flavors will develop slightly over time, becoming more pronounced. It’s a great snack to have on hand for late-night munchies.
Nutritional Information & Benefits
This board offers a balance of protein, healthy fats, and carbohydrates. The cheese provides calcium and protein, while the nuts and olives offer healthy fats. The fruits add fiber and vitamins. It’s a satisfying snack that can help curb hunger between meals.
However, be mindful of portions. Cheese and nuts are calorie-dense, so it’s easy to overeat. Enjoy it as part of a balanced meal or as a treat. For those with dietary restrictions, many of the ingredients can be substituted to fit gluten-free, dairy-free, or nut-free diets.
From a wellness perspective, I love this board because it encourages mindful eating. You take your time, savor each bite, and enjoy the variety of flavors. It’s a way to nourish your body while also indulging your senses.
Conclusion
The Best Halloween Charcuterie Board with Cheese Ghosts is more than just a snack; it’s a celebration of creativity and simplicity. It’s a recipe that turns a chaotic evening into a memorable one, proving that you don’t need to be a professional chef to impress your guests. I love this recipe because it’s forgiving, fun, and delicious. It allows you to be playful in the kitchen without the pressure of perfection.
I encourage you to try this recipe and make it your own. Add your favorite fruits, swap out cheeses, or experiment with different crackers. The possibilities are endless. And when you do, I’d love to hear about it. Leave a comment below and tell me what variations you tried. Did you use hot honey? Did the kids love the candy eyes? Share your experiences and inspire others.
Happy haunting, and happy eating! May your boards be abundant and your ghosts be plentiful.
FAQs
Can I make the cheese ghosts ahead of time?
Yes, you can shape the cheese ghosts up to a day in advance. Store them in the refrigerator, covered. However, add the olive eyes right before serving to prevent them from drying out or losing their color.
What kind of wine pairs best with this board?
A Sauvignon Blanc or a Pinot Noir pairs beautifully. The acidity in the Sauvignon Blanc cuts through the richness of the brie, while the light body of the Pinot Noir complements the fruits and nuts.
Can I use other cheeses for the ghosts?
Absolutely. Goat cheese, cream cheese rounds, or even mozzarella balls can be used. Just keep in mind that softer cheeses may be harder to shape into ghosts.
Is this board suitable for kids?
Yes, it’s very kid-friendly. You can use milder cheeses, sweet crackers, and even candy eyes for the ghosts to make it more appealing to younger palates.
How long does the board last in the fridge?
The board components can last up to three days in the refrigerator. However, the fruit may soften, and the crackers may lose their crunch over time. It’s best enjoyed fresh.
Pin This Recipe!
Best Halloween Charcuterie Board with Cheese Ghosts
A quick, spooky, and impressive Halloween snack board featuring creative cheese ghosts made from brie and olives, perfect for autumn gatherings or chaotic evenings.
- Prep Time: 23 minutes
- Cook Time: 0 minutes
- Total Time: 23 minutes
- Yield: 8 servings 1x
- Category: Appetizer
- Cuisine: American
Ingredients
- 1 small wheel of Brie cheese (or several rounds), rind on
- Black olives (Kalamata preferred), sliced or whole
- Cream cheese (small tub)
- Assorted crackers (water crackers, sesame seed crackers, pretzel crisps)
- Sharp cheddar cheese, cut into cubes or sticks
- Prosciutto or Ham, folded slices
- Red and green grapes
- Apples or Pears, thinly sliced
- Dried cranberries or apricots
- Walnuts or pecans, toasted
Instructions
- Prepare the cheese base by slicing the brie wheel into thick rounds (about 1/2 inch). If the brie is very soft, chill it for 10 minutes to make it easier to handle.
- Shape the cheese ghosts: Cut a circle out of a brie slice and trim the bottom into a wavy, sheet-like shape. If the cheese is crumbly, mix in a little cream cheese to help it hold its shape.
- Add the eyes: Cut black olives into small pieces and place two on each cheese ghost. Use a tiny dab of cream cheese as glue if the olives aren’t sticking.
- Arrange the crackers: Place crackers in piles or fanned out around the board, mixing different types for visual interest.
- Add meats and hard cheeses: Fold prosciutto or ham into loose rosettes and place on the board. Arrange cheddar cubes or sticks in clusters.
- Fill in with fruits and nuts: Scatter grapes, apple slices, and dried fruit around the board. Sprinkle toasted nuts in empty spaces to tie the board together.
- Final touches: Step back and adjust the arrangement for balance and abundance. Serve at room temperature.
Notes
Take cheese out of the fridge 30 minutes before serving for best flavor. Add olive eyes right before serving to prevent drying. For a vegan version, use vegan brie and skip the meat. For gluten-free, use GF crackers.
Nutrition
- Serving Size: Varied bites from th
- Calories: 350
- Sugar: 8
- Sodium: 450
- Fat: 28
- Saturated Fat: 12
- Carbohydrates: 18
- Fiber: 2
- Protein: 12
Keywords: Halloween, charcuterie board, cheese ghosts, brie, appetizer, party snack, easy recipe, autumn gathering