Love this? Save it for later!
Share the inspiration with your friends
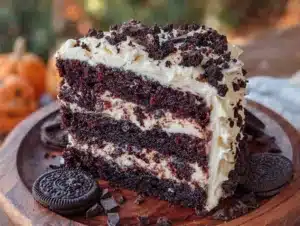
There used to be this quirky little bakery tucked away in a sleepy corner of Salem, Massachusetts, called The Witch’s Whisk, that made the most unforgettable black velvet cake with Oreo buttercream I had ever tasted. When they suddenly closed their doors one chilly October, it felt like I’d lost a treasure. I mean, it wasn’t just any cake — it was that perfect blend of deep cocoa darkness with a hint of velvet smoothness, paired with that nostalgic Oreo frosting that tasted like childhood memories wrapped in a Halloween spell. After at least five attempts — including one where I forgot the baking powder and had a pancake-like disaster — I finally got it just right.
The texture, the flavor, even the eerie black layers that practically whispered Halloween, it all came through. Honestly, this cake stuck with me because it’s not your everyday spooky dessert; it’s the kind that makes you pause and savor, maybe with a cup of black coffee or a glass of cold milk. And let me tell you, if you’ve ever hunted for that perfect dark, decadent Halloween treat that feels both classic and a little bit wild, this Decadent Black Velvet Halloween Layer Cake with Oreo Buttercream will probably hit that sweet spot for you too.
Why You’ll Love This Recipe
Making this cake has been a wild ride of trial, error, and more than a few crumbs on the floor, but it’s all worth it. Here’s why this recipe stands out:
- Quick & Easy: You can whip it up start to finish in about 1 hour and 30 minutes — perfect for last-minute Halloween parties or a fun weekend project.
- Simple Ingredients: No need for exotic stuff; everything you need is probably in your pantry or local store.
- Perfect for Halloween: The deep black velvet layers create a dramatic and festive look that’s sure to impress trick-or-treaters and guests alike.
- Crowd-Pleaser: The Oreo buttercream frosting is a nostalgic hit that kids and adults rave about, blending creamy sweetness with a little crunch.
- Unbelievably Delicious: The balance of a tender crumb and rich frosting makes every bite feel like a little celebration.
This isn’t just another chocolate cake with black food coloring. The secret is in the way the cocoa is combined with a touch of vinegar and buttermilk, creating that signature velvet texture and depth. Plus, folding crushed Oreos into the buttercream gives the frosting a perfect crunch without overpowering the sweetness. Honestly, this recipe has become my go-to for Halloween because it’s comforting, decadent, and a little bit mysterious — just like the holiday itself.
What Ingredients You Will Need
This recipe uses simple, wholesome ingredients to deliver bold flavor and that signature black velvet texture without any fuss. Most of these are pantry staples, with a couple of treats for the frosting.
- For the Cake Layers:
- All-purpose flour – 2 ½ cups (310g), sifted for a light texture
- Cocoa powder – ⅓ cup (35g), unsweetened, use Dutch-processed for a richer flavor
- Baking soda – 1 ½ tsp
- Baking powder – 1 tsp
- Salt – ½ tsp
- Granulated sugar – 2 cups (400g)
- Unsalted butter – ¾ cup (170g), softened (I like using Land O’Lakes for consistency)
- Large eggs – 3, room temperature
- Buttermilk – 1 cup (240ml), room temperature (if you don’t have buttermilk, mix 1 cup milk with 1 tbsp vinegar and let sit for 5 minutes)
- Vanilla extract – 2 tsp, pure for best flavor
- White vinegar – 1 tbsp (this helps with that velvety crumb and subtle tang)
- Black gel food coloring – about 2 tsp, to get that deep black color without thinning the batter
- For the Oreo Buttercream Frosting:
- Unsalted butter – 1 cup (225g), softened
- Powdered sugar – 4 cups (480g), sifted to avoid lumps
- Heavy cream – 2-3 tbsp (30-45ml), adjust for desired consistency
- Vanilla extract – 1 ½ tsp
- Oreo cookies – 15-20, finely crushed (reserve some bigger chunks for texture)
- A pinch of salt (balances the sweetness)
If you want to keep it dairy-free, you can swap the butter and cream for plant-based alternatives, and almond or oat milk works fine for the buttermilk substitute. For gluten-free versions, almond flour or a gluten-free blend can be used, but the texture will be a bit different. I’ve tried both ways — the original recipe still wins for richness and crumb.
Equipment Needed
- Two 8-inch (20 cm) round cake pans – non-stick or lined with parchment paper
- Electric mixer – either stand or hand mixer works fine; I prefer stand mixers for the frosting as it’s less messy
- Mixing bowls – at least two, medium and large
- Measuring cups and spoons – precise measurements make a big difference in baking
- Rubber spatula – for folding ingredients gently
- Sifter or fine mesh strainer – to sift cocoa and powdered sugar
- Cooling racks – to let the cakes cool evenly without sogginess
- Offset spatula – great for spreading frosting smoothly (a butter knife works if you don’t have one)
If you don’t have two cake pans, you can bake in one and slice it horizontally, but it takes a bit more patience. I once used a springform pan in a pinch, and while it worked, the edges weren’t quite as crisp. For frosting, a good-quality mixer speeds things up and helps get that silky texture.
Preparation Method

- Preheat your oven to 350°F (175°C). Grease your two 8-inch cake pans and line them with parchment paper to prevent sticking. This step is crucial — I once skipped it and nearly lost a cake to the pan, so don’t skip!
- Sift together the dry ingredients: In a large bowl, combine 2 ½ cups all-purpose flour, ⅓ cup cocoa powder, 1 ½ tsp baking soda, 1 tsp baking powder, and ½ tsp salt. Sifting helps avoid lumps and gives a lighter texture.
- Cream the butter and sugar: In a separate bowl, beat ¾ cup softened unsalted butter with 2 cups granulated sugar until pale and fluffy — about 3-4 minutes on medium speed. This aerates the batter, which is key for that tender crumb.
- Add the eggs: Beat in the 3 large eggs one at a time, making sure each is fully incorporated before adding the next. Then mix in 2 tsp vanilla extract.
- Combine wet and dry: Alternately add the dry ingredients and 1 cup buttermilk to the butter mixture, starting and ending with dry. Mix gently on low speed; don’t overmix or your cake may turn tough.
- Add vinegar and food coloring: Stir in 1 tbsp white vinegar and about 2 tsp black gel food coloring until the batter is smooth and evenly colored. The vinegar reacts with baking soda to give that velvety softness.
- Divide and bake: Pour the batter evenly into the prepared pans. Tap the pans gently on the counter to release air bubbles. Bake for 30-35 minutes or until a toothpick inserted in the center comes out clean. The edges should pull slightly away from the pan.
- Cool the cakes: Let the cakes cool in pans for 10 minutes, then transfer to wire racks to cool completely. This prevents sogginess under the frosting.
- Prepare the Oreo buttercream: Beat 1 cup softened butter until creamy. Gradually add 4 cups sifted powdered sugar, mixing on low. Add 2-3 tbsp heavy cream and 1 ½ tsp vanilla extract, then beat on high until light and fluffy. Finally, fold in the crushed Oreo cookies, saving a few chunks for decoration.
- Assemble the cake: Place one cake layer on your serving plate. Spread a thick layer of Oreo buttercream on top, then add the second cake layer. Frost the top and sides evenly. Decorate with reserved Oreo chunks or Halloween-themed sprinkles if you like.
- Chill and serve: Refrigerate the cake for at least 30 minutes to set the frosting. Bring to room temperature before slicing for the best flavor and texture.
Cooking Tips & Techniques
Let me share some tricks I’ve learned making this cake that might save you from the little hiccups I’ve had:
- Use real buttermilk: It’s the acid in buttermilk that interacts with baking soda to give the cake its trademark velvet texture and tender crumb.
- Don’t skip sifting: Cocoa powder and powdered sugar can clump, leading to uneven texture or frosting lumps.
- Beat the butter and sugar well: This step traps air, making the cake lighter and softer — a rushed mix means denser cake.
- Be gentle when folding: Overmixing after adding flour can develop gluten and toughen the cake — a light hand is best.
- Check your oven temperature: Ovens vary, so start checking the cake a few minutes before the timer ends to avoid overbaking.
- For the frosting: If it’s too stiff, add cream a teaspoon at a time; if too soft, add a bit more powdered sugar.
- Crush Oreos carefully: You want a mix of fine crumbs and larger pieces for texture — a food processor is great but pulse gently.
- Room temperature ingredients: Eggs, butter, and buttermilk at room temp blend better, yielding a smoother batter and frosting.
Variations & Adaptations
If you want to switch things up or accommodate different dietary needs, here are some ideas I’ve tried or thought about:
- Spooky Spice Twist: Add 1 tsp cinnamon and ½ tsp nutmeg to the dry ingredients for a subtle warming flavor that pairs great with Halloween vibes.
- Gluten-Free Version: Swap all-purpose flour for a 1:1 gluten-free baking blend. The texture is slightly denser but still delicious.
- Vegan Adaptation: Use flax eggs (3 tbsp ground flaxseed + 9 tbsp water), dairy-free butter, and plant-based milk with vinegar for the buttermilk. The cake is less rich but still moist and tasty.
- Frosting Swap: Instead of Oreo buttercream, try a cream cheese frosting or chocolate ganache for a different flavor profile.
- Seasonal Fruit Addition: Layer in fresh raspberries or blackberries between the layers for a tart contrast that brightens the cake.
Personally, I once added a splash of espresso powder to the batter for a subtle mocha note — it was surprisingly good and added depth to the chocolate without tasting like coffee.
Serving & Storage Suggestions
This cake is best served at room temperature so the frosting is soft and the layers tender. It pairs beautifully with a cold glass of milk or a warm spiced chai latte to balance the sweetness.
For a festive touch, decorate with Halloween-themed sprinkles, edible glitter, or candy eyeballs. It’s the kind of cake that looks as good as it tastes when presented with a little flair.
Store leftover cake covered tightly in the refrigerator for up to 4 days. Before serving again, let it sit at room temperature for about 30 minutes to regain its softness. You can freeze the cake (wrapped well in plastic and foil) for up to 2 months; thaw overnight in the fridge.
Interestingly, letting the cake rest overnight actually improves the flavors as they meld together, making it even more indulgent the next day.
Nutritional Information & Benefits
Per serving (assuming 12 servings), this cake offers about 420 calories, 22g fat, 55g carbohydrates, and 4g protein. While it’s definitely a treat, the recipe uses real butter and fresh ingredients rather than processed shortcuts.
The cocoa powder provides antioxidants, and the dark color comes from natural ingredients, avoiding artificial dyes beyond the gel food coloring. Using real buttermilk adds some calcium and protein too.
For those watching allergens, this recipe contains dairy, gluten, and eggs, but can be adapted for gluten-free and vegan diets as mentioned earlier. It’s a festive indulgence best enjoyed in moderation, but hey, it’s Halloween!
Conclusion
This Decadent Black Velvet Halloween Layer Cake with Oreo Buttercream is more than just a dessert — it’s a memory resurrected, a little mystery captured in cake form. It’s perfect for anyone who’s ever wanted to recreate a lost favorite or simply impress their Halloween crowd with something both spooky and delicious.
I love this recipe because it’s approachable yet special, comforting but with a playful twist. Whether you stick to the classic or try one of the variations, it invites you to make it your own.
Give it a try, share your tweaks, or tell me how your first bite felt — I’d love to hear your story! And hey, if you’re looking for more chocolatey goodness, you might enjoy the rich layers of chocolate cherry layer cake or the creamy frosting on my classic red velvet cake.
Happy baking, and have a thrilling Halloween!
FAQs
Can I make this cake ahead of time?
Yes! You can bake the layers a day or two in advance and keep them wrapped tightly in the fridge. Assemble and frost the day you plan to serve for the freshest taste.
What’s the difference between black velvet and red velvet cake?
Black velvet uses dark cocoa and black food coloring for a deep, almost black color, while red velvet is lighter with a hint of red and typically has a cream cheese frosting.
Can I use regular cocoa powder instead of Dutch-processed?
Yes, but Dutch-processed cocoa gives a smoother, less acidic flavor that complements the velvet texture better. If you use regular cocoa, you might notice a sharper taste.
How do I crush Oreos without a food processor?
Place the cookies in a sealed plastic bag and gently crush them with a rolling pin or the bottom of a heavy pan until you get a mix of fine crumbs and small chunks.
Can I substitute the buttercream with cream cheese frosting?
Absolutely! Cream cheese frosting pairs wonderfully with black velvet cake for a tangy contrast, though it will change the texture and sweetness slightly.
Pin This Recipe!
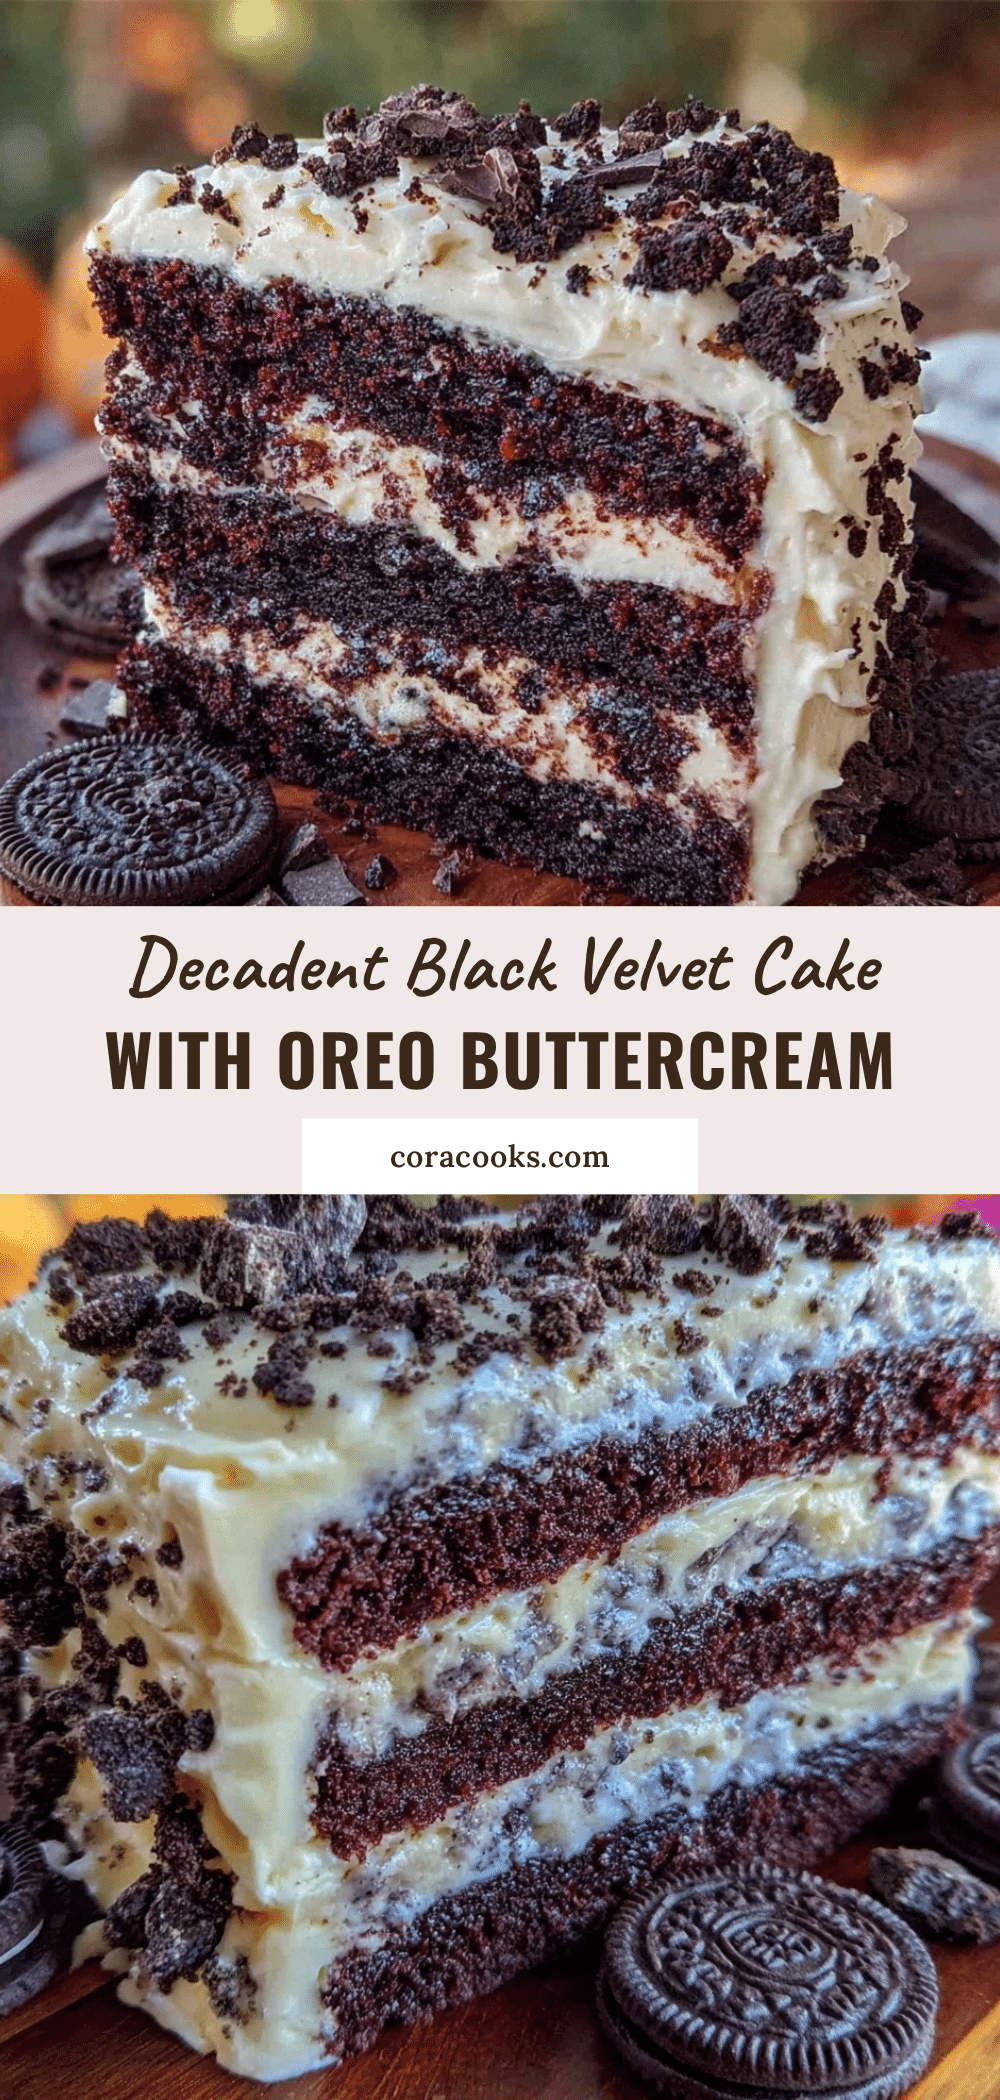
Decadent Black Velvet Halloween Layer Cake Recipe with Oreo Buttercream Frosting
A rich and festive black velvet cake with deep cocoa layers and nostalgic Oreo buttercream frosting, perfect for Halloween celebrations.
- Prep Time: 30 minutes
- Cook Time: 35 minutes
- Total Time: 1 hour 30 minutes
- Yield: 12 servings 1x
- Category: Dessert
- Cuisine: American
Ingredients
- 2 ½ cups (310g) all-purpose flour, sifted
- ⅓ cup (35g) unsweetened Dutch-processed cocoa powder
- 1 ½ tsp baking soda
- 1 tsp baking powder
- ½ tsp salt
- ¾ cup (170g) unsalted butter, softened
- 2 cups (400g) granulated sugar
- 3 large eggs, room temperature
- 1 cup (240ml) buttermilk, room temperature (or 1 cup milk + 1 tbsp vinegar, let sit 5 minutes)
- 2 tsp pure vanilla extract
- 1 tbsp white vinegar
- about 2 tsp black gel food coloring
- 1 cup (225g) unsalted butter, softened (for frosting)
- 4 cups (480g) powdered sugar, sifted
- 2–3 tbsp (30-45ml) heavy cream
- 1 ½ tsp vanilla extract (for frosting)
- 15–20 Oreo cookies, finely crushed (reserve some chunks for decoration)
- A pinch of salt (for frosting)
Instructions
- Preheat oven to 350°F (175°C). Grease two 8-inch cake pans and line with parchment paper.
- Sift together flour, cocoa powder, baking soda, baking powder, and salt in a large bowl.
- In a separate bowl, beat ¾ cup softened butter with granulated sugar until pale and fluffy, about 3-4 minutes on medium speed.
- Add eggs one at a time, beating well after each addition, then mix in 2 tsp vanilla extract.
- Alternately add dry ingredients and buttermilk to the butter mixture, starting and ending with dry ingredients. Mix gently on low speed.
- Stir in white vinegar and black gel food coloring until batter is smooth and evenly colored.
- Divide batter evenly between prepared pans, tap pans to release air bubbles.
- Bake for 30-35 minutes or until a toothpick inserted in the center comes out clean and edges pull slightly from the pan.
- Cool cakes in pans for 10 minutes, then transfer to wire racks to cool completely.
- For the frosting, beat 1 cup softened butter until creamy. Gradually add powdered sugar, mixing on low speed.
- Add heavy cream and 1 ½ tsp vanilla extract, then beat on high until light and fluffy.
- Fold in crushed Oreo cookies, reserving some chunks for decoration.
- Place one cake layer on serving plate, spread a thick layer of Oreo buttercream on top, then add second layer.
- Frost top and sides evenly, decorate with reserved Oreo chunks or Halloween sprinkles.
- Refrigerate cake for at least 30 minutes to set frosting. Bring to room temperature before serving.
Notes
Use real buttermilk for best velvet texture. Sift cocoa powder and powdered sugar to avoid lumps. Beat butter and sugar well for a light crumb. Be gentle when folding flour to avoid tough cake. Check oven temperature and start checking cake before timer ends. Adjust frosting consistency with cream or powdered sugar as needed. Crush Oreos gently for a mix of fine crumbs and chunks. Room temperature ingredients blend better.
Nutrition
- Serving Size: 1 slice (1/12 of cak
- Calories: 420
- Fat: 22
- Carbohydrates: 55
- Protein: 4
Keywords: black velvet cake, Halloween cake, Oreo buttercream, chocolate cake, festive dessert, layered cake, spooky dessert