Love this? Save it for later!
Share the inspiration with your friends
There used to be a little diner on the corner of Elm and 4th—the kind with cracked vinyl booths and a coffee pot that had been brewing since the early 90s—that made the most incredible chicken pot pie. When they closed in 2017, I literally stood outside and stared at the “For Lease” sign for a solid five minutes. I’m not kidding. After 11 tries—including one disastrous version where I forgot to thicken the gravy and ended up with chicken soup in a crust—I finally got it. But here’s the thing: I never actually wanted the crust. I wanted the filling. That creamy, herby, soul-warming filling that made you forget it was raining outside and you had a 7 AM meeting the next day.
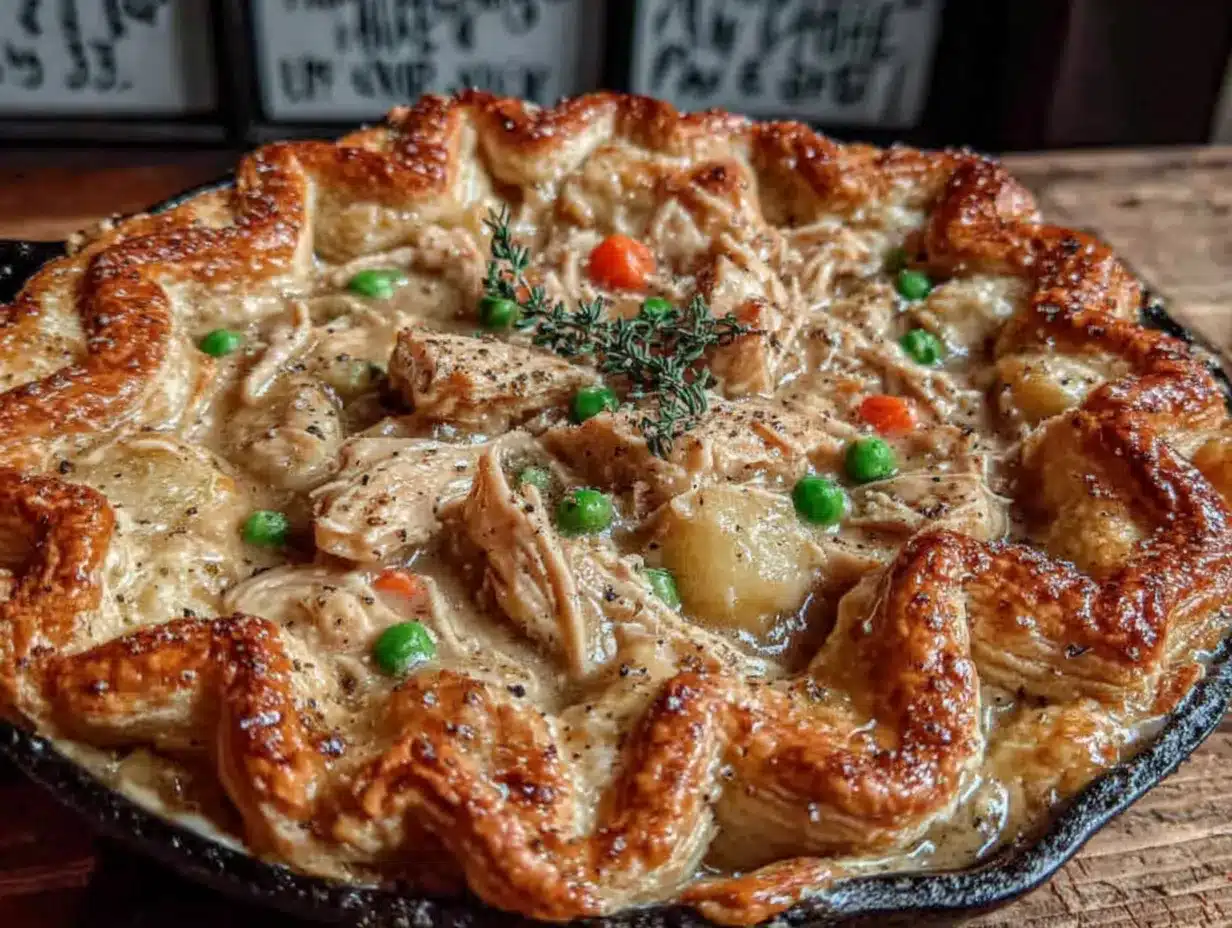
So I did what any reasonable person would do. I ditched the crust entirely. I mean, honestly, who has time to roll out pastry on a Tuesday night? Not me. Not you either, probably. This one-pan chicken pot pie skillet is the weeknight hero I didn’t know I needed. It’s got all the cozy, comforting flavor of the original—that rich, velvety gravy with tender chicken and soft vegetables—but it comes together in about 30 minutes, and you only dirty one pan. Maybe you’ve been there: staring into your fridge at 6 PM, exhausted, wondering if you have the energy to make something that actually tastes good. This is the answer.
The first time I made this, I burned my finger on the skillet handle because I forgot a towel was sitting on it. Totally worth it. The second time, I doubled the recipe and my neighbor, Mrs. Patterson, knocked on my door to ask what smelled so good. Now I make it every other week, and let me tell you—it never gets old. This is the kind of recipe that stays with you, not because it’s fancy, but because it works. It’s real food for real people, and it’s exactly what you need on a busy weeknight.
Why You’ll Love This Recipe
Let me be honest with you—I’ve tested a lot of chicken pot pie recipes over the years. Some were too complicated, some took forever, and some just didn’t taste like the real thing. This one-pan version is different. It’s the one I actually make on a regular Tuesday when I’m tired and hungry and just need dinner to happen. Here’s why it works:
- Quick & Easy: From start to finish, this comes together in about 30 minutes. No fussing with pie crust, no multiple pots and pans, no complicated techniques. Just chop, sauté, simmer, and eat.
- Simple Ingredients: You probably already have most of these in your kitchen. Butter, flour, chicken broth, milk, frozen vegetables, and some cooked chicken. No fancy grocery trips required.
- Perfect for Weeknights: This is the definition of a busy night dinner. It’s filling, comforting, and requires minimal effort. You can even prep the veggies ahead of time if you’re feeling organized.
- Crowd-Pleaser: My kids inhale this. My husband asks for seconds. Even my picky aunt, who “doesn’t like creamy things,” cleaned her plate. It’s that good.
- Unbelievably Delicious: The texture is pure comfort—thick, velvety gravy with tender chunks of chicken and soft vegetables. And the flavor? Rich, savory, and perfectly seasoned. You won’t miss the crust, I promise.
What makes this recipe different from the rest is the technique. Instead of making a separate roux and then adding liquid, I build the gravy right in the skillet with the vegetables. This means the flavors meld together beautifully, and you get that deep, savory taste without any extra steps. It’s not just another version of chicken pot pie—it’s the best version for real life.
This recipe is the kind that makes you close your eyes after the first bite. It’s comfort food reimagined—faster, simpler, but with the same soul-soothing satisfaction. Perfect for impressing your family without stress, or turning a simple Tuesday night into something memorable.
What Ingredients You Will Need
This recipe uses simple, wholesome ingredients to deliver that classic chicken pot pie flavor without the fuss. Everything here is easy to find and most are pantry staples. Here’s what you’ll need:
For the Base
- 2 tablespoons unsalted butter (I prefer Land O’Lakes for consistent results, but any brand works)
- 1 medium yellow onion, diced (about 1 cup; adds savory depth to the gravy)
- 2 medium carrots, peeled and diced (about 1 cup; for sweetness and texture)
- 2 celery stalks, diced (about 1/2 cup; adds that classic pot pie flavor)
- 3 cloves garlic, minced (fresh is best, but jarred minced garlic works in a pinch)
For the Gravy
- 1/3 cup all-purpose flour (this thickens the gravy; you can use gluten-free all-purpose blend if needed)
- 2 cups low-sodium chicken broth (I recommend Swanson or Kitchen Basics for best flavor)
- 1 cup whole milk (adds richness; 2% or even oat milk works, but the gravy won’t be as creamy)
- 1/2 cup heavy cream (optional but highly recommended for extra velvety texture)
- 1 teaspoon salt (adjust to taste)
- 1/2 teaspoon black pepper
- 1 teaspoon dried thyme (the secret to that classic pot pie flavor)
- 1/2 teaspoon dried rosemary (crush it between your fingers before adding for more flavor)
- 1/4 teaspoon garlic powder (not strictly necessary, but I love the extra savory kick)
For the Filling
- 2 cups cooked chicken, shredded or diced (rotisserie chicken is my go-to for speed; leftover grilled chicken works too)
- 1 cup frozen peas (no need to thaw—just toss them in frozen)
- 1 cup frozen corn kernels (adds sweetness and texture)
- 1/2 cup frozen green beans, cut into 1-inch pieces (optional, but I love the extra veggie boost)
For the Topping (Optional but Recommended)
- 1 can (16.3 oz) refrigerated biscuits (like Pillsbury Grands; this makes it feel like a real pot pie without the work)
- 1 tablespoon melted butter (for brushing on the biscuits before baking)
- Flaky sea salt (for sprinkling on top)
Substitution Tips: If you’re dairy-free, use olive oil instead of butter, and unsweetened oat milk or almond milk instead of regular milk. The gravy won’t be quite as rich, but it’ll still be delicious. For a gluten-free version, use a 1:1 gluten-free flour blend in place of all-purpose flour. And if you don’t have frozen peas and corn, any frozen vegetable mix will work—just make sure it’s thawed and drained.
Sourcing Note: I always look for firm, bright-colored carrots and celery that snaps when you break it. Fresh vegetables make a difference here, but frozen work in a pinch. And for the chicken, rotisserie chicken is your best friend—it’s already seasoned and perfectly cooked.
Equipment Needed
One of the best things about this recipe is how little equipment you need. Here’s what you’ll need:
- Large oven-safe skillet (12-inch cast iron or stainless steel works best; you’ll need a lid or a piece of foil to cover it)
- Wooden spoon or silicone spatula (for stirring the gravy without scratching your pan)
- Cutting board and chef’s knife (for prepping the vegetables)
- Measuring cups and spoons (for accuracy—this is not the time to eyeb it)
- Small bowl (for mixing the flour and broth if you want to avoid lumps)
- Oven mitts (the skillet gets hot, and I learned this the hard way)
Budget-Friendly Alternatives: If you don’t have an oven-safe skillet, you can cook the filling in a regular skillet and then transfer it to a 9×13 baking dish before adding the biscuits. If you don’t have a lid, a sheet of aluminum foil works perfectly. And if you don’t have a wooden spoon, any spoon will do—just be careful not to scratch non-stick pans.
Personal Note: I use my grandmother’s old cast iron skillet for this recipe, and I swear it adds something to the flavor. But honestly, any heavy-bottomed pan will work. Just make sure it’s oven-safe if you’re doing the biscuit topping.
Preparation Method
Alright, let’s get cooking. This comes together fast, so have everything prepped and ready to go before you start. Trust me on this—I’ve learned the hard way that scrambling for ingredients while the onions are burning is not fun.
- Prep the vegetables. Dice the onion, carrots, and celery into small, uniform pieces (about 1/4-inch cubes). This helps them cook evenly. Mince the garlic and set everything aside. If you’re using rotisserie chicken, shred or dice it now. Time: 5 minutes.
- Melt the butter. Place your skillet over medium heat and add the 2 tablespoons of butter. Let it melt completely, swirling the pan occasionally. The butter should be sizzling but not browning—if it starts to brown, your heat is too high.
- Sauté the aromatics. Add the diced onion, carrots, and celery to the skillet. Cook, stirring occasionally, for 5-7 minutes until the vegetables are softened and the onion is translucent. The carrots should be tender when pierced with a fork. Add the minced garlic and cook for another 30 seconds until fragrant. Pro tip: If the garlic starts to brown, remove the pan from the heat for a few seconds—burnt garlic tastes bitter.
- Make the roux. Sprinkle the 1/3 cup of flour evenly over the cooked vegetables. Stir constantly for 1-2 minutes until the flour is fully incorporated and has a light golden color. This cooks out the raw flour taste and ensures a smooth gravy. Watch for: The mixture should look like a thick paste coating the vegetables.
- Add the liquid. Slowly pour in the chicken broth while whisking or stirring vigorously. Keep stirring until the mixture is smooth and starts to thicken, about 2-3 minutes. Then add the milk and heavy cream (if using) and continue stirring. The gravy should be thick enough to coat the back of a spoon. Troubleshooting: If the gravy is too thick, add a splash more broth. If it’s too thin, let it simmer for another minute or two.
- Season the gravy. Add the salt, pepper, dried thyme, dried rosemary, and garlic powder. Stir well to combine. Taste and adjust the seasoning—you might want more salt or pepper depending on your preference. My personal tip: I always add a pinch more thyme than I think I need. It makes the dish taste like it’s been simmering for hours.
- Add the chicken and vegetables. Stir in the cooked chicken, frozen peas, frozen corn, and frozen green beans (if using). Let the mixture simmer for 3-4 minutes until everything is heated through and the frozen vegetables are tender. The gravy should be thick and bubbly. Sensory cue: You’ll know it’s ready when the peas turn bright green and the corn is plump.
- Prepare the biscuit topping (optional). If you’re using the biscuit topping, preheat your oven to 375°F (190°C). Open the can of refrigerated biscuits and separate them. Place the biscuits on top of the filling, spacing them evenly. Brush the tops with melted butter and sprinkle with flaky sea salt. Note: If you’re not using biscuits, you can serve the filling as-is with crusty bread or over rice.
- Bake the skillet. Transfer the skillet to the preheated oven and bake for 12-15 minutes until the biscuits are golden brown and cooked through. The filling should be bubbling around the edges. Check for doneness: The biscuits should be puffed and golden, and a toothpick inserted into the center should come out clean.
- Rest and serve. Remove the skillet from the oven and let it rest for 5 minutes before serving. This allows the gravy to set slightly and prevents burning your mouth. Serve hot, straight from the skillet. Warning: The skillet will be extremely hot—use oven mitts and warn your family members!
Cooking Tips & Techniques
I’ve made this recipe more times than I can count, and I’ve learned a few things along the way. Here are my best tips for getting it right every time:
The Roux is Everything
The key to a smooth, lump-free gravy is cooking the flour properly. Don’t rush this step. Stir constantly for a full 1-2 minutes until the flour turns a light golden color. If you skip this, your gravy will taste like raw flour—and nobody wants that. I learned this the hard way when I made it for my in-laws and they politely ate it while making faces.
Don’t Skip the Veggies
The onion, carrot, and celery mixture (called a mirepoix) is the foundation of this dish. It adds depth and sweetness that you can’t get from just adding frozen vegetables. Take the time to dice them small and cook them until they’re soft. Your taste buds will thank you.
Use Rotisserie Chicken
This is my number one weeknight shortcut. A store-bought rotisserie chicken saves you at least 20 minutes of cooking time and adds incredible flavor. Just shred the meat and you’re good to go. If you’re cooking chicken from scratch, poach it in seasoned water for 15-20 minutes until tender, then shred.
Watch Your Heat
Medium heat is your friend here. Too high and the butter will burn, the garlic will turn bitter, and the gravy will scorch. Too low and everything will take forever. Medium heat gives you that perfect sizzle without the risk of burning.
Make-Ahead Magic
You can prep the vegetables and shred the chicken up to 2 days ahead. Store them in separate containers in the fridge. When you’re ready to cook, just pull everything out and start. This cuts your active cooking time down to about 15 minutes.
One-Pan Cleanup
Here’s a trick I figured out after too many sinkfuls of dishes: wipe the skillet with a paper towel between steps if needed, but honestly, this recipe doesn’t require it. Everything happens in the same pan, so cleanup is a breeze. Just soak the pan in hot soapy water for 10 minutes before washing.
Variations & Adaptations
One of the best things about this recipe is how adaptable it is. Here are some of my favorite variations:
Dietary Variations
- Gluten-Free: Use a 1:1 gluten-free flour blend instead of all-purpose flour. The gravy will be slightly thinner, but still delicious. Serve with gluten-free biscuits or cornbread.
- Dairy-Free: Substitute olive oil or vegan butter for the butter, and use unsweetened oat milk or almond milk instead of regular milk. Skip the heavy cream or use coconut cream for richness.
- Lower Carb: Skip the flour and use a slurry of 1 tablespoon cornstarch mixed with 2 tablespoons cold water to thicken the gravy. Serve over cauliflower rice or mashed cauliflower instead of biscuits.
Flavor Twists
- Herb Lover’s Version: Add 1 tablespoon fresh chopped parsley and 1 teaspoon fresh dill at the end for a bright, fresh flavor. This is amazing in the spring.
- Spicy Kick: Add 1/2 teaspoon red pepper flakes or a diced jalapeño with the onions for some heat. A dash of hot sauce at the end works too.
- Mushroom & Leek: Swap the celery for 1 cup sliced mushrooms and 1 leek (cleaned and sliced). Sauté them with the onions and carrots for an earthy, sophisticated version.
Different Cooking Methods
- Slow Cooker: Sauté the vegetables in a skillet, then transfer everything to a slow cooker. Cook on low for 4-6 hours or high for 2-3 hours. Add the frozen vegetables in the last 30 minutes. Serve with biscuits on the side.
- Instant Pot: Use the sauté function for the vegetables and roux, then add the broth and chicken. Pressure cook on high for 5 minutes, then quick release. Stir in the frozen vegetables and let them warm through before serving.
Personal Variation
My favorite way to make this is with leftover Thanksgiving turkey and a splash of white wine. I add 1/4 cup dry white wine after the garlic and let it cook for a minute before adding the flour. It adds a subtle acidity that balances the richness perfectly. I made this the day after Thanksgiving last year, and my husband said it was better than the actual holiday meal.
Serving & Storage Suggestions
This one-pan chicken pot pie skillet is incredibly versatile when it comes to serving. Here’s how to get the most out of it:
Serving
Serve the skillet hot, straight from the oven. The biscuits should be golden and puffed, and the filling should be bubbling. Spoon generous portions into shallow bowls, making sure each serving gets a biscuit on top. If you skipped the biscuit topping, serve the filling over mashed potatoes, egg noodles, or with crusty bread for dipping.
What to Serve With It: A simple green salad with a lemon vinaigrette is the perfect side—it cuts through the richness of the gravy. Roasted broccoli or green beans also work well. And if you’re feeling indulgent, a glass of crisp white wine like Sauvignon Blanc or a dry Riesling pairs beautifully.
Storage
Refrigerator: Store leftovers in an airtight container in the refrigerator for up to 4 days. The gravy will thicken as it cools, but it’ll loosen up when reheated. Pro tip: If you have leftover biscuits, store them separately to prevent them from getting soggy.
Freezer: This recipe freezes beautifully. Let the filling cool completely, then transfer it to a freezer-safe container. Freeze for up to 3 months. Thaw overnight in the refrigerator before reheating. Note: If you added the biscuit topping, the biscuits won’t freeze well—consider freezing the filling and making fresh biscuits when you’re ready to serve.
Reheating
Stovetop: Reheat the filling in a skillet over medium-low heat, stirring occasionally, until heated through. Add a splash of broth or milk if the gravy is too thick.
Microwave: Place individual portions in a microwave-safe bowl and heat on high for 1-2 minutes, stirring halfway through. This is the fastest method, but the biscuits will be softer.
Oven: For the best texture, reheat the entire skillet in a 350°F oven for 10-15 minutes until bubbly. If the biscuits are getting too dark, cover them loosely with foil.
Flavor Development
Here’s a secret: this dish actually tastes better the next day. The flavors meld together overnight, and the gravy becomes even more savory and complex. I often make it a day ahead on purpose, just so I can enjoy the leftovers. The biscuits won’t be as crisp, but the filling is absolutely spectacular.
Nutritional Information & Benefits
While this is definitely comfort food, it’s not without its nutritional merits. Here’s a breakdown of what you’re getting in each serving (based on 6 servings with the biscuit topping):
| Nutrient | Amount per Serving |
|---|---|
| Calories | 485 |
| Protein | 28g |
| Carbohydrates | 38g |
| Fat | 24g |
| Saturated Fat | 12g |
| Fiber | 5g |
| Sodium | 890mg |
| Vitamin A | 85% DV |
| Vitamin C | 15% DV |
| Iron | 15% DV |
Health Benefits: This dish is packed with vegetables—carrots, celery, peas, corn, and green beans—which provide fiber, vitamins, and antioxidants. The chicken offers lean protein to keep you full and satisfied. And while it’s not low-fat, the butter and cream are used in moderation to create a rich, satisfying meal that doesn’t leave you feeling deprived.
Dietary Considerations: This recipe contains gluten (from the flour and biscuits) and dairy (from the butter, milk, and cream). It can be adapted for gluten-free and dairy-free diets as noted above. It’s also naturally nut-free and egg-free (unless you use egg-wash on the biscuits).
Personal Wellness Note: I believe in balance. This isn’t a health food, but it’s real food made with real ingredients. It’s the kind of meal that nourishes your body and your soul. And honestly, sometimes that’s exactly what you need after a long day.
Conclusion
Look, I know there are a million chicken pot pie recipes out there. But this one-pan skillet version? It’s different. It’s faster, simpler, and honestly more satisfying than the original. No fussy crust, no multiple dishes to wash, no complicated techniques. Just pure, creamy, comforting goodness that comes together in about 30 minutes.
This recipe is for those nights when you’re tired and hungry and just need something that works. It’s for the times when you want to feel like you made something special, but you don’t have the energy for a project. It’s for the busy parents, the exhausted professionals, and anyone who deserves a warm, delicious meal without the stress.
I want you to make this your own. Add more vegetables, swap in different herbs, or skip the biscuits if that’s your thing. The beauty of this recipe is that it’s forgiving and flexible. It’s a starting point, not a rulebook.
So here’s my challenge to you: make this on a Tuesday night. Invite someone you love to share it with you. And when you take that first bite—the one where the creamy gravy coats your tongue and the tender chicken melts in your mouth—remember that good food doesn’t have to be complicated. Sometimes the best meals come from the simplest places.
I’d love to hear how it turns out for you. Drop a comment below and let me know what variations you tried, or tag me in your photos on social media. Happy cooking, friends!
Frequently Asked Questions
Can I use frozen mixed vegetables instead of individual frozen veggies?
Absolutely! A 16-ounce bag of frozen mixed vegetables (peas, carrots, corn, green beans) works perfectly. Just make sure they’re thawed and drained before adding them to the skillet, or add them frozen and cook for an extra 2-3 minutes.
Can I make this without the biscuit topping?
Yes, and it’s still delicious. The filling is rich and satisfying on its own. Serve it over rice, egg noodles, mashed potatoes, or with crusty bread for dipping. You can also top it with puff pastry or crescent roll dough if you want something different.
How do I prevent the gravy from being lumpy?
The key is to cook the flour for a full 1-2 minutes before adding the liquid. This creates a smooth roux that incorporates easily. Also, add the broth slowly while whisking constantly. If you still get lumps, use an immersion blender or a regular blender to smooth them out.
Can I use leftover turkey instead of chicken?
Yes, this is a fantastic way to use up leftover Thanksgiving turkey. The recipe works exactly the same way. I actually prefer it with turkey because it’s slightly more flavorful. Just make sure the turkey is fully cooked before adding it to the skillet.
How can I make this recipe lower in calories?
Skip the heavy cream and use 2% milk instead of whole milk. Use olive oil instead of butter, and reduce the amount to 1 tablespoon. Skip the biscuit topping and serve the filling over steamed vegetables or cauliflower rice. You can also use low-sodium chicken broth to reduce the sodium content.
Pin This Recipe!

Quick One-Pan Chicken Pot Pie Skillet Recipe

A quick and easy one-pan chicken pot pie skillet that delivers all the creamy, herby, soul-warming flavor of the classic dish without the fuss of a crust. Ready in about 30 minutes, this weeknight hero uses simple ingredients and only one pan.
- Prep Time: 15 minutes
- Cook Time: 30 minutes
- Total Time: 45 minutes
- Yield: 6 servings 1x
- Category: Main Course
- Cuisine: American
Ingredients
- 2 tablespoons unsalted butter
- 1 medium yellow onion, diced (about 1 cup)
- 2 medium carrots, peeled and diced (about 1 cup)
- 2 celery stalks, diced (about 1/2 cup)
- 3 cloves garlic, minced
- 1/3 cup all-purpose flour
- 2 cups low-sodium chicken broth
- 1 cup whole milk
- 1/2 cup heavy cream (optional)
- 1 teaspoon salt
- 1/2 teaspoon black pepper
- 1 teaspoon dried thyme
- 1/2 teaspoon dried rosemary, crushed
- 1/4 teaspoon garlic powder
- 2 cups cooked chicken, shredded or diced
- 1 cup frozen peas
- 1 cup frozen corn kernels
- 1/2 cup frozen green beans, cut into 1-inch pieces (optional)
- 1 can (16.3 oz) refrigerated biscuits (optional)
- 1 tablespoon melted butter (for brushing biscuits)
- Flaky sea salt (for sprinkling)
Instructions
- Prep the vegetables. Dice the onion, carrots, and celery into small, uniform pieces (about 1/4-inch cubes). Mince the garlic. If using rotisserie chicken, shred or dice it now.
- Melt the butter. Place your skillet over medium heat and add the 2 tablespoons of butter. Let it melt completely, swirling the pan occasionally. The butter should be sizzling but not browning.
- Sauté the aromatics. Add the diced onion, carrots, and celery to the skillet. Cook, stirring occasionally, for 5-7 minutes until the vegetables are softened and the onion is translucent. Add the minced garlic and cook for another 30 seconds until fragrant.
- Make the roux. Sprinkle the 1/3 cup of flour evenly over the cooked vegetables. Stir constantly for 1-2 minutes until the flour is fully incorporated and has a light golden color.
- Add the liquid. Slowly pour in the chicken broth while whisking or stirring vigorously. Keep stirring until the mixture is smooth and starts to thicken, about 2-3 minutes. Then add the milk and heavy cream (if using) and continue stirring until the gravy is thick enough to coat the back of a spoon.
- Season the gravy. Add the salt, pepper, dried thyme, dried rosemary, and garlic powder. Stir well to combine. Taste and adjust the seasoning.
- Add the chicken and vegetables. Stir in the cooked chicken, frozen peas, frozen corn, and frozen green beans (if using). Let the mixture simmer for 3-4 minutes until everything is heated through and the frozen vegetables are tender.
- Prepare the biscuit topping (optional). If using the biscuit topping, preheat your oven to 375°F (190°C). Open the can of refrigerated biscuits and separate them. Place the biscuits on top of the filling, spacing them evenly. Brush the tops with melted butter and sprinkle with flaky sea salt.
- Bake the skillet. Transfer the skillet to the preheated oven and bake for 12-15 minutes until the biscuits are golden brown and cooked through. The filling should be bubbling around the edges.
- Rest and serve. Remove the skillet from the oven and let it rest for 5 minutes before serving. Serve hot, straight from the skillet.
Notes
For a dairy-free version, use olive oil instead of butter and unsweetened oat milk or almond milk instead of regular milk. For gluten-free, use a 1:1 gluten-free flour blend. The dish tastes even better the next day as flavors meld. Store leftovers in an airtight container in the refrigerator for up to 4 days, or freeze the filling for up to 3 months.
Nutrition
- Serving Size: 1 serving (with bisc
- Calories: 485
- Sugar: 8
- Sodium: 890
- Fat: 24
- Saturated Fat: 12
- Carbohydrates: 38
- Fiber: 5
- Protein: 28
Keywords: chicken pot pie, one-pan, skillet, quick, easy, weeknight dinner, comfort food, chicken, vegetables, creamy, biscuit topping