Love this? Save it for later!
Share the inspiration with your friends
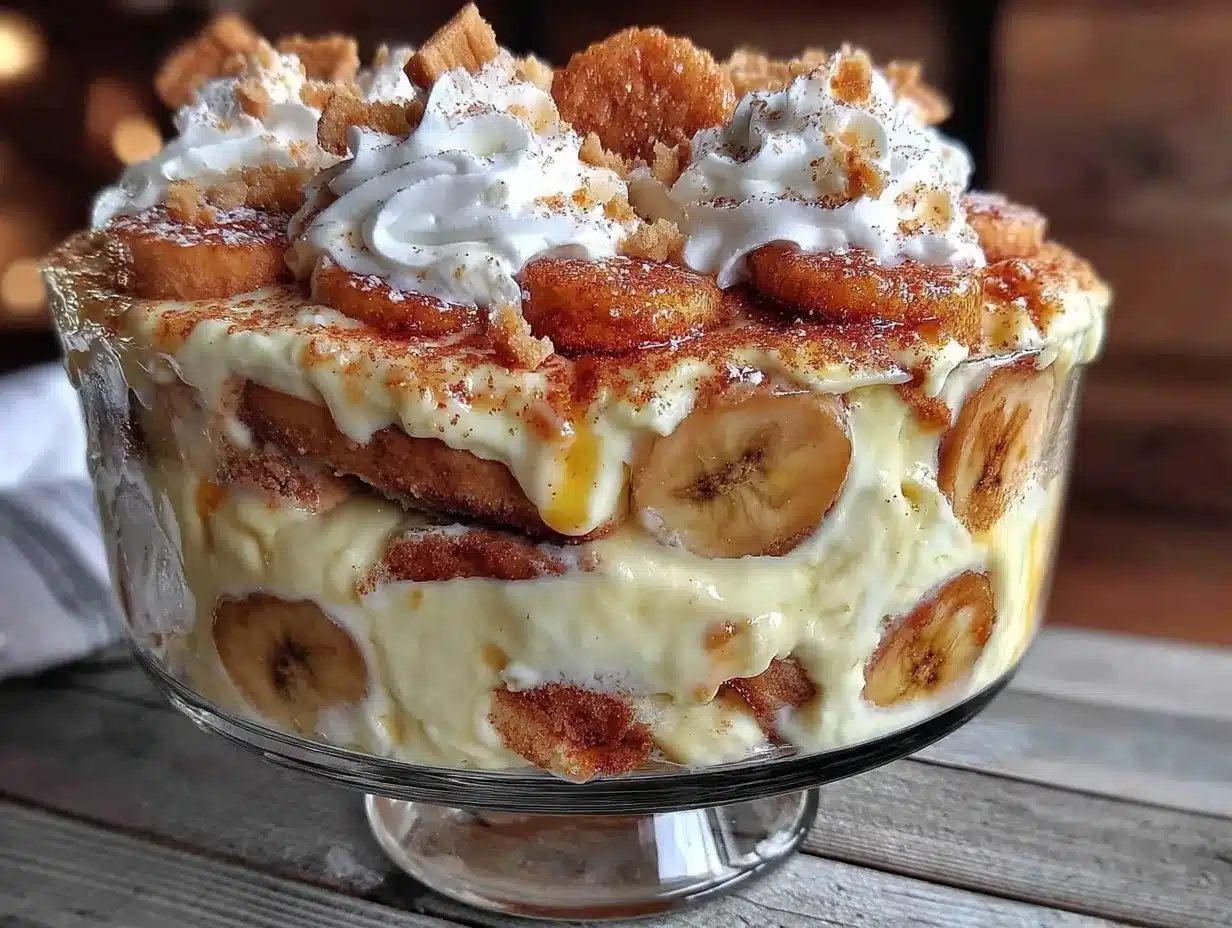
“You know,” my neighbor Linda said one afternoon as we chatted over the fence, “this banana pudding recipe has been in my family since forever.” Honestly, I wasn’t expecting much when she handed over that slightly stained handwritten card. But, well, let me tell you — that first spoonful took me right back to those lazy summer afternoons, when the heat made the ice cream melt faster than you could eat it. This classic homemade Grandma’s banana pudding with Nilla wafers is more than just a dessert; it’s a little jar of nostalgia, a simple sweet that somehow never gets old.
It was a rainy Thursday, and I was juggling a mess of groceries, including a bunch of bananas that were way too ripe for anything else. Linda popped by (as she often does) with a warm smile and a memory to share. I didn’t expect the recipe to be anything special—it was just bananas, pudding, and those little vanilla wafers, right? But after that first bite, I was hooked. The creamy vanilla custard, the soft bananas, and the crisp wafers that soak up just the right amount of flavor—it’s comfort food at its best.
Maybe you’ve been there, staring at a bunch of ripe bananas, wondering if banana bread is the only option. This recipe is your answer. It’s straightforward, unpretentious, and the kind of dessert that feels like a hug from an old friend. There’s something about making it the way Grandma did—no shortcuts, just love and patience. I’m still working on not making a mess when layering the pudding, bananas, and wafers (trust me, it happens), but that’s part of the charm. Stick with me, and I’ll show you how to make this timeless classic your own.
Why You’ll Love This Recipe
This classic homemade Grandma’s banana pudding with Nilla wafers isn’t just another dessert—it’s a crowd-pleaser that’s been tested and loved over countless family gatherings and casual dinners. I’ve made this recipe dozens of times, tweaking it here and there, and honestly, it’s one of the few recipes that always comes out just right.
- Quick & Easy: Ready in under 30 minutes, making it perfect for busy weeknights or last-minute dessert plans.
- Simple Ingredients: Uses pantry staples and fresh bananas—no need to hunt for fancy items.
- Perfect for Every Occasion: Whether it’s a potluck, holiday feast, or cozy family night, this pudding fits right in.
- Crowd-Pleaser: Kids and adults alike ask for seconds (and sometimes thirds!).
- Unbelievably Delicious: The smooth, creamy texture paired with crunchy Nilla wafers is just irresistible.
What sets this banana pudding apart? It’s the balance between creamy homemade custard and the nostalgic crunch of Nilla wafers. Instead of using instant pudding mixes, we make the custard from scratch, which gives it that perfect silky texture and fresh vanilla flavor. Plus, layering the bananas and wafers thoughtfully ensures every bite is a harmony of flavors and textures. Honestly, it’s the kind of recipe that makes you close your eyes and savor every spoonful, thinking, “Yep, this is the real deal.”
What Ingredients You Will Need
This recipe uses simple, wholesome ingredients to deliver bold flavor and satisfying texture without the fuss. Most of these are pantry staples, and the bananas add that fresh, natural sweetness that ties everything together.
- Milk: 3 cups (720 ml), whole milk preferred for richness
- Granulated Sugar: 1 cup (200 g), for that classic sweet taste
- Egg Yolks: 4 large, room temperature (adds creaminess and body)
- Cornstarch: 1/3 cup (40 g), for thickening the pudding
- Salt: 1/4 teaspoon, to balance sweetness
- Vanilla Extract: 2 teaspoons, pure vanilla for best flavor (I like Nielsen-Massey)
- Bananas: 4 to 5 ripe, peeled and sliced (firm but ripe works best)
- Nilla Wafers: About 45 wafers, original flavor
- Whipped Cream (optional): 1 cup (240 ml), for topping (freshly whipped beats store-bought anytime!)
Some tips on ingredients: I recommend using firm, ripe bananas—not too mushy—to keep the texture just right. If you want a dairy-free option, swap the milk with almond or oat milk, but note the custard will be less rich. For gluten-free, you can find gluten-free vanilla wafers online or in specialty stores.
Equipment Needed
- Medium saucepan – for cooking the custard evenly without scorching
- Whisk – essential for smooth custard, helps prevent lumps
- Mixing bowls – at least two, one for eggs and sugar, one for assembling
- 9×13 inch (23×33 cm) glass or ceramic baking dish – perfect for layering
- Measuring cups and spoons – accuracy matters for pudding consistency
- Rubber spatula – for scraping down sides of the pan and folding ingredients
If you don’t have a whisk, a fork can work in a pinch, but it’s harder to get that silky custard texture. Glass dishes are my favorite for serving because you can see those lovely layers through the sides. Plus, they hold temperature well, which helps the pudding set. For budget-friendly options, a simple stainless steel pan and any oven-safe dish from your kitchen will do just fine.
Preparation Method
- Combine Dry Ingredients: In a medium saucepan, whisk together 1 cup (200 g) sugar, 1/3 cup (40 g) cornstarch, and 1/4 teaspoon salt. This mix ensures the pudding thickens nicely. (5 minutes)
- Add Milk Gradually: Slowly whisk in 3 cups (720 ml) whole milk, making sure there are no lumps. The slow addition helps prevent clumps. (3 minutes)
- Cook the Mixture: Place the saucepan over medium heat. Stir constantly with a whisk to avoid burning. You’ll notice the pudding starting to thicken after about 7-10 minutes. The texture should coat the back of a spoon. (10 minutes)
- Temper the Egg Yolks: In a separate bowl, lightly beat 4 large egg yolks. Slowly pour about 1 cup (240 ml) of the hot milk mixture into the yolks, whisking constantly to avoid scrambling them. (5 minutes)
- Combine and Cook: Pour the tempered yolks back into the saucepan. Continue cooking, stirring constantly, for another 2-3 minutes until thickened and smooth. It should be thick but still pourable. (3 minutes)
- Remove from Heat and Add Vanilla: Stir in 2 teaspoons of pure vanilla extract. This step gives the pudding that warm aroma and flavor you’re craving. (1 minute)
- Cool Slightly: Transfer the pudding to a bowl. Cover the surface with plastic wrap to prevent a skin from forming. Let it cool to room temperature, about 30 minutes. (30 minutes)
- Layer the Pudding: In your 9×13 inch (23×33 cm) dish, start with a layer of Nilla wafers (about half the package). Add a layer of sliced bananas (4 to 5 ripe bananas, sliced), then pour half the pudding over the top. Repeat the layers—wafers, bananas, pudding. (10 minutes)
- Chill: Refrigerate for at least 4 hours, preferably overnight, to let the flavors meld and the wafers soften just right. (4+ hours)
- Optional Topping: Before serving, spread freshly whipped cream over the pudding for an extra creamy touch. (5 minutes)
Pro tip: If your pudding gets too thick while cooking, a splash of milk can loosen it up. And don’t rush the chilling—this step is key for the flavors to blend and the texture to become that perfect creamy-yet-soft bite.
Cooking Tips & Techniques
Here’s what I’ve learned after many batches (and a few too-runny ones!). First, constant stirring is non-negotiable when cooking the custard. You want to avoid those dreaded lumps and scorched bits on the bottom of the pan. I like to keep the heat medium, never too high—patience really pays off here.
Tempering the eggs is another crucial step. Pouring the hot milk slowly into the eggs while whisking prevents scrambled eggs in your pudding, which, trust me, I accidentally made once. It’s a simple step but can make all the difference.
When layering, don’t overdo the bananas or wafers in one spot. Spread them evenly so every bite gets a little bit of each—balanced layers make the pudding sing. Also, if you’re short on time, chilling for at least two hours will work, but overnight is best for that creamy texture and flavor melding.
One last thing: I like to cover the pudding with plastic wrap pressed against the surface (before refrigeration) to stop a skin from forming on top. It’s a little trick my grandma taught me, and it really works.
Variations & Adaptations
- Dietary Swap: Use coconut milk and dairy-free whipped topping for a vegan-friendly banana pudding. The coconut adds a lovely subtle flavor that complements the bananas nicely.
- Seasonal Twist: In summer, add fresh berries between layers for a colorful, juicy pop. Strawberries and blueberries mix beautifully with the vanilla custard.
- Chocolate Lover’s Version: Add a layer of mini chocolate chips or drizzle melted chocolate over the top before chilling. It adds a rich contrast that’s hard to resist.
- Cooking Method Change: For a no-cook shortcut, use instant vanilla pudding and fold in whipped cream, but honestly, the homemade custard is worth the extra effort.
- Personal Variation: Once, I swapped out Nilla wafers for crispy graham crackers. The texture was different but delicious—just a bit crunchier and less sweet.
Serving & Storage Suggestions
Serve this banana pudding chilled, straight from the fridge. It’s delightful in a glass bowl or individual parfait glasses for a pretty presentation. Pair it with a hot cup of coffee or a cold glass of milk to balance the sweetness.
If you have leftovers (which is rare!), cover tightly and store in the refrigerator for up to 3 days. The flavors actually deepen overnight, but the wafers will get softer over time. You can also freeze it, but the texture of bananas changes a bit after thawing, so I recommend eating fresh.
When reheating (if you want it warm), do so gently in the microwave for 20-30 seconds—just enough to take the chill off without separating the pudding.
Nutritional Information & Benefits
Each serving of this classic homemade banana pudding with Nilla wafers contains approximately 280 calories, with about 6 grams of fat, 45 grams of carbohydrates, and 5 grams of protein. The ripe bananas add natural sweetness along with potassium and vitamin C.
This dessert is gluten-containing due to the wafers, but substituting gluten-free wafers makes it suitable for gluten-sensitive folks. Using whole milk and egg yolks provides protein, calcium, and essential nutrients. It’s a treat, yes, but one you can feel good about sharing with family.
Personally, I see this pudding as a reminder that simple ingredients can create magic. It’s a dessert that doesn’t rely on sugar bombs but on real food and care.
Conclusion
This classic homemade Grandma’s banana pudding with Nilla wafers is a timeless dessert that’s easy to make and impossible not to love. It’s a recipe that invites you to slow down, savor, and maybe even make a little mess in the kitchen while you’re at it. Whether you’re making it for a special occasion or just because you have ripe bananas to use up, it’s a sweet way to bring a bit of comfort to your table.
Feel free to tweak it to your heart’s content—add berries, swap wafers, or add a dollop of whipped cream. I’d love to hear how you make it your own, so drop a comment below and share your version. Let’s keep this classic alive, one spoonful at a time!
FAQs about Classic Homemade Grandma’s Banana Pudding with Nilla Wafers
Can I make banana pudding ahead of time?
Absolutely! It actually tastes better after chilling for several hours or overnight. Just cover it tightly and refrigerate.
What if I don’t have Nilla wafers?
You can substitute with graham crackers, vanilla cookies, or even ladyfingers for a different texture and flavor.
How ripe should the bananas be?
Use bananas that are ripe but still firm—not overly mushy—to keep the texture balanced.
Can I make this pudding dairy-free?
Yes, swap regular milk for almond or coconut milk and use dairy-free whipped cream to make a vegan version.
What’s the best way to prevent lumps in the custard?
Whisk constantly over medium heat and add milk slowly to the dry ingredients. Temper the eggs carefully to avoid scrambling.
For a similar comforting treat, you might enjoy my creamy peach cobbler recipe or the beloved classic chocolate chip cookies from last fall’s collection!
Pin This Recipe!
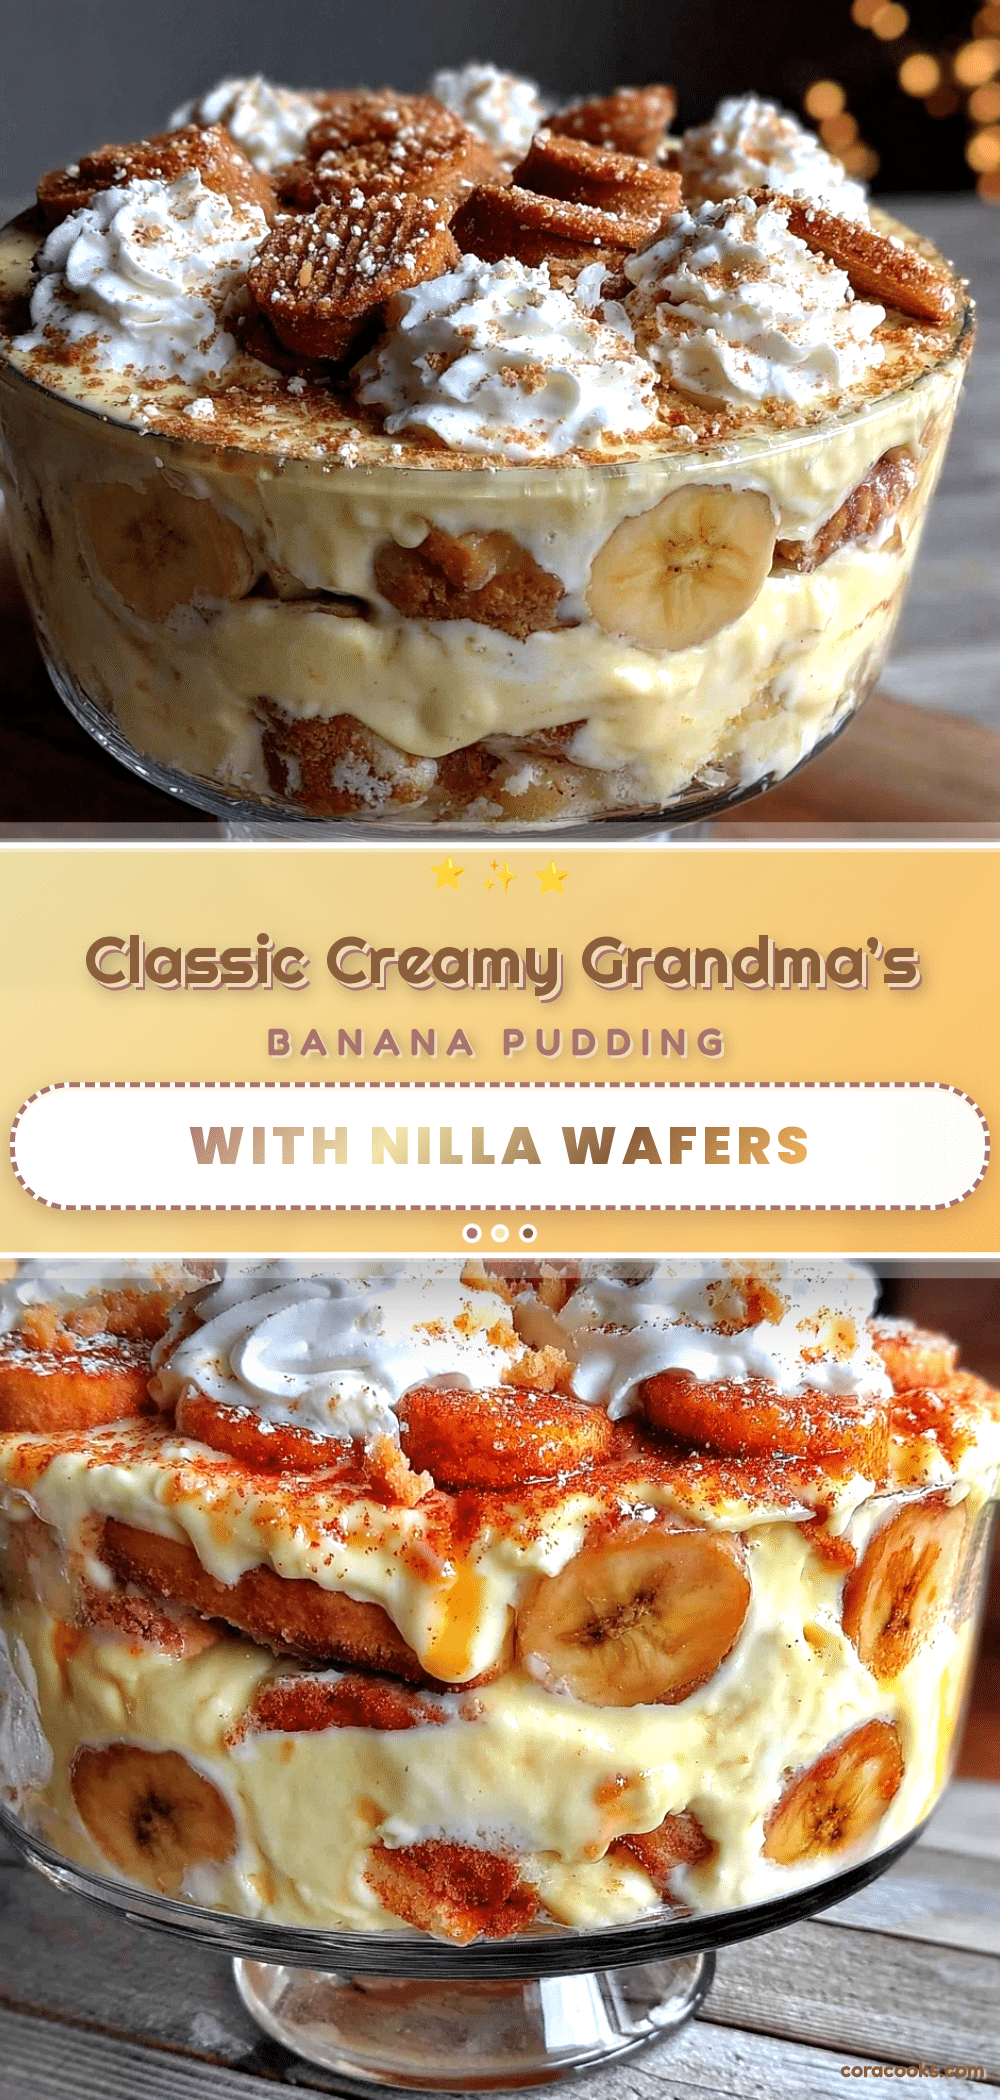
Classic Homemade Grandma’s Banana Pudding Recipe with Nilla Wafers

A timeless dessert featuring creamy homemade vanilla custard layered with ripe bananas and crisp Nilla wafers, perfect for any occasion and easy to make from scratch.
- Prep Time: 15 minutes
- Cook Time: 20 minutes
- Total Time: 4 hours 35 minutes
- Yield: 8 servings 1x
- Category: Dessert
- Cuisine: American
Ingredients
- 3 cups whole milk (720 ml)
- 1 cup granulated sugar (200 g)
- 4 large egg yolks, room temperature
- 1/3 cup cornstarch (40 g)
- 1/4 teaspoon salt
- 2 teaspoons pure vanilla extract
- 4 to 5 ripe bananas, peeled and sliced
- About 45 Nilla wafers, original flavor
- 1 cup whipped cream (optional, 240 ml)
Instructions
- In a medium saucepan, whisk together sugar, cornstarch, and salt.
- Slowly whisk in whole milk, ensuring no lumps form.
- Place saucepan over medium heat and stir constantly until pudding thickens and coats the back of a spoon, about 7-10 minutes.
- In a separate bowl, lightly beat egg yolks. Slowly pour about 1 cup of the hot milk mixture into the yolks while whisking constantly to temper.
- Pour tempered yolks back into the saucepan and cook, stirring constantly, for another 2-3 minutes until thickened and smooth.
- Remove from heat and stir in vanilla extract.
- Transfer pudding to a bowl, cover surface with plastic wrap to prevent skin formation, and let cool to room temperature (about 30 minutes).
- In a 9×13 inch dish, layer half the Nilla wafers, then sliced bananas, then half the pudding. Repeat layers with remaining wafers, bananas, and pudding.
- Refrigerate for at least 4 hours or overnight to let flavors meld and wafers soften.
- Before serving, optionally spread freshly whipped cream over the pudding.
Notes
Constant stirring is essential to avoid lumps and scorching. Temper eggs carefully to prevent scrambling. Cover pudding surface with plastic wrap to prevent skin formation. Chilling overnight yields best texture and flavor. For dairy-free, substitute milk and whipped cream with plant-based alternatives. Gluten-free wafers can be used for gluten sensitivity.
Nutrition
- Serving Size: 1/8 of the prepared
- Calories: 280
- Fat: 6
- Carbohydrates: 45
- Protein: 5
Keywords: banana pudding, homemade banana pudding, Nilla wafers, classic dessert, vanilla custard, easy dessert, family recipe