Love this? Save it for later!
Share the inspiration with your friends
The summer I turned thirty, I found myself sitting on a park bench at the local Fourth of July festival, munching on a surprisingly memorable dessert that wasn’t coming from any fancy vendor or food truck. It was the quiet plumber from two blocks down—the last person you’d expect to be a culinary wizard—who handed me a little cup filled with what looked like a patriotic dream. That’s when I first tasted these Fresh Red White and Blue No-Bake Cheesecake Cups. Honestly, I wasn’t expecting much, but the layers of creamy cheesecake, fresh berries, and crumbly crust were so delightfully fresh and vibrant, I kept asking for more.
You know that feeling when a simple dessert can instantly lift the whole day? This recipe came wrapped in a casual conversation about summer picnics and family barbecues, with a cracked plastic cup and a slightly messy spoon that somehow made the experience even more charming. Maybe you’ve been there—stuck at a community event, tired but curious, and then something small surprises you in the best way. Since that day, I’ve made these no-bake cheesecake cups a staple for every patriotic holiday and summer gathering. It’s a little sweet moment in a cup that’s easy to put together, doesn’t heat up the kitchen, and looks stunning on any table.
Let me tell you, this recipe stayed with me because it’s the kind of dessert that feels festive without fuss, perfect for those warm days when you want something fresh and sweet but don’t want to spend hours baking. If you’ve ever wanted a dessert that’s as visually striking as it is delicious, these red, white, and blue cheesecake cups will absolutely charm your taste buds and your guests.
Why You’ll Love This Recipe
This Fresh Red White and Blue No-Bake Cheesecake Cups recipe has been tested in my kitchen many times, and honestly, it ticks all the boxes for a summer dessert that’s both easy and impressive. Here’s why you’ll find yourself reaching for this recipe again and again:
- Quick & Easy: Comes together in under 30 minutes, perfect for busy weeknights or last-minute celebrations.
- Simple Ingredients: No fancy grocery trips needed; you likely already have cream cheese, graham crackers, and fresh berries in your kitchen.
- Perfect for Patriotic Occasions: Ideal for Independence Day, Memorial Day, or any time you want to show some red, white, and blue pride.
- Crowd-Pleaser: Kids love the sweet berry topping, and adults appreciate the creamy, tangy cheesecake base.
- Unbelievably Delicious: The balance of creamy, crunchy, and fruity textures makes it a refreshing comfort treat.
This recipe isn’t just another no-bake cheesecake. The trick is in the layering—using slightly crushed graham cracker crumbs for a crunchy base, a perfectly whipped cream cheese filling that’s light yet tangy, and a crown of fresh berries that bring natural sweetness and vibrant color. Honestly, the secret is in folding the cream cheese with a bit of whipped cream for that melt-in-your-mouth texture.
It’s a dessert that’s both nostalgic and fresh—comfort food with a festive twist. Perfect for impressing guests without stress, or turning a simple summer meal into something memorable.
What Ingredients You Will Need
This recipe uses simple, wholesome ingredients to deliver bold flavor and satisfying texture without the fuss. Most are pantry staples, with fresh berries adding that seasonal pop of color and taste.
- For the Crust:
- 1 ½ cups graham cracker crumbs (about 10 full crackers, crushed finely)
- 5 tablespoons unsalted butter, melted (I prefer Plugrá for rich flavor)
- 2 tablespoons granulated sugar
- For the Cheesecake Filling:
- 8 oz (225 g) cream cheese, softened (use full-fat for best texture)
- ½ cup (120 ml) heavy whipping cream
- ⅓ cup (65 g) granulated sugar
- 1 teaspoon vanilla extract
- 1 tablespoon fresh lemon juice (adds brightness)
- For the Topping:
- 1 cup fresh strawberries, sliced
- 1 cup fresh blueberries
- Optional: fresh mint leaves for garnish
Look for firm, ripe berries for the best freshness. If strawberries aren’t in season, raspberries can be a nice substitute for the red layer. For a dairy-free option, swap cream cheese with a plant-based alternative and use coconut cream instead of heavy cream.
Equipment Needed
- Mixing bowls (one medium, one large)
- Electric hand mixer or stand mixer (for whipping cream and cream cheese)
- Measuring cups and spoons
- Spatula for folding
- Crushing tool for graham crackers (a rolling pin or food processor works)
- Clear dessert cups or small mason jars (4–6 oz size) for assembling the cheesecake cups
If you don’t have an electric mixer, a sturdy whisk and some elbow grease can get the job done—just be prepared for a bit more arm work! I’ve found that using clear cups really shows off the layers, making the dessert look as good as it tastes. For budget-friendly options, thrift stores often have simple glassware perfect for these cups.
Preparation Method
- Prepare the Crust: In a medium bowl, combine 1 ½ cups graham cracker crumbs, 5 tablespoons melted butter, and 2 tablespoons sugar. Stir until the mixture resembles wet sand. This should take about 3 minutes. If the mixture feels too dry, add a bit more melted butter—think texture, not sogginess.
- Form the Base: Spoon about 2 tablespoons of the crust mixture into each dessert cup. Press down firmly with the back of a spoon or your fingers to create a compact base. This helps keep the crust from crumbling when you eat it. Chill the cups in the fridge while you prepare the filling—about 10 minutes.
- Make the Cheesecake Filling: In a large bowl, beat the softened cream cheese with an electric mixer until smooth and creamy, about 2 minutes. Add ⅓ cup sugar, vanilla extract, and lemon juice, mixing well to combine. In a separate bowl, whip the heavy cream until soft peaks form (this usually takes 3-4 minutes).
- Fold the Whipped Cream: Gently fold the whipped cream into the cream cheese mixture with a spatula. Be careful not to overmix; you want to keep the light, airy texture. This step is crucial for that no-bake cheesecake’s signature fluffiness.
- Assemble the Cups: Spoon or pipe the cheesecake filling over the chilled crust layer in each cup, filling them about ¾ full. Smooth the tops with the back of a spoon for a clean finish. Return the cups to the fridge to set for at least 1 hour (or overnight if you plan ahead). This chilling step lets the flavors meld and the texture firm up.
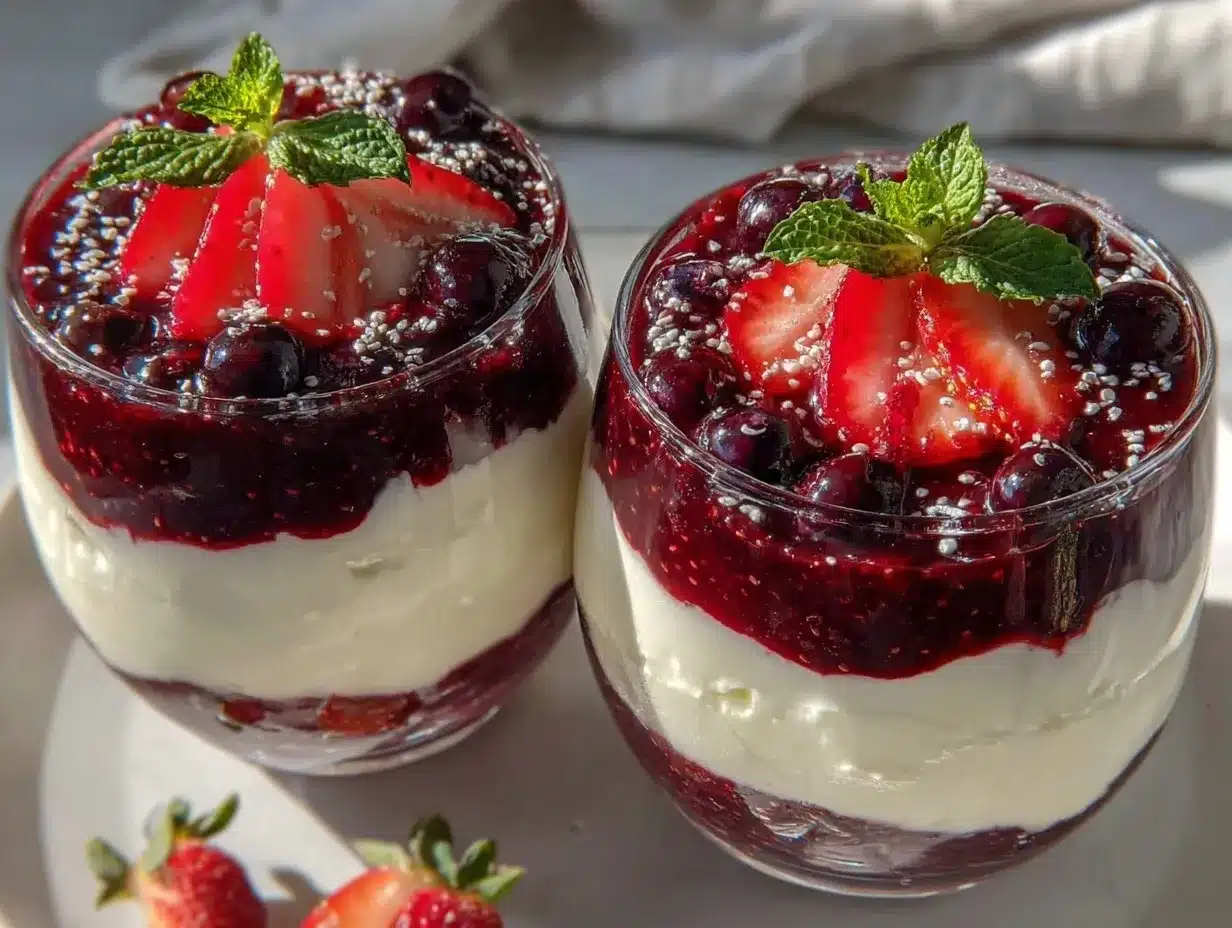
- Add the Fresh Berries: Just before serving, top each cheesecake cup with a mix of sliced strawberries and blueberries. Arrange them so the colors show distinctly—red, white, and blue, just like the flag. A small mint leaf on top adds a fresh aroma and a pop of green.
If your cream cheese isn’t soft enough, the filling can get lumpy. A quick tip: microwave it for 10 seconds if needed, then beat immediately. Also, don’t rush the chilling time; this dessert needs that wait to become truly creamy and sliceable in a cup.
Cooking Tips & Techniques
Making these no-bake cheesecake cups is mostly about technique rather than heat. Here are some pro tips I picked up from trial and error:
- Softening Cream Cheese: Always let cream cheese come to room temperature before mixing. Cold cream cheese leads to lumps and uneven texture. If you forget, warm it in very short bursts in the microwave.
- Whipping Cream: Chill your mixing bowl and beaters for at least 15 minutes before whipping the cream. Cold tools help achieve those perfect soft peaks quickly, giving the filling a light texture.
- Folding Technique: When folding whipped cream into the cream cheese, use a gentle folding motion, turning the bowl and cutting through the center with your spatula. This keeps the air in for fluffy filling.
- Crust Consistency: Press the crust firmly but gently so it holds together without becoming a dense brick. If it’s too loose, it will crumble when you try to eat it.
- Berry Selection: Choose berries that are ripe but firm to avoid bleeding juice into the cheesecake filling. If berries are very juicy, pat them dry with paper towels before topping.
One time, I hurried through the folding step and ended up with a dense, heavy filling—not fun! Since then, I always remind myself: gentle is the way to go. Multitasking tip: start chilling the crust while you whip the cream. Saves you precious minutes.
Variations & Adaptations
This recipe is pretty flexible, so you can customize it to suit your taste or dietary needs. Here are some ideas:
- Dietary Variation: Use gluten-free graham cracker crumbs or swap them for crushed gluten-free cookies. For a vegan twist, try dairy-free cream cheese and coconut cream.
- Seasonal Twist: In summer, mix in fresh peaches or cherries with the berries. In fall, swap berries for pomegranate seeds and add a sprinkle of cinnamon to the crust.
- Flavor Boost: Add a tablespoon of lemon zest to the cheesecake filling for extra zing. Or swirl in some blueberry jam for a marbled effect.
- Cooking Method: While this is no-bake, you could bake the crust briefly (5 minutes at 350°F/175°C) for a crunchier base if you prefer.
- Personal Touch: I once added a layer of crushed peppermint candies for a festive winter version—it was surprisingly good and a hit at holiday parties!
Serving & Storage Suggestions
Serve these Fresh Red White and Blue No-Bake Cheesecake Cups chilled for the best texture and flavor. They look fantastic on a dessert table, especially when lined up in clear cups to show off the layers.
Pair with iced tea, lemonade, or a light sparkling wine for a refreshing summer treat. These cups are also great alongside a plate of crispy garlic chicken for a balanced meal with a festive finish.
Store leftover cheesecake cups covered tightly in the refrigerator for up to 3 days. If you want to keep them longer, they freeze well—just wrap the cups with plastic wrap and place in an airtight container. Thaw in the fridge overnight before serving.
When reheating (if you prefer them slightly less cold), let them sit at room temperature for 15 minutes—this softens the filling without melting it completely. The flavors actually deepen after a day in the fridge, making leftovers even better the next day.
Nutritional Information & Benefits
Each serving of these cheesecake cups offers a modest calorie count, roughly 250-300 calories depending on portion size. The cream cheese provides protein and calcium, while fresh berries add antioxidants, vitamins C and K, and fiber.
This dessert is gluten-friendly if you choose gluten-free crusts, and can be made low-sugar by adjusting the sweetener amounts. Just remember, the fresh fruit adds natural sweetness and nutrients, which makes this treat feel indulgent yet balanced.
From a wellness perspective, I appreciate that this recipe uses real, simple ingredients without preservatives or artificial flavors. It’s a wholesome way to enjoy dessert without feeling like you’re overdoing it—perfect for those who want a fresh take on classic cheesecake.
Conclusion
These Fresh Red White and Blue No-Bake Cheesecake Cups are a total winner when you want a dessert that’s pretty, tasty, and easy to make. Whether it’s a Fourth of July picnic or a casual summer dinner, they bring a splash of color and joy to the table without any oven fuss. I love this recipe because it’s forgiving, customizable, and always impresses guests with its fresh flavors and creamy texture.
Give it a try, play around with your favorite fruits or add a little twist to the filling, and let me know how you make it your own. If you give this recipe a shot, I’d love to hear your thoughts or see your photos in the comments—sharing these little kitchen victories feels like a celebration in itself!
Happy cooking and here’s to many fresh, sweet moments ahead!
FAQs
Can I make these cheesecake cups ahead of time?
Absolutely! Prepare them up to 24 hours in advance and keep them refrigerated. The flavors and texture actually improve as they chill.
What if I don’t have graham crackers?
You can substitute with digestive biscuits, vanilla wafers, or any crunchy cookie you enjoy. Just crush them finely for the crust.
How do I prevent the berries from making the cheesecake soggy?
Pat berries dry with paper towels before topping and add them just before serving to keep the layers crisp.
Can I use frozen berries?
Yes, but thaw and drain them well to avoid excess moisture. Fresh berries work best for presentation and texture.
Is there a way to make this recipe dairy-free?
Yes! Use dairy-free cream cheese alternatives and coconut cream instead of heavy cream. Make sure your crust ingredients are also dairy-free.
Pin This Recipe!
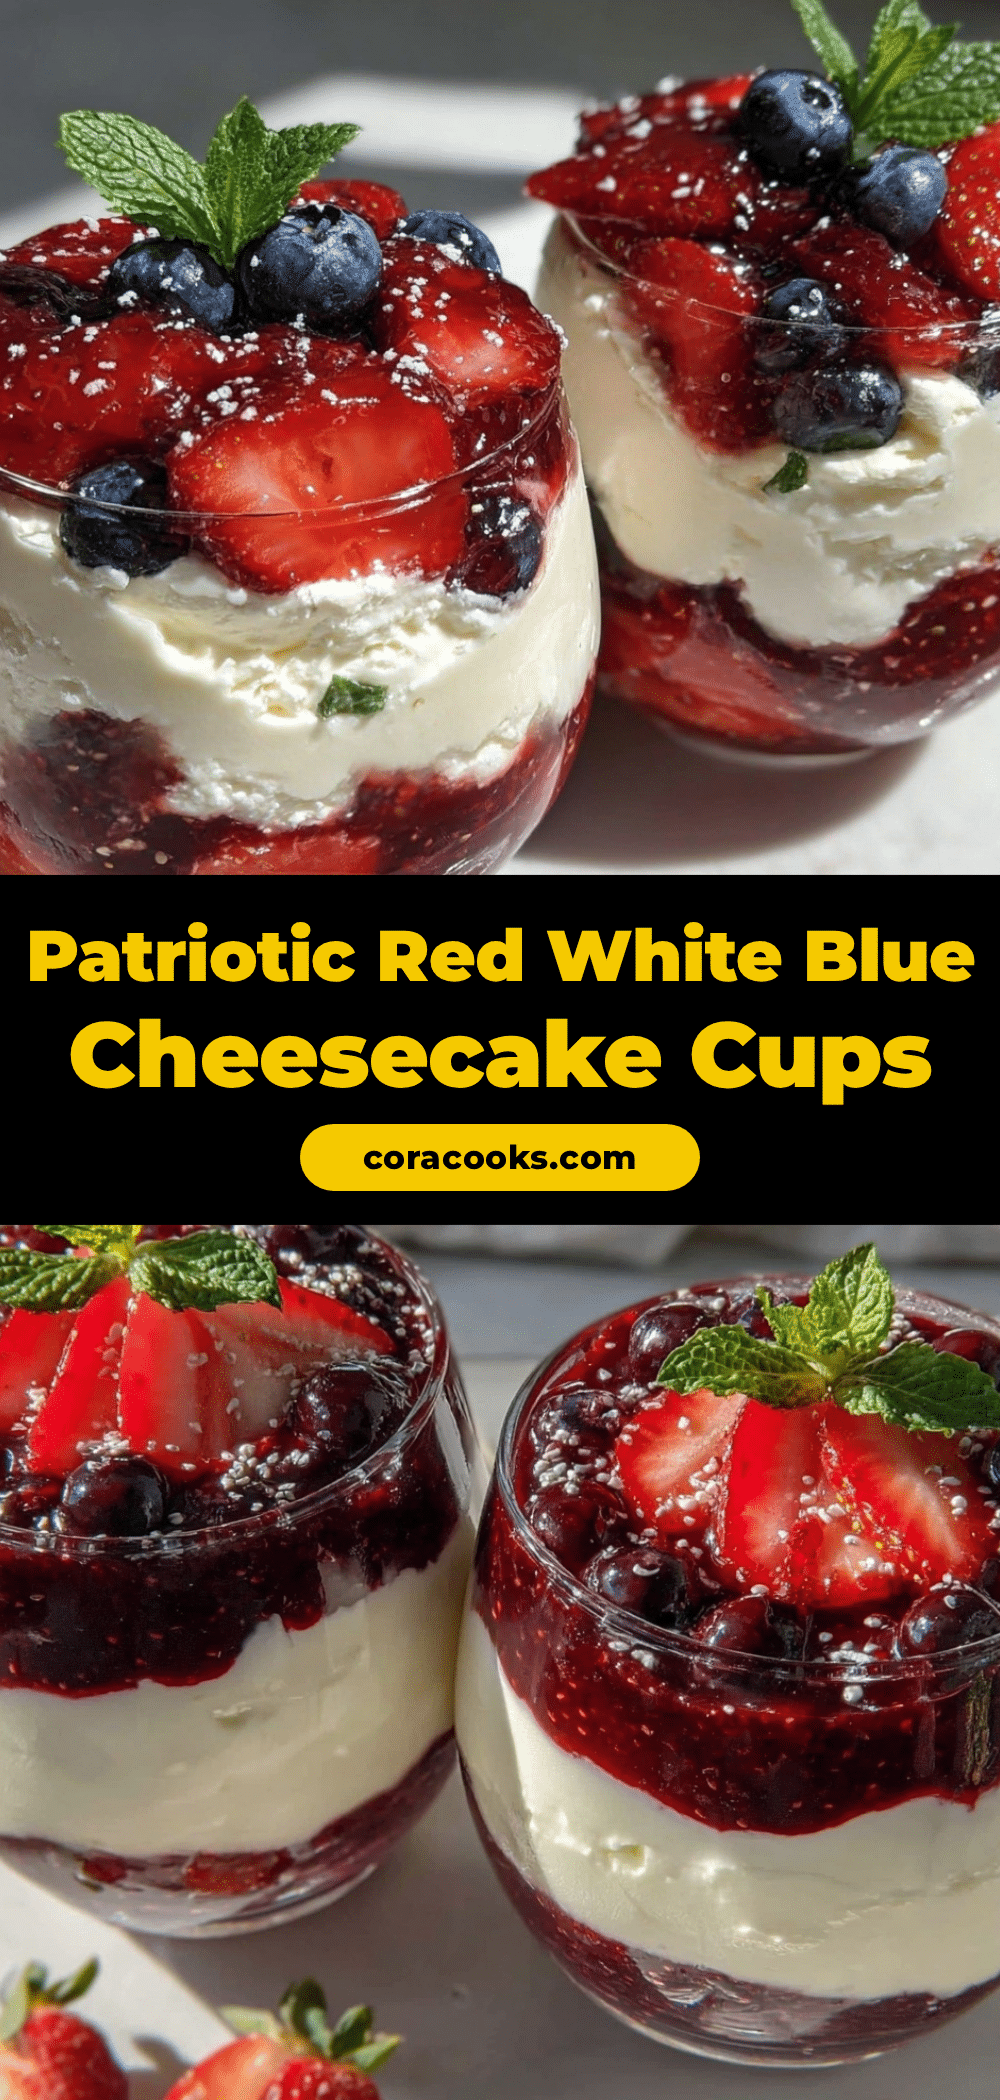
Fresh Red White and Blue No-Bake Cheesecake Cups
A quick and easy no-bake cheesecake dessert featuring layers of creamy cheesecake, crunchy graham cracker crust, and fresh red, white, and blue berries. Perfect for patriotic occasions and summer gatherings.
- Prep Time: 15 minutes
- Cook Time: 0 minutes
- Total Time: 1 hour 15 minutes
- Yield: 6 servings 1x
- Category: Dessert
- Cuisine: American
Ingredients
- 1 ½ cups graham cracker crumbs (about 10 full crackers, crushed finely)
- 5 tablespoons unsalted butter, melted
- 2 tablespoons granulated sugar
- 8 oz (225 g) cream cheese, softened (full-fat recommended)
- ½ cup (120 ml) heavy whipping cream
- ⅓ cup (65 g) granulated sugar
- 1 teaspoon vanilla extract
- 1 tablespoon fresh lemon juice
- 1 cup fresh strawberries, sliced
- 1 cup fresh blueberries
- Optional: fresh mint leaves for garnish
Instructions
- Prepare the Crust: In a medium bowl, combine 1 ½ cups graham cracker crumbs, 5 tablespoons melted butter, and 2 tablespoons sugar. Stir until the mixture resembles wet sand, about 3 minutes. Add more melted butter if too dry.
- Form the Base: Spoon about 2 tablespoons of the crust mixture into each dessert cup. Press down firmly to create a compact base. Chill the cups in the fridge for about 10 minutes.
- Make the Cheesecake Filling: Beat softened cream cheese with an electric mixer until smooth, about 2 minutes. Add ⅓ cup sugar, vanilla extract, and lemon juice; mix well. In a separate bowl, whip heavy cream until soft peaks form (3-4 minutes).
- Fold the Whipped Cream: Gently fold whipped cream into the cream cheese mixture with a spatula, keeping the texture light and airy.
- Assemble the Cups: Spoon or pipe cheesecake filling over the chilled crust in each cup, filling about ¾ full. Smooth tops with a spoon. Refrigerate for at least 1 hour or overnight to set.
- Add the Fresh Berries: Just before serving, top each cup with sliced strawberries and blueberries. Garnish with a mint leaf if desired.
Notes
Let cream cheese come to room temperature before mixing to avoid lumps. Chill mixing bowl and beaters before whipping cream for best results. Fold whipped cream gently to keep filling airy. Pat berries dry before topping to prevent sogginess. Can be made dairy-free by substituting cream cheese and heavy cream with plant-based alternatives. Crust can be baked briefly for crunchier texture if desired.
Nutrition
- Serving Size: 1 cheesecake cup (ab
- Calories: 275
- Sugar: 15
- Sodium: 150
- Fat: 18
- Saturated Fat: 11
- Carbohydrates: 22
- Fiber: 2
- Protein: 4
Keywords: no-bake cheesecake, patriotic dessert, red white and blue dessert, summer dessert, easy cheesecake cups, Fourth of July dessert