Love this? Save it for later!
Share the inspiration with your friends
Introduction
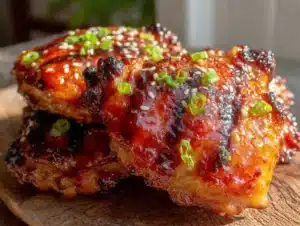
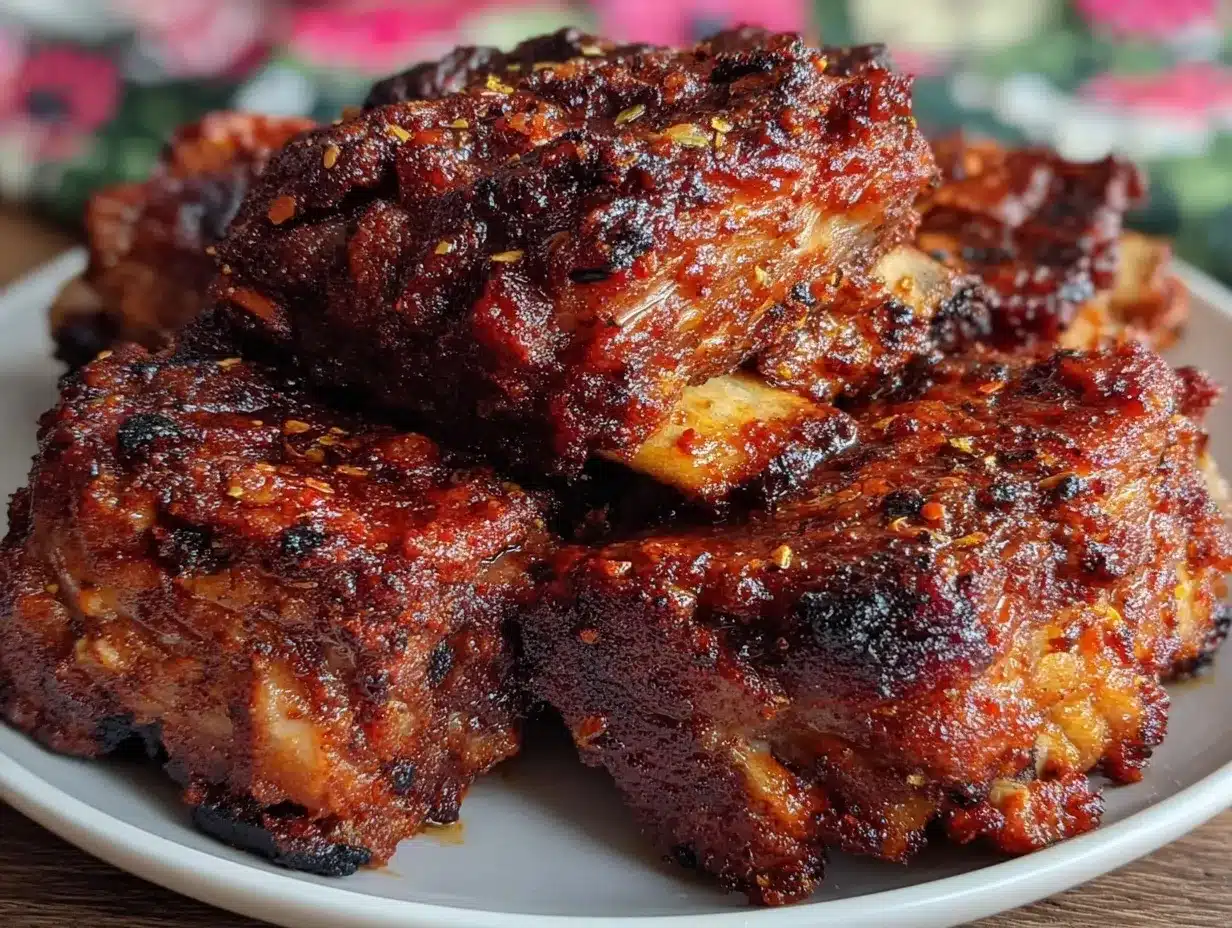
“You know, I wasn’t even planning on cooking ribs that day,” my Uncle Joe confessed one summer afternoon as we sat around the old picnic table, smoke curling lazily from the backyard grill. It was a sticky July evening, and the air smelled faintly of cedar and charcoal. Joe had been fumbling with an old notebook, stained and tattered, where his dad had scribbled down his secret dry rub recipe decades ago. It wasn’t just any rub—it was a 30-year perfected blend that had quietly won over every skeptical cousin and neighbor at family barbecues.
Honestly, I’d heard about those ribs for years but never quite believed they’d live up to the hype until that evening. The way the meat pulled away from the bone, tender and juicy, with just the right hint of spice and sweetness—it was like tasting a memory you didn’t know you had. The cracked enamel bowl Joe used for mixing the rub had a story too, scraped up from his dad’s first grill days, and now it holds not just spices but decades of weekend laughter and sun-soaked afternoons.
Maybe you’ve been there—standing at a barbecue, unsure if the fuss is worth it—only to find yourself sneaking back to the grill for “just one more” rib. That’s how this recipe stayed glued to my mind (and appetite). It’s simple, honest, and downright addictive. Let me tell you, this Best Dad’s Ribs recipe with a 30-year perfected dry rub isn’t just about cooking; it’s about sharing something timeless, something that pulls people together and makes a summer night unforgettable.
Why You’ll Love This Recipe
This recipe has been tested, tweaked, and loved over three decades, and it shows. It’s not just another ribs recipe; it’s a journey of flavor and technique that anyone can master, even if you’re not a grill pro.
- Quick & Easy: The dry rub comes together in minutes, and the cooking method is straightforward—perfect for busy weeknights or last-minute BBQ cravings.
- Simple Ingredients: No exotic spices or complicated steps here. You likely have everything already in your pantry.
- Perfect for Gatherings: Whether it’s a casual weekend cookout or a holiday feast, these ribs always steal the show.
- Crowd-Pleaser: Kids, adults, picky eaters—they all ask for seconds, no joke.
- Unbelievably Delicious: The magic is in the balance—smoky, sweet, and just the right kick of heat that makes each bite a little celebration.
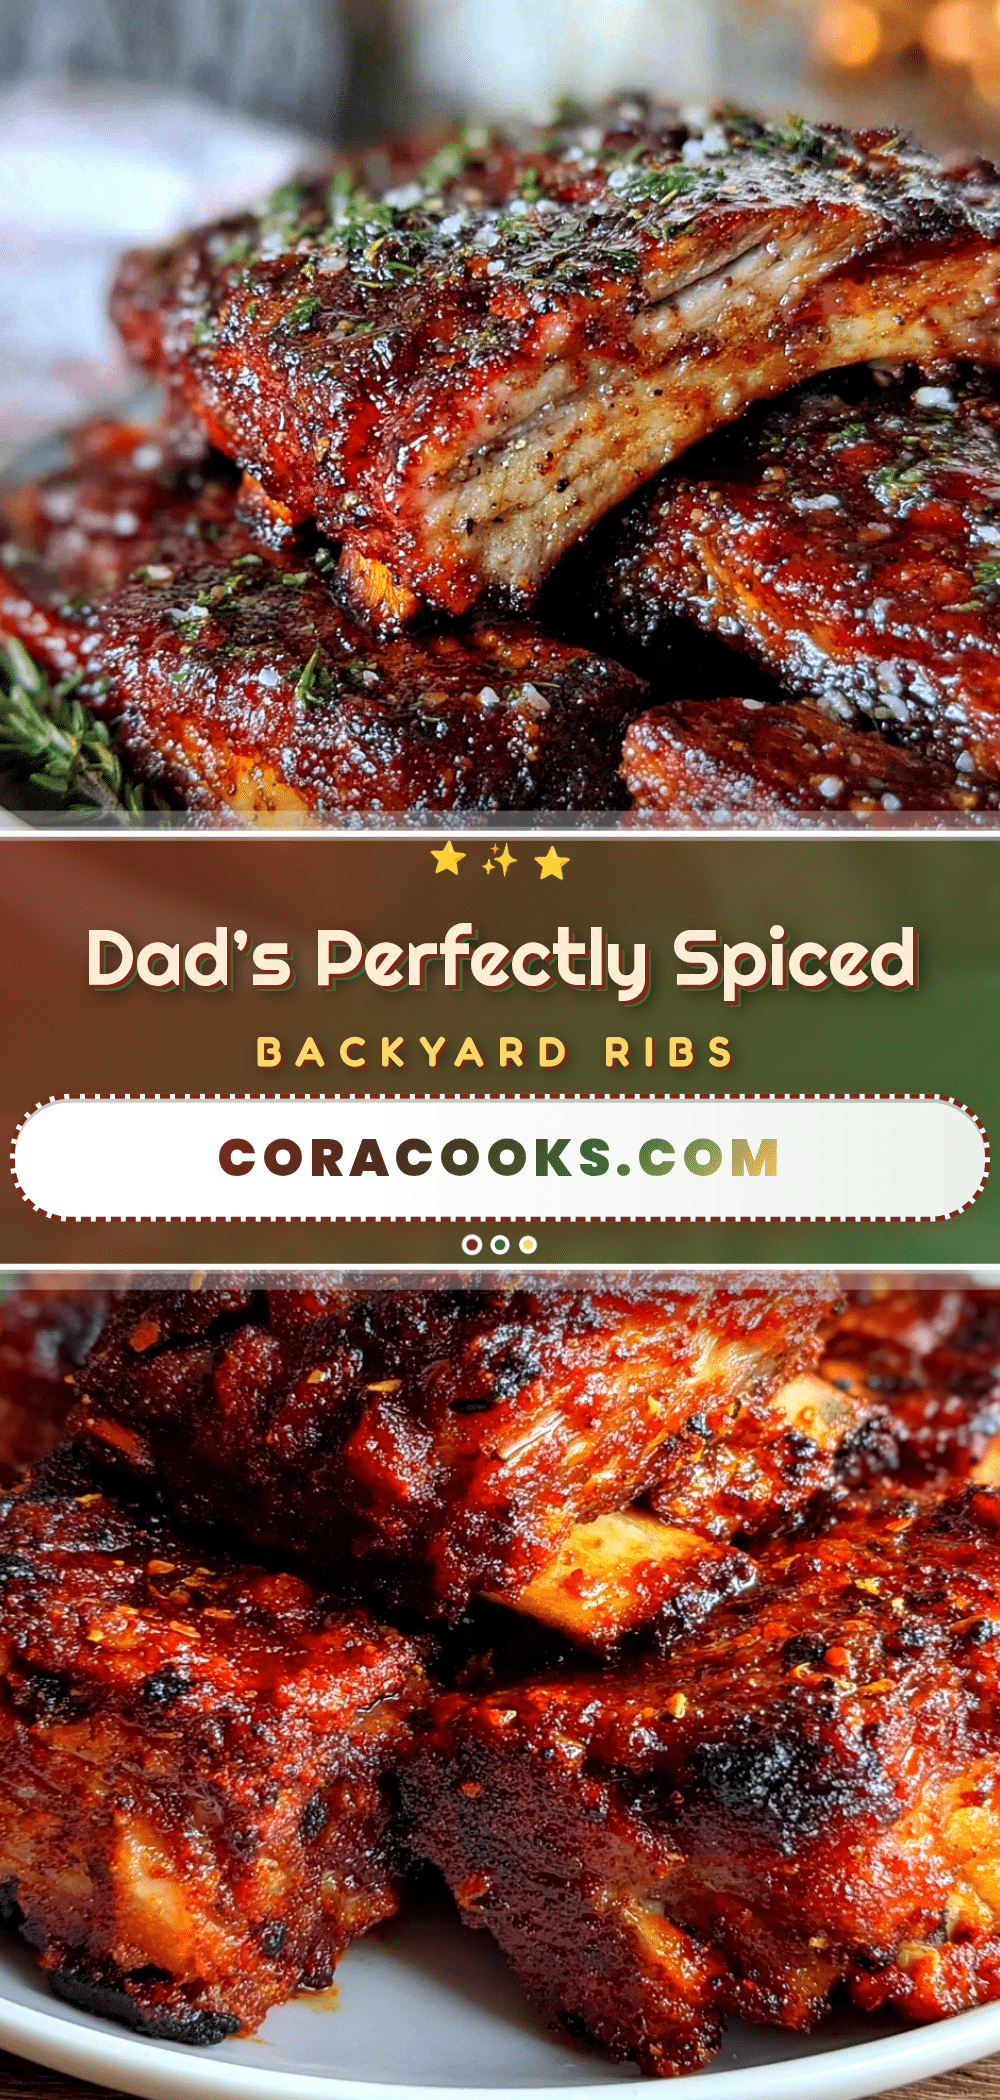
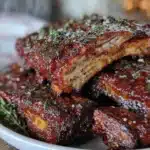
What sets this apart is the dry rub itself. It’s not just a mix of spices; it’s a carefully balanced blend that’s been perfected over 30 years, creating a crust that locks in moisture and flavor. Plus, the slow cooking method means the ribs are fall-off-the-bone tender without drying out. Honestly, it’s the kind of recipe that makes you close your eyes after the first bite and smile. If you want a taste of something truly special without fuss, this is it.
What Ingredients You Will Need
This recipe uses simple, wholesome ingredients to deliver bold flavor and satisfying texture without the fuss. Most of these are pantry staples, but the secret is in the quality and balance.
For the Dry Rub
- Brown sugar: 1/4 cup (adds sweetness and helps caramelize the crust)
- Paprika: 2 tablespoons (smoky depth; I prefer Smoky Sweet Paprika from McCormick for consistent flavor)
- Coarse kosher salt: 1 tablespoon (balances sweetness and enhances flavor)
- Black pepper: 1 tablespoon, freshly ground (for a mild kick)
- Garlic powder: 1 tablespoon (earthy aroma)
- Onion powder: 1 tablespoon (adds subtle sweetness)
- Cayenne pepper: 1 teaspoon (adjust to taste for heat)
- Dried mustard powder: 1 teaspoon (adds a tangy note)
- Chili powder: 1 teaspoon (depth of flavor)
For the Ribs
- Pork baby back ribs: 2 racks (about 3-4 pounds / 1.4-1.8 kg)
- Olive oil: 2 tablespoons (helps rub adhere and locks moisture)
- Apple cider vinegar: Optional, for spritzing during cooking (adds tang and keeps ribs moist)
If you want to swap for beef ribs, it works but adjust cooking times. For a gluten-free option, ensure your chili powder and paprika are certified gluten-free (I recommend Frontier Co-op brands). In summer, fresh cracked black pepper and a touch of smoked sea salt make a nice twist. I like to use ribs from a trusted butcher, but supermarket ribs work fine if trimmed well.
Equipment Needed
- Grill or smoker: Charcoal, gas, or electric grills all work. I’ve had success with a Weber charcoal grill, but a simple gas grill with indirect heat will do the trick.
- Mixing bowl: For combining the dry rub. A medium-sized ceramic or glass bowl works well—avoid metal to keep flavors pure.
- Brush or your hands: For applying olive oil and rubbing the spice mix.
- Aluminum foil: For wrapping ribs during part of the cooking process to lock moisture in.
- Meat thermometer: Optional, but handy to check doneness (target 190°F / 88°C for tender ribs).
- Basting spray bottle: For the optional apple cider vinegar spritz (a clean spray bottle works fine).
If you don’t have a smoker, don’t sweat it—just use a two-zone setup on your grill to cook indirectly. Also, investing in a good-quality grill thermometer can make a world of difference. I once ruined a batch by misjudging the heat, so trust me, it’s worth it. Budget-friendly options like disposable foil pans work if you need to keep things tidy.
Preparation Method
- Prep the ribs: Remove the silver skin membrane from the back of the ribs by sliding a butter knife under it and pulling it off with a paper towel for grip. This helps the rub penetrate and makes ribs more tender. (Approx. 10 mins)
- Mix the dry rub: Combine all the dry rub ingredients in a bowl and stir thoroughly to blend evenly. I usually double the batch to keep some on hand for next time—it stores well in an airtight jar. (5 mins)
- Apply olive oil: Lightly brush both sides of the ribs with olive oil. This helps the rub stick and seals in moisture.
- Generously apply dry rub: Massage the dry rub all over both sides of the ribs, pressing it in firmly but gently. Don’t be shy here—the rub forms that irresistible crust. (10 mins)
- Let it rest: Wrap the ribs in plastic wrap or place them in a covered container and refrigerate for at least 1 hour, or overnight for deeper flavor penetration.
- Prepare your grill for indirect heat: For charcoal, pile coals to one side; for gas, light only half the burners. Aim for a steady temperature of about 250°F (121°C). (15 mins)
- Place ribs on the grill: Lay ribs meat side up on the cool side of the grill. Close the lid and cook low and slow for about 2 hours. Resist the urge to peek too often—steady heat is key.
- Optional spritzing: Every 30 minutes, lightly spritz ribs with apple cider vinegar to keep them moist and add tangy brightness.
- Wrap in foil: After 2 hours, remove ribs and wrap them tightly in foil to trap steam. Return to grill for another 1 hour to tenderize. (You can add a splash of apple juice inside the foil for extra moisture.)
- Final unwrapped cook: Unwrap ribs and place back on grill for 30 minutes to firm up the crust and develop that perfect bark.
- Check for doneness: The ribs should be tender and pull away from the bone easily. Internal temp near 190°F (88°C) is ideal.
- Rest before serving: Let ribs rest for 10 minutes before slicing between the bones.
During my first try, I forgot the spritzing step and noticed the ribs dried a bit. Lesson learned! The spritz really makes a difference, especially in dry summer heat. Also, keeping the temperature steady was tricky, but using a grill thermometer helped me master it over time.
Cooking Tips & Techniques
Mastering best dad’s ribs means paying attention to a few key details that make all the difference.
- Low and slow is your friend: Cooking at 225-250°F (107-121°C) breaks down connective tissue without drying the meat.
- Don’t rush the membrane removal: That thin layer on the back can block flavors and toughen ribs if left on.
- Use indirect heat: Direct flames can char the rub and dry out ribs. Setting up your grill zones is crucial.
- Patience with resting: Letting ribs rest after cooking distributes juices evenly.
- Test for doneness with a bend test: Pick up ribs with tongs—if the meat bends and cracks slightly but doesn’t break, it’s perfect.
- Multitask smart: While ribs cook, prep sides or clean up to make the process smoother.
One time I tried to speed up the process by cranking the heat, and the ribs ended up tough and chewy—no thanks! Slow and steady wins the race here. And if you don’t have a spray bottle for spritzing, a quick dab with a wet paper towel helps keep things moist.
Variations & Adaptations
This recipe is flexible, so feel free to tweak it to suit your tastes or dietary needs.
- Spicy kick: Add extra cayenne or swap chili powder for smoked chipotle powder for a smoky heat.
- Sweet and tangy twist: Mix brown sugar with a tablespoon of maple syrup into the rub or brush ribs with a honey glaze during the final 30 minutes.
- Gluten-free option: Use gluten-free chili powder, and double-check all spices for allergens.
- Beef ribs: Use the same rub, but increase cooking time to 3-4 hours depending on thickness.
- Oven method: Wrap ribs in foil and bake at 275°F (135°C) for 3 hours, finishing under the broiler for crust.
I once tried a coffee-infused rub variation that added a subtle depth of flavor—my friends were pleasantly surprised. Feel free to experiment but keep that balance of sweet, smoky, and spicy in mind.
Serving & Storage Suggestions
These ribs are best served warm, straight off the grill, with a side of tangy coleslaw or crunchy cornbread for contrast. I like pairing them with a cold craft beer or a glass of iced tea to balance the richness.
Leftovers? Wrap tightly in foil and refrigerate up to 3 days. Reheat gently in the oven at 300°F (150°C) wrapped in foil to keep moist. You can also freeze ribs for up to 2 months—just thaw overnight in the fridge before reheating.
Flavors actually deepen after a day or two, so don’t hesitate to make them a day ahead. Just reheat gently and serve with fresh sides.
Nutritional Information & Benefits
Estimate per serving (1/4 rack):
| Calories | 450-500 kcal |
|---|---|
| Protein | 35-40 g |
| Fat | 30-35 g (mostly from pork) |
| Carbohydrates | 10-15 g (from brown sugar and spices) |
Key ingredients like paprika and chili powder offer antioxidants and anti-inflammatory benefits. This recipe is naturally gluten-free and can be adjusted for low-sugar diets by reducing brown sugar. From a wellness perspective, enjoying ribs occasionally as part of a balanced diet is a satisfying treat that nourishes body and soul.
Conclusion
So there you have it—Best Dad’s Ribs with a 30-year perfected dry rub that’s as much about tradition as it is taste. Whether you’re a seasoned griller or trying ribs for the first time, this recipe offers a reliable, delicious way to impress without stress.
Feel free to make it your own with little twists or stick to the classic blend that’s been a family favorite for decades. Honestly, it’s the kind of recipe that makes you want to gather around the grill, share stories, and savor every bite.
If you give this recipe a try, I’d love to hear how it turns out or what variations you come up with—leave a comment below! Here’s to many more smoky, tender, perfectly seasoned ribs in your future.
FAQs
What’s the best way to remove the silver skin from ribs?
Use a butter knife to gently lift the membrane on the back of the ribs, then grab it with a paper towel and pull it off in one piece. This helps spices penetrate better and makes ribs more tender.
Can I make this recipe without a grill?
Absolutely! You can bake the ribs in the oven wrapped in foil at 275°F (135°C) for about 3 hours, then broil for a few minutes to crisp the rub.
How do I know when the ribs are done?
Look for meat that pulls away easily from the bone and an internal temperature around 190°F (88°C). The ribs should bend and crack slightly when picked up.
Can I prepare the dry rub in advance?
Yes, the dry rub keeps well for months stored in an airtight jar away from light. Making extra means you’re ready for another batch anytime.
What sides pair well with these ribs?
Classic coleslaw, cornbread, baked beans, and a crisp green salad all complement these ribs beautifully. For drinks, iced tea or light beers balance the rich flavors.
Pin This Recipe!
Best Dad’s Ribs Recipe with 30-Year Perfected Dry Rub for Easy BBQ Success
A time-tested ribs recipe featuring a 30-year perfected dry rub that creates tender, juicy, and flavorful ribs with a perfect balance of smoky, sweet, and spicy notes. Ideal for gatherings and easy to master even for grill novices.
- Prep Time: 30 minutes
- Cook Time: 3 hours 30 minutes
- Total Time: 4 hours
- Yield: 4 servings 1x
- Category: Main Course
- Cuisine: American
Ingredients
- 1/4 cup brown sugar
- 2 tablespoons paprika (preferably Smoky Sweet Paprika)
- 1 tablespoon coarse kosher salt
- 1 tablespoon freshly ground black pepper
- 1 tablespoon garlic powder
- 1 tablespoon onion powder
- 1 teaspoon cayenne pepper (adjust to taste)
- 1 teaspoon dried mustard powder
- 1 teaspoon chili powder
- 2 racks pork baby back ribs (about 3–4 pounds / 1.4–1.8 kg)
- 2 tablespoons olive oil
- Apple cider vinegar (optional, for spritzing during cooking)
Instructions
- Remove the silver skin membrane from the back of the ribs by sliding a butter knife under it and pulling it off with a paper towel for grip (approx. 10 minutes).
- Combine all the dry rub ingredients in a mixing bowl and stir thoroughly to blend evenly (5 minutes).
- Lightly brush both sides of the ribs with olive oil to help the rub stick and seal in moisture.
- Generously massage the dry rub all over both sides of the ribs, pressing it in firmly but gently (10 minutes).
- Wrap the ribs in plastic wrap or place them in a covered container and refrigerate for at least 1 hour, or overnight for deeper flavor penetration.
- Prepare your grill for indirect heat: for charcoal, pile coals to one side; for gas, light only half the burners. Aim for a steady temperature of about 250°F (121°C) (15 minutes).
- Place ribs meat side up on the cool side of the grill. Close the lid and cook low and slow for about 2 hours, avoiding frequent peeking.
- Optionally, every 30 minutes, lightly spritz ribs with apple cider vinegar to keep them moist and add tangy brightness.
- After 2 hours, remove ribs and wrap them tightly in aluminum foil to trap steam. Return to grill for another 1 hour to tenderize (optionally add a splash of apple juice inside the foil).
- Unwrap ribs and place back on grill for 30 minutes to firm up the crust and develop the perfect bark.
- Check for doneness: ribs should be tender and pull away from the bone easily, with an internal temperature near 190°F (88°C).
- Let ribs rest for 10 minutes before slicing between the bones.
Notes
Remove the silver skin membrane for better flavor penetration and tenderness. Use indirect heat to avoid charring and drying out the ribs. Spritzing with apple cider vinegar every 30 minutes helps keep ribs moist. Rest ribs after cooking to distribute juices evenly. If no grill is available, bake ribs wrapped in foil at 275°F (135°C) for 3 hours and finish under the broiler for crust. Adjust cooking times if using beef ribs.
Nutrition
- Serving Size: 1/4 rack of ribs
- Calories: 450500
- Fat: 3035
- Carbohydrates: 1015
- Protein: 3540
Keywords: ribs, BBQ ribs, dry rub, pork ribs, baby back ribs, grilling, barbecue, easy ribs recipe, smoky ribs, tender ribs