Love this? Save it for later!
Share the inspiration with your friends
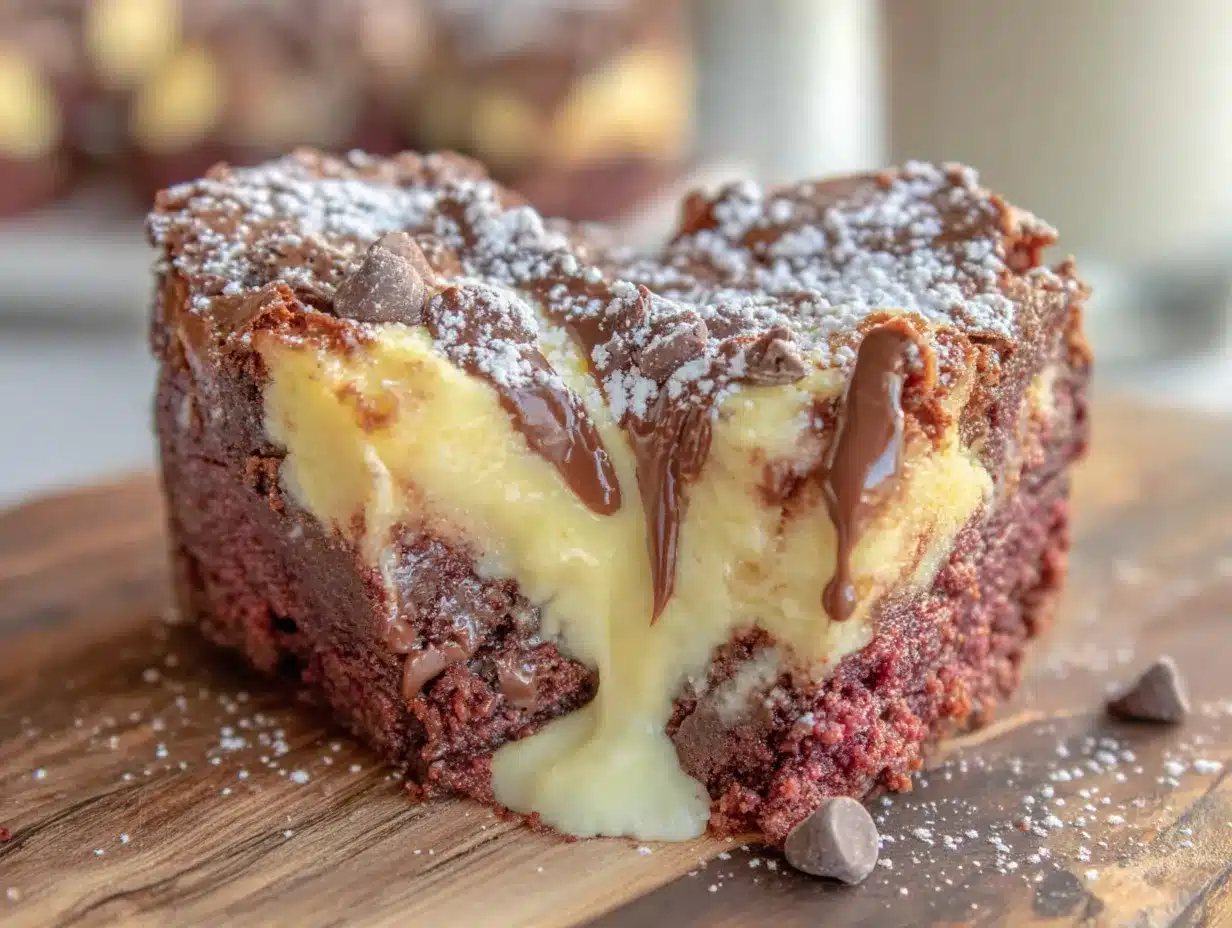
My neighbor Patty wasn’t trying to impress anyone. I’d stopped by to borrow a cup of sugar—cliché, I know, but I was halfway through a batch of cookies and came up short—and the smell hit me before I even got to her front door. Something rich and chocolatey, but with this faint tangy sweetness underneath that I couldn’t quite place. She opened the door with flour on her cheek, holding a pan of these deep red-brown squares that looked like they’d come straight from a bakery window. “Oh, these?” she said when I asked, practically waving her hand at them. “Just some brownies my kids begged me to make.” She cut me a piece right there on the porch, still warm, and I swear I almost dropped the sugar I’d come for. The cream cheese swirl, the tender crumb, that little hint of vanilla—it was the kind of thing you remember for weeks. I stood there eating it with my mouth full, probably looking ridiculous, and she just laughed. “I’ll send you the recipe,” she said. And she did, scribbled on a napkin that I still have tucked in my cookbook.
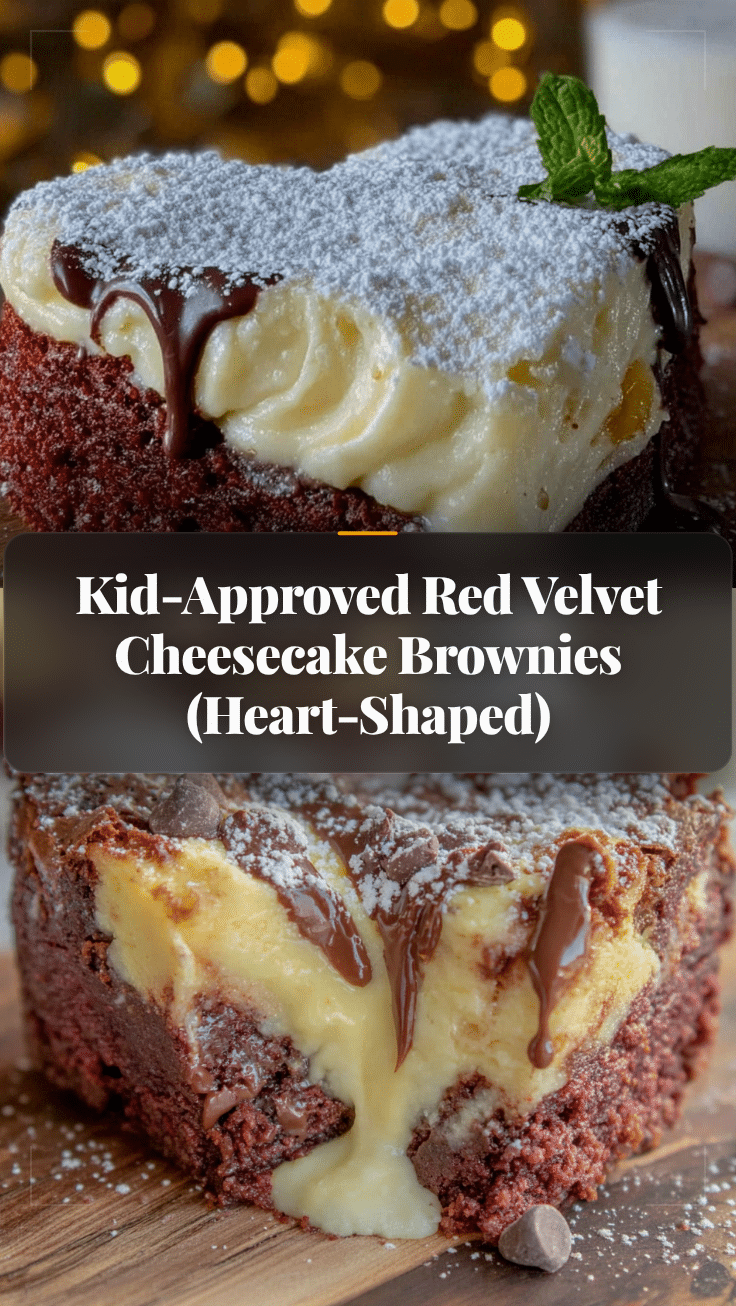
Now, these Kid-Approved Red Velvet Cheesecake Brownies have become a staple in my own kitchen. I’ve tweaked them over the years—added a heart-shaped twist because, honestly, who doesn’t love a little extra love in their baking? Maybe you’ve been there, trying to find a dessert that feels special but doesn’t require a culinary degree or a trip to three different stores. These brownies are that recipe. They’re the ones you pull out for Valentine’s Day, birthday parties, or just a random Tuesday when everyone needs a little cheering up. And the best part? Kids absolutely go crazy for them—the red color, the creamy cheesecake swirl, the fact that they look like they took way more effort than they actually did. I’ve lost count of how many times I’ve made these, and every single time, someone asks for the recipe.
So let me tell you, this isn’t just another brownie recipe. It’s the one that makes you look like a rockstar with minimal effort. It’s the one that uses ingredients you probably already have, and it’s the one that will have your family hovering around the kitchen counter waiting for them to cool. Trust me on this.
Why You’ll Love This Recipe
Let me be honest with you—I’ve tested a lot of brownie recipes over the years. Some were too cakey, some were too fudgy, and some just didn’t have that wow factor. These red velvet cheesecake brownies hit every single note perfectly. Here’s why they’ve earned a permanent spot in my rotation:
- Kid-Approved & Family-Friendly: The vibrant red color and creamy cheesecake swirl make these brownies irresistible to little ones. My own kids practically inhale them, and I’ve yet to meet a child who doesn’t ask for seconds. They’re sweet without being overwhelming, and the cream cheese adds a tang that balances the chocolate beautifully.
- Simple Ingredients, No Fuss: You don’t need any fancy extracts or hard-to-find ingredients. Everything on this list is likely already in your pantry or fridge. No specialty stores, no expensive imports—just good, honest baking ingredients that work together perfectly.
- Perfect for Any Occasion: The heart-shaped twist makes them ideal for Valentine’s Day, anniversaries, or Galentine’s gatherings. But honestly? They’re just as perfect for bake sales, school parties, or a cozy weekend treat. The shape adds a special touch without any extra work.
- Crowd-Pleaser Guaranteed: I’ve brought these to potlucks, family dinners, and neighborhood gatherings, and they always disappear first. Adults love the sophisticated flavor combination, and kids love the fun color and creamy swirl. It’s a win-win.
- Unbelievably Delicious: The texture is where these brownies really shine. The brownie layer is tender and moist with that classic red velvet flavor—hints of cocoa and vanilla, with a soft, almost velvety crumb. The cheesecake layer is rich, tangy, and perfectly creamy. Together, they create something truly special.
What makes this recipe different from all the others I’ve tried? It’s the balance. So many red velvet brownies are either too dry or too sweet, and the cheesecake layer often sinks to the bottom or gets lost. I’ve spent time perfecting the ratios so that every bite has that beautiful swirl, that perfect texture, and that flavor that makes you close your eyes for a second. Plus, the heart shape feels like a little gift every time you pull them out of the pan. It’s comfort food with a touch of romance, and honestly, isn’t that what we all need sometimes?
These brownies are the kind that make you feel like you’ve really accomplished something in the kitchen, even though they come together in about 15 minutes of active prep. They’re forgiving, adaptable, and absolutely delicious. If you’ve been looking for a dessert that feels special without the stress, this is it.
What Ingredients You Will Need
This recipe uses simple, wholesome ingredients to deliver that signature red velvet flavor and creamy cheesecake swirl. Most of these are pantry staples, which makes these brownies perfect for those moments when you need a dessert but don’t want to make a special trip to the store. Let me walk you through each one and share a few tips I’ve picked up along the way.
For the Red Velvet Brownie Layer
- 1/2 cup (1 stick or 113g) unsalted butter, melted — I prefer unsalted so I can control the salt level. Let it cool slightly after melting so it doesn’t cook the eggs when you mix everything together. (Kerrygold is my go-to for the richest flavor, but any good-quality butter works.)
- 1 cup (200g) granulated sugar — Regular white sugar gives these brownies that classic sweetness and helps create that crackly top we all love. Don’t substitute with brown sugar here—it will change the texture and color.
- 2 large eggs, room temperature — Room temperature eggs incorporate more air into the batter, giving you a lighter, tenderer brownie. If you forget to take them out ahead of time, place them in a bowl of warm water for 5 minutes.
- 2 teaspoons vanilla extract — Pure vanilla extract makes a difference here. I’ve tried imitation, and honestly, the flavor just isn’t as warm and rich. Splurge on the real stuff if you can.
- 1 tablespoon unsweetened cocoa powder — Just enough to give that subtle chocolate flavor without overpowering the red velvet. I recommend Dutch-processed cocoa for a smoother, less acidic taste, but natural cocoa works too.
- 1 1/4 cups (160g) all-purpose flour — Spoon and level your flour for the most accurate measurement. Scooping directly from the bag can pack in too much flour and make your brownies dry.
- 1/4 teaspoon salt — Enhances all the flavors and balances the sweetness. Don’t skip it!
- 1 tablespoon red food coloring (liquid or gel) — Gel food coloring gives a more vibrant red without thinning the batter. If you’re using liquid, you might need an extra teaspoon or two. I like the AmeriColor brand for its intensity—just a little goes a long way.
- 1 teaspoon white vinegar — This is a classic red velvet ingredient. It reacts with the cocoa powder to enhance the red color and adds a tiny bit of tang that you won’t even notice as vinegar. Trust the process!
For the Cheesecake Swirl Layer
- 8 oz (226g) cream cheese, softened — Full-fat cream cheese is non-negotiable here. Low-fat versions have too much water and won’t create that thick, creamy swirl. Let it sit on the counter for at least 30 minutes before you start. (Philadelphia is my tried-and-true brand.)
- 1/4 cup (50g) granulated sugar — Just enough to sweeten the cream cheese without making it cloying. The tanginess of the cream cheese is what makes this swirl so magical.
- 1 large egg yolk — Using just the yolk gives the cheesecake layer a richer, denser texture. The white would make it too fluffy and it wouldn’t swirl as nicely.
- 1/2 teaspoon vanilla extract — A little extra vanilla in the cheesecake layer ties everything together beautifully.
Ingredient Tips I’ve Learned the Hard Way
Let me save you some trouble. First, make sure your cream cheese is truly softened—if it’s still cold, you’ll end up with lumpy cheesecake batter that won’t swirl smoothly. Second, don’t overmix the brownie batter once you add the flour. Overmixing develops gluten and gives you tough, cakey brownies instead of tender, fudgy ones. And third, if you’re using liquid food coloring, add it gradually until you reach the shade of red you want. Different brands vary in intensity, so trust your eyes more than the exact measurement.
For the heart shape, you’ll need a heart-shaped baking pan. I use a 9-inch heart-shaped pan that I found at a kitchen supply store for about $12, but you can also use a standard 8×8 square pan and cut the brownies into heart shapes with a cookie cutter after they’re baked and cooled. I’ve done both, and honestly, the cookie cutter method is great if you want to use the scraps for a little chef’s treat!
Equipment Needed
You don’t need a professional bakery setup to make these brownies, which is part of their charm. Here’s what you’ll need:
- Heart-shaped baking pan (9-inch) — This is the star of the show if you’re going for the heart shape. I found mine at a local kitchen store, but you can also order one online. If you don’t have one, an 8×8 square pan works perfectly—just cut the brownies into heart shapes with a cookie cutter after baking.
- Mixing bowls (2 medium, 1 small) — One for the brownie batter, one for the cheesecake mixture, and a small one for the egg yolk. I use glass bowls because they don’t retain odors, but any bowl will do.
- Electric hand mixer or stand mixer — You can technically mix everything by hand, but the cheesecake layer comes out much smoother with a mixer. A hand mixer is more than enough and easier to clean.
- Rubber spatula — For folding the batter and scraping every last bit of goodness into the pan. A silicone spatula is my favorite—it doesn’t scratch your bowls and it’s heat-resistant.
- Parchment paper — Line your pan with parchment paper for easy removal. I leave an overhang on two sides to use as handles. This is non-negotiable unless you want to wrestle your brownies out of the pan.
- Measuring cups and spoons — Accurate measurements matter in baking. I use metal measuring cups for dry ingredients and glass ones for liquids.
- Toothpick or skewer — For creating the swirl pattern. A butter knife works too, but a toothpick gives you more control.
- Cooling rack — Letting the brownies cool completely in the pan on a rack prevents the bottoms from getting soggy. If you don’t have one, just prop the pan up on something to allow air circulation underneath.
One tip from personal experience: if you’re using a heart-shaped pan, make sure to grease it well even if you’re using parchment paper. Those curved edges can be tricky, and you don’t want your beautiful heart-shaped brownies to stick. A light coating of non-stick spray under the parchment paper does the trick.
Preparation Method
Alright, let’s get baking! I’ve broken this down into clear steps with all the little details that make the difference between good brownies and unforgettable ones. Take your time, and don’t rush—the results are worth it.
Step 1: Preheat and Prep Your Pan
Preheat your oven to 350°F (175°C). While it’s heating, line your heart-shaped pan (or 8×8 square pan) with parchment paper, leaving an overhang on two opposite sides. Lightly grease the parchment and the exposed sides of the pan with non-stick spray or butter. This step is crucial—I once skipped the greasing and spent 20 minutes trying to pry a brownie out of a pan. Not fun.
Step 2: Make the Brownie Batter
In a medium mixing bowl, whisk together the melted butter and granulated sugar until well combined. It should look like wet sand. Add the eggs one at a time, whisking well after each addition. Stir in the vanilla extract, cocoa powder, and red food coloring. The mixture should turn a beautiful deep red. Don’t worry if it looks a little thin at this point—that’s normal.
In a separate small bowl, whisk together the flour and salt. Gradually add the dry ingredients to the wet mixture, folding gently with a rubber spatula until just combined. A few streaks of flour are okay—overmixing will make your brownies tough. Finally, stir in the white vinegar. You’ll see the batter brighten slightly as the vinegar reacts with the cocoa. Set the batter aside while you make the cheesecake layer.
Step 3: Make the Cheesecake Swirl
In a medium bowl, beat the softened cream cheese with an electric hand mixer on medium speed until smooth and creamy, about 1 minute. Add the sugar and beat until combined, scraping down the sides of the bowl as needed. Add the egg yolk and vanilla extract, then beat on low speed just until incorporated. Be careful not to overbeat—you want the mixture to be smooth but not too airy, which can cause it to puff up during baking.
Step 4: Layer and Swirl
Spread about two-thirds of the brownie batter evenly into your prepared pan. Drop spoonfuls of the cheesecake mixture over the brownie layer, then dollop the remaining brownie batter on top. Here’s where the fun begins: use a toothpick or a butter knife to gently swirl the two batters together. I like to make figure-eight patterns, but honestly, any design works. Don’t over-swirl, or you’ll lose the distinct layers—about 6-8 passes with the toothpick is plenty.
Step 5: Bake to Perfection
Bake in the preheated oven for 30-35 minutes. The edges should be set and slightly pulling away from the pan, and the center should be just barely jiggly when you gently shake the pan. A toothpick inserted into the center should come out with a few moist crumbs attached—not wet batter, but not completely clean either. Every oven runs differently, so start checking at 28 minutes. My oven tends to run hot, so I usually pull mine at 32 minutes.
Step 6: Cool Completely
Place the pan on a cooling rack and let the brownies cool completely in the pan. This usually takes about 1-2 hours. I know it’s tempting to cut into them while they’re warm, but trust me—they need this time to set. Cutting them too early will result in a gooey mess. Once cool, use the parchment overhang to lift the entire block of brownies out of the pan and onto a cutting board.
Step 7: Cut and Serve
If you used a heart-shaped pan, simply cut along the natural lines of the pan to create individual heart-shaped brownies. If you used a square pan, use a heart-shaped cookie cutter to press out shapes from the cooled brownie block. Press straight down and lift—don’t twist the cutter, or the edges will crumble. Save the scraps for snacking (or crumble them over ice cream—highly recommended).
Cooking Tips & Techniques
After making these brownies more times than I can count, I’ve collected a few tricks that make the process smoother and the results more consistent. Let me share what I’ve learned—including a few mistakes so you don’t have to make them yourself.
Don’t Overmix the Brownie Batter. This is probably the most common mistake I see. Once you add the flour, mix only until it disappears. Overmixing develops gluten, which gives you tough, cakey brownies instead of the tender, fudgy texture we’re after. I learned this the hard way when I made a batch for a party and ended up with brownies that were more like hockey pucks. Not my finest moment.
Room Temperature Ingredients Matter. I know, I know—it’s tempting to use cold eggs and cold cream cheese straight from the fridge. But cold ingredients don’t emulsify properly, which can lead to a grainy texture in the cheesecake layer and a less tender brownie. Take the time to let everything come to room temperature. It makes a real difference.
Use Gel Food Coloring for the Best Color. Liquid food coloring can thin out your batter and give you a more muted red. Gel coloring is more concentrated, so you get a vibrant red without adding extra liquid. Plus, a little goes a long way, so one bottle will last you through many batches. I’ve tried both, and gel wins every time.
Swirl with a Light Hand. When you’re creating the swirl pattern, less is more. Too much swirling will muddy the two layers together, and you’ll lose that beautiful contrast between the red velvet and the white cheesecake. I aim for about 6-8 gentle passes with a toothpick, and I stop as soon as I see a nice pattern forming.
Let Them Cool Completely. I cannot stress this enough. The cheesecake layer needs time to set, and cutting into warm brownies will result in a messy, gooey situation. If you’re in a hurry, you can pop the pan in the fridge for about 30 minutes after they’ve cooled to room temperature. But honestly, patience pays off here.
Test for Doneness Carefully. The toothpick test can be tricky with these because the cheesecake layer will leave moist crumbs. Instead of relying solely on the toothpick, look for visual cues: the edges should be set and pulling away from the pan, and the center should have a slight jiggle. When in doubt, err on the side of slightly underbaked—they’ll continue to set as they cool.
Variations & Adaptations
One of the things I love most about this recipe is how adaptable it is. Over the years, I’ve tried several variations, and they’ve all been hits. Here are some of my favorites:
Gluten-Free Version: Substitute the all-purpose flour with a 1:1 gluten-free baking flour blend. I’ve had great results with Bob’s Red Mill Gluten-Free 1-to-1 Baking Flour. The texture is slightly more delicate, but the flavor is spot-on. Just be careful not to overmix, as gluten-free batters can get gummy if overworked.
Dairy-Free Adaptation: Use a high-quality vegan butter stick (like Earth Balance) in place of the regular butter, and substitute the cream cheese with a dairy-free cream cheese alternative. Kite Hill makes a great almond-based cream cheese that works beautifully. The texture will be slightly less creamy, but the flavor is still fantastic.
Chocolate Swirl Variation: For an extra chocolatey twist, add 1/2 cup of semi-sweet chocolate chips to the brownie batter before layering. The melted chocolate pockets add a wonderful richness that complements the tangy cheesecake. I tried this for a friend’s birthday, and she said it was the best brownie she’d ever had.
Peppermint Red Velvet: Add 1/2 teaspoon of peppermint extract to the brownie batter along with the vanilla. This gives the brownies a festive, holiday feel. Top with crushed candy canes for an extra special touch. I made these for a Christmas party, and they disappeared within minutes.
Mini Heart Bites: Instead of using a large heart-shaped pan, pour the batter into a mini heart-shaped muffin tin. Reduce the baking time to about 15-18 minutes. These are perfect for party platters or lunchbox surprises. Just make sure to grease the mini pans well—those tiny hearts can be stubborn.
Nutty Addition: Fold 1/2 cup of chopped pecans or walnuts into the brownie batter before layering. The crunch adds a lovely contrast to the creamy cheesecake swirl. I’m not usually a nut-in-brownies person, but my husband convinced me to try it, and I have to admit—he was right.
Serving & Storage Suggestions
These brownies are versatile when it comes to serving. Here’s how I like to present them and keep them fresh:
Serving Temperature: I prefer these brownies at room temperature, where the cheesecake layer is perfectly creamy and the brownie layer is tender. However, they’re also delicious slightly chilled—the cheesecake firms up and takes on a almost ice-cream-like texture. For a truly indulgent treat, warm a brownie in the microwave for about 10 seconds and top with a scoop of vanilla ice cream. The warm-cold contrast is absolutely divine.
Presentation Ideas: Arrange the heart-shaped brownies on a pretty platter and dust with powdered sugar for a elegant look. For Valentine’s Day, I like to add a few fresh raspberries or strawberries around the edges—the red-on-red is gorgeous. You can also drizzle with a simple white chocolate ganache for an extra touch of sweetness.
Storage Instructions: Store leftover brownies in an airtight container at room temperature for up to 3 days. If your kitchen is warm, I recommend storing them in the refrigerator to keep the cheesecake layer firm. They’ll last up to 5 days in the fridge. Just let them come to room temperature for about 15 minutes before serving for the best texture.
Freezing Instructions: These brownies freeze beautifully! Wrap individual brownies tightly in plastic wrap, then place them in a freezer-safe bag or container. They’ll keep for up to 3 months. To thaw, simply leave them at room temperature for about 30 minutes, or pop them in the microwave for 15-20 seconds. I often make a double batch and freeze half for last-minute dessert emergencies.
Flavor Development: Here’s a little secret—these brownies actually taste better the next day. The flavors meld together overnight, and the texture becomes even more fudgy and cohesive. So if you can resist the temptation, make them a day ahead. Your future self will thank you.
Nutritional Information & Benefits
Let’s be real—these are a treat, not a health food. But that doesn’t mean they don’t have some redeeming qualities! Here’s a rough nutritional breakdown per brownie (based on 9 servings):
- Calories: Approximately 320-350 per brownie
- Fat: 18-20g (mostly from butter and cream cheese)
- Carbohydrates: 38-42g
- Protein: 5-6g
- Sugar: 26-30g
While these aren’t low-calorie, they do offer some small benefits. The cream cheese provides a decent amount of calcium and protein, and the cocoa powder contains antioxidants called flavonoids that can support heart health. Plus, the eggs add a good dose of protein and healthy fats that help keep you satisfied.
For those with dietary restrictions, please note that this recipe contains gluten, dairy, and eggs. I’ve included gluten-free and dairy-free variations above if you need them. Also, the red food coloring is optional—you can skip it for a more natural-looking brownie, though the kids might miss the vibrant color!
My personal philosophy? Life is about balance. These brownies are a celebration, a treat, a little moment of joy. Enjoy them mindfully, share them with people you love, and don’t stress about the numbers. That’s what food is really about.
Conclusion
So there you have it—my tried-and-true recipe for Kid-Approved Red Velvet Cheesecake Brownies, shaped like hearts because why not make something already wonderful even more special? These brownies have become a beloved staple in my kitchen, and I hope they’ll become one in yours too.
What I love most about this recipe is how it brings people together. Whether I’m making them for a school bake sale, a Valentine’s Day dinner, or just because it’s Tuesday and we all need a little sweetness, these brownies never fail to put smiles on faces. The vibrant red color, the creamy cheesecake swirl, the tender, fudgy texture—every bite is a reminder that the best things in life are often the simplest.
I encourage you to make this recipe your own. Try the variations I suggested, or come up with your own twists. Maybe add a pinch of cinnamon to the brownie batter, or swirl in some raspberry jam along with the cheesecake. The possibilities are endless, and that’s the beauty of baking—it’s a canvas for your creativity.
Now I’d love to hear from you! Have you tried these brownies? Did your kids love them? Did you come up with a fun variation? Drop a comment below and let me know. And if you share them on social media, tag me—I absolutely love seeing your creations. Until next time, happy baking, and remember: a little love in every bite makes all the difference.
Frequently Asked Questions
Can I use a different pan shape if I don’t have a heart-shaped pan?
Absolutely! An 8×8 square pan works perfectly. You can either cut the brownies into squares or use a heart-shaped cookie cutter to stamp out shapes from the cooled brownie block. The scraps make a great snack or ice cream topping.
Can I reduce the amount of red food coloring?
Yes, you can. The red color is mostly for visual appeal, so feel free to reduce it or skip it entirely. The brownies will still taste delicious—they’ll just be more of a chocolate color with a slight reddish tint from the cocoa and vinegar reaction.
Why did my cheesecake layer sink to the bottom?
This usually happens if the cream cheese is too cold or if the batter is too thin. Make sure your cream cheese is fully softened to room temperature before mixing. Also, don’t overmix the cheesecake batter—too much air can cause it to rise and then sink during baking.
Can I make these brownies ahead of time?
Yes, and I actually recommend it! These brownies taste even better the next day after the flavors have had time to meld. You can bake them a day ahead, cool completely, and store them in an airtight container at room temperature or in the refrigerator.
How do I get clean, neat cuts when slicing the brownies?
For the cleanest cuts, make sure the brownies are completely cool. Use a sharp knife and wipe it clean with a damp paper towel between each cut. If you’re using a cookie cutter, press straight down and lift—don’t twist, or the edges will crumble.
Pin This Recipe!
Kid-Approved Red Velvet Cheesecake Brownies: Best Easy Heart-Shaped
These red velvet cheesecake brownies feature a tender, fudgy red velvet layer swirled with creamy cheesecake, all baked in a heart shape for a special touch. They’re kid-approved, easy to make with simple ingredients, and perfect for Valentine’s Day, birthdays, or any occasion.
- Prep Time: 15 minutes
- Cook Time: 30-35 minutes
- Total Time: 1 hour 45 minutes to 2 hours 10 minutes (including cooling)
- Yield: 9 servings 1x
- Category: Dessert
- Cuisine: American
Ingredients
- 1/2 cup (1 stick or 113g) unsalted butter, melted
- 1 cup (200g) granulated sugar
- 2 large eggs, room temperature
- 2 teaspoons vanilla extract
- 1 tablespoon unsweetened cocoa powder
- 1 1/4 cups (160g) all-purpose flour
- 1/4 teaspoon salt
- 1 tablespoon red food coloring (liquid or gel)
- 1 teaspoon white vinegar
- 8 oz (226g) cream cheese, softened
- 1/4 cup (50g) granulated sugar
- 1 large egg yolk
- 1/2 teaspoon vanilla extract
Instructions
- Preheat oven to 350°F (175°C). Line a 9-inch heart-shaped pan (or 8×8 square pan) with parchment paper, leaving overhang on two sides. Lightly grease parchment and exposed pan sides with non-stick spray or butter.
- In a medium bowl, whisk together melted butter and 1 cup sugar until well combined. Add eggs one at a time, whisking well after each. Stir in 2 teaspoons vanilla, cocoa powder, and red food coloring until deep red.
- In a small bowl, whisk together flour and salt. Gradually add dry ingredients to wet mixture, folding gently with a rubber spatula until just combined. Stir in white vinegar. Set aside.
- In a medium bowl, beat softened cream cheese with an electric hand mixer on medium speed until smooth, about 1 minute. Add 1/4 cup sugar and beat until combined. Add egg yolk and 1/2 teaspoon vanilla, beating on low just until incorporated.
- Spread about two-thirds of brownie batter evenly into prepared pan. Drop spoonfuls of cheesecake mixture over brownie layer, then dollop remaining brownie batter on top. Use a toothpick or butter knife to gently swirl batters together with 6-8 passes.
- Bake for 30-35 minutes, until edges are set and center is just barely jiggly. A toothpick inserted in center should come out with a few moist crumbs. Start checking at 28 minutes.
- Place pan on a cooling rack and let brownies cool completely in pan, about 1-2 hours. Once cool, use parchment overhang to lift brownie block out onto a cutting board.
- If using heart-shaped pan, cut along natural lines to create individual hearts. If using square pan, use a heart-shaped cookie cutter to press out shapes. Serve at room temperature.
Notes
For best results, use room temperature ingredients. Gel food coloring gives a more vibrant red without thinning the batter. Don’t overmix the brownie batter to avoid tough brownies. Let brownies cool completely before cutting to ensure clean slices. These brownies taste even better the next day.
Nutrition
- Serving Size: 1 brownie
- Calories: 320350
- Sugar: 2630
- Sodium: 180220
- Fat: 1820
- Saturated Fat: 1012
- Carbohydrates: 3842
- Fiber: 1
- Protein: 56
Keywords: red velvet, cheesecake brownies, heart-shaped, kid-friendly, Valentine's Day, easy dessert, cream cheese swirl