Love this? Save it for later!
Share the inspiration with your friends
This was supposed to be a batch of my aunt’s famous cheese straws. I had the sharp cheddar grated, the butter softening on the counter, and I was feeling pretty good about myself. Then I realized I was out of cream cheese—the one thing that makes those straws so flaky and perfect. It was a Tuesday, I had a house full of hungry teenagers who had just finished a game, and I was already running late. I grabbed a roll of breakfast sausage from the fridge out of pure desperation, crumbled it into the bowl, and just… hoped. What came out was nothing like the plan—and way, way better.
Honestly, I almost threw the whole thing away before baking. The dough looked weird, the texture felt off, and I was convinced I had just ruined a pound of good cheese. But I rolled them into balls anyway, popped them in the oven, and waited for the worst. The smell that filled my kitchen was the first sign something had gone right. Then the kids came running in asking what was for dinner. Then they ate thirty of them in about ten minutes.
That was three years ago, and I haven’t made cheese straws since. These crowd-pleasing freezer-friendly sausage balls have become my go-to for every gathering, every potluck, every time I need to feed a crowd without losing my mind. Maybe you’ve been there—staring at a recipe that just isn’t going to happen, wondering what to do with what you actually have. Trust me, I get it. And I promise, this happy little accident is one you’ll want to keep around. I keep making them because they work every single time, and they make me look like I planned the whole thing.
Why You’ll Love This Recipe
I’ve tested this recipe more times than I can count—at family reunions, holiday parties, and even a few Super Bowl Sundays where people were literally fighting over the last one. Here’s why these sausage balls have earned a permanent spot in my freezer and my heart.
- Quick & Easy: From bowl to oven in under 20 minutes. No chilling, no resting, no complicated steps. Just mix, roll, and bake.
- Simple Ingredients: You only need four things—sausage, cheese, baking mix, and a little seasoning. No weird stuff you have to hunt down at a specialty store.
- Perfect for Hosting: These are the ultimate party appetizer. Make a double batch, freeze half, and you’re ready for unexpected guests or last-minute gatherings.
- Crowd-Pleaser: I’ve served these to picky kids, vegetarian skeptics (who caved after one bite), and serious foodies. They disappear every single time.
- Freezer-Friendly: This is the star feature. You can make them weeks ahead, pull them out when you need them, and nobody will know they weren’t fresh-baked.
What makes these different from every other sausage ball recipe out there? It’s the ratio. Most recipes use too much baking mix and end up dry and crumbly. I spent months tweaking the proportions until I got that perfect balance—crispy on the outside, tender and juicy on the inside. Plus, I add a pinch of cayenne and a touch of garlic powder that takes the flavor from good to “what did you put in these?”
This isn’t just another appetizer recipe. It’s the kind that makes you close your eyes after the first bite and wonder why you ever bothered with anything else. Perfect for impressing guests without stress, or turning a simple game day into something memorable.
What Ingredients You Will Need
This recipe uses simple, everyday ingredients to deliver bold flavor and satisfying texture without any fuss. Most of these are probably in your kitchen right now.
- 1 pound ground breakfast sausage (I prefer Jimmy Dean or Owens for consistent flavor and fat content—avoid lean sausage as it makes the balls dry)
- 2 cups sharp cheddar cheese, shredded (freshly shredded melts better than pre-shredded, which has anti-caking agents. I use Tillamook or Cabot for best results)
- 2 cups Bisquick or similar baking mix (store brand works fine—just make sure it’s fresh. Stale baking mix makes dense balls)
- 1/4 teaspoon cayenne pepper (optional but highly recommended—adds warmth without heat)
- 1/2 teaspoon garlic powder (not garlic salt—we’re controlling the sodium ourselves)
- 1/4 cup milk (whole milk gives the best texture, but 2% works too. In a pinch, I’ve used water and it was fine)
Ingredient Selection Tips:
Look for sausage that comes in a tube or bulk roll, not links. The fat content is crucial here—you want around 20-25% fat for moist, tender balls. If you can only find lean sausage, add a tablespoon of butter or olive oil to the mix.
Substitution Guidance:
For a gluten-free version, use a gluten-free baking mix like King Arthur’s or Pamela’s. The texture will be slightly different—a bit more crumbly—but still delicious. For a dairy-free option, use dairy-free cheese shreds and unsweetened almond milk. Just know the cheese won’t melt the same way, so the balls will be a little less gooey.
I’ve also made these with spicy Italian sausage for a bolder flavor, and with turkey sausage for a lighter option. Both work, but the original breakfast sausage version is still my favorite. The seasoning in breakfast sausage is perfectly balanced for this recipe.
Equipment Needed
You don’t need much for this recipe, which is part of the beauty. Here’s what I use:
- Large mixing bowl (any bowl works, but a wide one makes mixing easier on your hands)
- Box grater or food processor with shredding disc (for shredding cheese—please don’t buy pre-shredded if you can avoid it)
- Measuring cups and spoons (standard set is fine)
- Baking sheet (rimmed is best to catch any grease drips)
- Parchment paper or silicone baking mat (non-stick spray works too, but parchment makes cleanup effortless)
- Cookie scoop or small ice cream scoop (for uniform balls—I use a #60 scoop which gives about 1.5 tablespoons per ball)
- Freezer-safe zip-top bags or airtight containers (for storing the unbaked or baked balls)
If you don’t have a cookie scoop, just use your hands—lightly oil them first to prevent sticking. I actually prefer the hand-rolled method when I’m making these for a special occasion. There’s something meditative about rolling each ball perfectly.
For the baking sheet, any standard half-sheet pan works. I’ve used cheap ones from the grocery store for years and they’re fine. Just line them with parchment and you’re golden.
Preparation Method
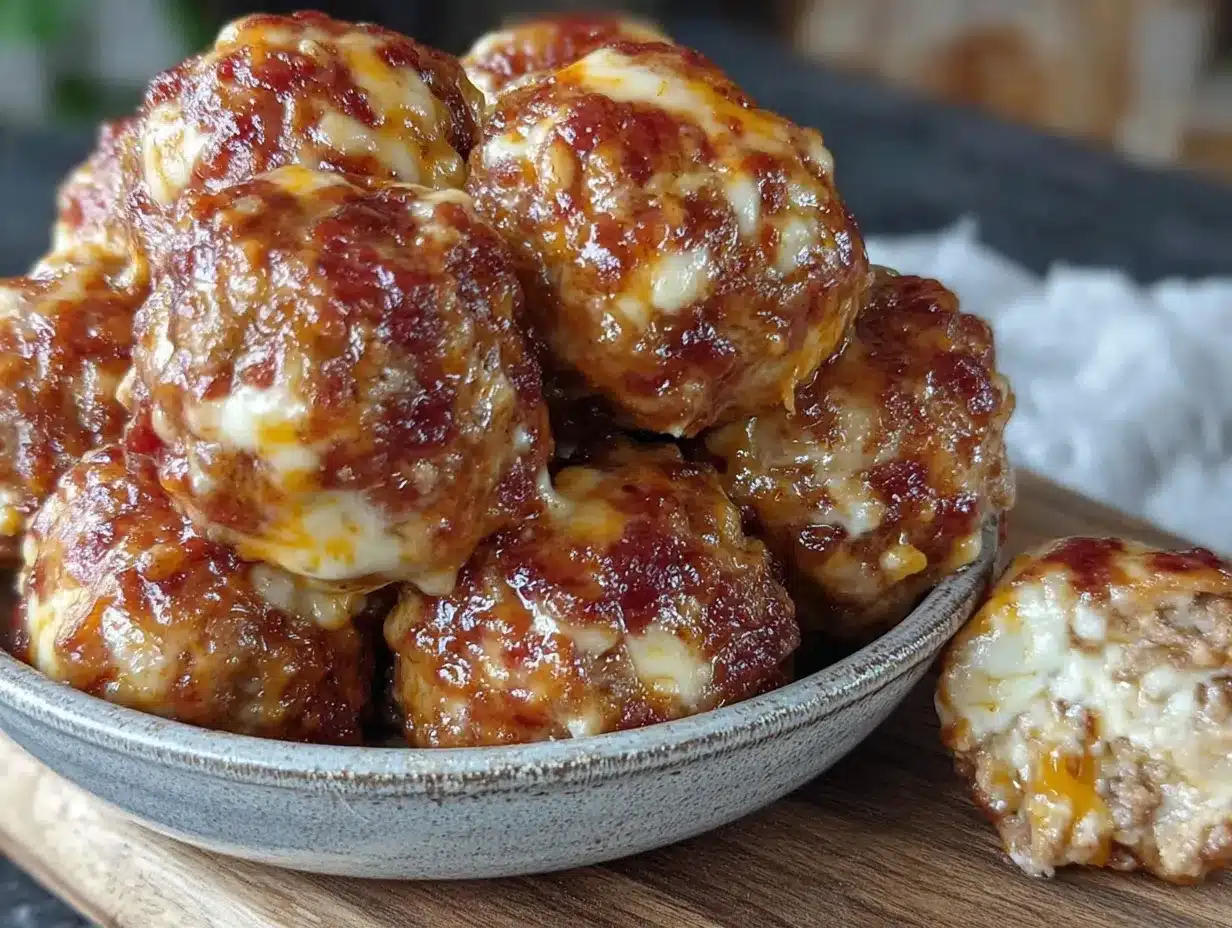
Let me walk you through this step by step. I’ve made these so many times I could do it in my sleep, but I’ll share all the little tricks I’ve learned along the way.
- Preheat your oven to 375°F (190°C). Line a baking sheet with parchment paper or a silicone mat. Don’t skip this step—trust me, cleanup is so much easier.
- Shred your cheese. Grab a block of sharp cheddar and shred about 2 cups. I know it’s tempting to buy the pre-shredded stuff, but it really doesn’t melt as well. The anti-caking powder makes the balls a little gritty. Freshly shredded cheese melts into the sausage beautifully.
- Combine the dry ingredients. In your large mixing bowl, add the 2 cups of baking mix, the 1/4 teaspoon cayenne, and the 1/2 teaspoon garlic powder. Give it a quick stir with a fork to distribute the spices evenly.
- Add the sausage. Break the pound of sausage into chunks and drop them into the bowl with the baking mix. Use your hands to work the sausage into the dry ingredients. This is going to feel weird at first—like you’re making a mess. Keep going. The mixture will start to come together after about a minute. Your hands will get greasy, but that’s part of the process.
- Add the cheese and milk. Toss in the shredded cheese and pour in the 1/4 cup of milk. Now use your hands to mix everything together. Squeeze the mixture through your fingers, fold it over itself, really get in there. You want everything evenly distributed. The dough should hold together when you squeeze a handful—if it’s too crumbly, add another tablespoon of milk.
- Shape the balls. Using your cookie scoop or hands, form the mixture into 1-inch balls. I usually get about 36 to 40 balls from one batch. Place them on the prepared baking sheet about an inch apart—they don’t spread much, but you want air to circulate around each one for even browning.
- Bake for 18-22 minutes. The balls are done when they’re golden brown on the bottom and the tops are just starting to turn light gold. The internal temperature should reach 160°F (71°C). Don’t overbake them—they’ll continue cooking slightly after you pull them out.
- Cool slightly before serving. Let them rest on the baking sheet for about 5 minutes. This lets the cheese set a little so they hold together better. Then transfer to a serving platter or cooling rack.
Pro tip for even baking: If you’re making a double batch, bake one sheet at a time on the middle rack. Putting two sheets in at once can lead to uneven cooking. I learned this the hard way when I had a batch that was burnt on the bottom and raw in the middle.
Sensory cues: You’ll know they’re ready when the kitchen smells like breakfast and your mouth is watering. The bottoms should be a deep golden brown, and if you cut one open, the cheese should be melted and bubbly, not greasy and separated.
Cooking Tips & Techniques
I’ve made about a hundred batches of these over the years, and I’ve messed up plenty of them. Here’s what I’ve learned so you don’t have to make the same mistakes.
Don’t overmix. This is the number one mistake people make. The more you work the dough, the tougher the balls get. Mix just until everything comes together—about 2 minutes of hand mixing is plenty. Overmixing develops the gluten in the baking mix and you end up with dense, hockey-puck sausage balls.
Use cold ingredients. Cold sausage and cold cheese mix together more evenly and hold their shape better during baking. If your kitchen is warm, pop the formed balls in the fridge for 15 minutes before baking. This helps them keep their shape and prevents them from spreading into flat discs.
Get uniform sizes. Use that cookie scoop I mentioned. When all the balls are the same size, they cook evenly. Nothing worse than having some burnt and some undercooked in the same batch. If you’re rolling by hand, aim for golf ball size—about 1.5 inches in diameter.
Watch the fat content. I learned this one the hard way. I bought lean turkey sausage thinking I was being healthy, and the balls came out dry and crumbly. You need that fat from the sausage to keep everything moist. If you must use lean meat, add a tablespoon of olive oil or melted butter to the mix.
Test one first. Before you bake the whole batch, cook one test ball. This takes two minutes and saves you from ruining an entire batch. If it’s too dry, add more cheese or a splash of milk. If it falls apart, add a little more baking mix.
Multitasking strategy: While the first batch is baking, form the second batch on another sheet. By the time the first batch comes out, the second is ready to go in. This keeps the assembly line moving and your guests happy.
Variations & Adaptations
These sausage balls are incredibly versatile. Here are some of my favorite ways to change them up.
Spicy Chorizo Version: Swap the breakfast sausage for Mexican chorizo (remove the casing first). Use pepper jack cheese instead of cheddar, and add a diced jalapeño if you’re feeling brave. These are incredible with a cold beer and some salsa verde for dipping. I made these for a Cinco de Mayo party and they were gone in ten minutes.
Herb and Garlic Version: Add 2 tablespoons of fresh chopped parsley, 1 tablespoon of fresh rosemary, and an extra clove of minced garlic to the basic recipe. Use a mild Italian sausage instead of breakfast sausage. These are elegant enough for a cocktail party and pair beautifully with a honey mustard dipping sauce.
Cheesy Bacon Ranch Version: Cook 4 strips of bacon until crispy, crumble them, and add to the mix. Replace the cayenne with 1 tablespoon of ranch seasoning mix. Use colby jack cheese for a milder flavor. These taste like everything good about game day in one bite.
Gluten-Free Adaptation: Use a gluten-free baking mix like King Arthur’s Measure for Measure. Add an extra tablespoon of milk since gluten-free flours tend to be more absorbent. The texture will be slightly more delicate, so handle them gently when rolling.
Air Fryer Method: Preheat your air fryer to 375°F (190°C). Place the balls in a single layer in the basket (don’t overcrowd). Cook for 10-12 minutes, shaking the basket halfway through. They get extra crispy on the outside and stay tender inside. This is my new favorite method when I’m only making a small batch.
My personal favorite variation: I once added a tablespoon of maple syrup to the mix because I grabbed the wrong bottle. It was a happy accident that turned into a regular thing. The sweetness balances the salty sausage and sharp cheese perfectly. Try it—you won’t regret it.
Serving & Storage Suggestions
Serving: These are best served warm, straight from the oven. Arrange them on a platter with toothpicks for easy grabbing. For dipping, I love a simple honey mustard (equal parts honey and Dijon), ranch dressing, or a spicy sriracha mayo. They’re also fantastic with a side of warm maple syrup for breakfast—trust me on this one.
What to serve alongside: For a party spread, pair them with a veggie platter, some deviled eggs, and maybe a cheese board. For breakfast, serve them alongside scrambled eggs and fresh fruit. They’re versatile enough to fit any meal or occasion.
Storage: Let any leftovers cool completely, then store in an airtight container in the refrigerator for up to 5 days. To reheat, pop them in a 350°F oven for 5-7 minutes, or microwave for 30 seconds. The microwave is faster but the oven keeps them crispy.
Freezer instructions (this is the good stuff):
To freeze unbaked: Form the balls and place them on a baking sheet lined with parchment. Freeze for 2 hours until solid, then transfer to a freezer-safe zip-top bag. They’ll keep for up to 3 months. When ready to bake, place them frozen on a lined baking sheet and add 5-7 minutes to the baking time. No need to thaw!
To freeze baked: Bake as directed, let cool completely, then freeze in a single layer on a baking sheet. Once frozen, transfer to a freezer bag. Reheat directly from frozen in a 350°F oven for 10-12 minutes.
Flavor development: Here’s a secret—these actually taste better the next day. The flavors meld together overnight, and the texture becomes even more tender. I sometimes make them a day ahead on purpose. Just don’t tell anyone they’re not fresh-baked.
Nutritional Information & Benefits
Here’s the approximate nutritional breakdown per serving (3 sausage balls):
- Calories: 285
- Protein: 14g
- Fat: 21g
- Carbohydrates: 11g
- Fiber: 0g
- Sugar: 2g
- Sodium: 620mg
Health benefits: While these aren’t exactly health food, they do have some redeeming qualities. The sausage provides a good amount of protein and B vitamins, especially B12. The cheese adds calcium and vitamin D. And honestly, sometimes you need a little indulgence—that’s part of a balanced life.
Dietary considerations: This recipe is naturally low-carb (about 11g per serving) and can be made gluten-free with the right baking mix. It contains dairy and meat, so it’s not suitable for vegans or vegetarians. If you’re watching your sodium, use low-sodium baking mix and reduce the added salt.
My personal take: these are a treat, not a daily staple. But when you’re feeding a crowd or need something quick and satisfying, they’re a much better choice than processed snacks or fast food. Everything in moderation, right?
Conclusion
These crowd-pleasing freezer-friendly sausage balls started as a kitchen disaster and turned into one of my most-requested recipes. They’re proof that sometimes the best things happen when you stop trying so hard and just go with what you have.
What I love most about this recipe is how forgiving it is. You can swap ingredients, adjust the spices, make them ahead of time, freeze them for months—and they still turn out amazing every single time. They’ve saved me more times than I can count, from surprise guests to last-minute potlucks to those days when you just need something delicious without the stress.
I’d love to hear how yours turn out. Did you try a variation? Did you discover your own happy accident? Drop a comment below and let me know—I read every single one. And if you loved these, please share this recipe with a friend who needs a little kitchen magic in their life.
Happy cooking, and remember—sometimes the best recipes are the ones you never planned to make.
Frequently Asked Questions
Can I use a different type of sausage?
Absolutely! Italian sausage, chorizo, or even seasoned ground pork all work beautifully. Just adjust the seasoning to match. If using a milder sausage, you might want to add extra spices.
Why did my sausage balls turn out dry?
This usually happens from overmixing or using lean sausage. Make sure you’re using regular breakfast sausage with enough fat, and mix just until combined. Adding an extra tablespoon of milk can also help.
Can I make these in advance for a party?
Yes! You can make them up to 3 months ahead and freeze them unbaked. Just bake directly from frozen, adding a few extra minutes. They come out perfectly every time.
What’s the best way to reheat leftover sausage balls?
For crispy results, reheat in a 350°F oven for 5-7 minutes. The microwave works in 30 seconds but the texture won’t be as good. For frozen baked balls, reheat straight from the freezer in the oven.
Can I make these without a baking mix like Bisquick?
You can make your own by combining 1 cup all-purpose flour, 1 1/2 teaspoons baking powder, 1/2 teaspoon salt, and 1 tablespoon cold butter cut in until crumbly. But honestly, the store-bought mix works great and saves time.
Pin This Recipe!

Best Easy Freezer-Friendly Sausage Balls

These crowd-pleasing freezer-friendly sausage balls started as a kitchen disaster and turned into one of my most-requested recipes. They’re proof that sometimes the best things happen when you stop trying so hard and just go with what you have.
- Prep Time: 15 minutes
- Cook Time: 20 minutes
- Total Time: 35 minutes
- Yield: 12 servings (36-40 balls, 3 balls per serving) 1x
- Category: Appetizer
- Cuisine: American
Ingredients
- 1 pound ground breakfast sausage (preferably Jimmy Dean or Owens)
- 2 cups sharp cheddar cheese, shredded (freshly shredded, like Tillamook or Cabot)
- 2 cups Bisquick or similar baking mix
- 1/4 teaspoon cayenne pepper (optional)
- 1/2 teaspoon garlic powder
- 1/4 cup milk (whole milk preferred, 2% works)
Instructions
- Preheat your oven to 375°F (190°C). Line a baking sheet with parchment paper or a silicone mat.
- Shred your cheese. Grab a block of sharp cheddar and shred about 2 cups.
- Combine the dry ingredients. In your large mixing bowl, add the 2 cups of baking mix, the 1/4 teaspoon cayenne, and the 1/2 teaspoon garlic powder. Give it a quick stir with a fork to distribute the spices evenly.
- Add the sausage. Break the pound of sausage into chunks and drop them into the bowl with the baking mix. Use your hands to work the sausage into the dry ingredients. Keep going until the mixture starts to come together after about a minute.
- Add the cheese and milk. Toss in the shredded cheese and pour in the 1/4 cup of milk. Use your hands to mix everything together. Squeeze the mixture through your fingers, fold it over itself, until everything is evenly distributed. The dough should hold together when you squeeze a handful—if it’s too crumbly, add another tablespoon of milk.
- Shape the balls. Using your cookie scoop or hands, form the mixture into 1-inch balls. You should get about 36 to 40 balls from one batch. Place them on the prepared baking sheet about an inch apart.
- Bake for 18-22 minutes. The balls are done when they’re golden brown on the bottom and the tops are just starting to turn light gold. The internal temperature should reach 160°F (71°C). Don’t overbake them.
- Cool slightly before serving. Let them rest on the baking sheet for about 5 minutes. Then transfer to a serving platter or cooling rack.
Notes
Don’t overmix—mix just until everything comes together (about 2 minutes). Use cold ingredients for best results. For uniform sizes, use a cookie scoop. If using lean sausage, add a tablespoon of olive oil or melted butter. For even baking, bake one sheet at a time on the middle rack. These taste even better the next day as flavors meld.
Nutrition
- Serving Size: 3 sausage balls
- Calories: 285
- Sugar: 2
- Sodium: 620
- Fat: 21
- Saturated Fat: 9
- Carbohydrates: 11
- Protein: 14
Keywords: sausage balls, freezer-friendly, appetizer, party food, game day, easy recipe, crowd-pleaser